What if ear stretching was less about the destination of a 0g plug and more about the biological cultivation of your skin? You likely already know that your lobes deserve better than a forced taper or the irritation of porous acrylic. You want a look that is bold, clean, and intentional, but the fear of a painful blowout or the social anxiety of "ear funk" often creates hesitation. It's natural to feel protective of your body when the stakes involve permanent self-expression.
We're here to ensure your journey is healthy, safe, and effective. This guide will empower you to master ear stretching with a professional, safety-first approach that prioritizes long-term skin health. You'll learn to navigate the Association of Professional Piercers (APP) standards for implant-grade steel and titanium, understand why a 3-month waiting period is vital for tissue elasticity, and demystify the math of gauge sizes. We've crafted this roadmap to help you level up your aesthetic while maintaining the thick, healthy earlobes you deserve. It's time to move toward your goal size with the confidence of a specialist.
Key Takeaways
- Understand the biological mechanics of the fistula to ensure your journey is rooted in skin health rather than physical force.
- Select the right materials for your ear stretching journey by comparing the safety of surgical steel against common porous alternatives.
- Discover when to use the precision of the taper method versus the natural, weight-based approach of dead stretching for larger goals.
- Master the preparation phase using heat and organic lubrication to keep your lobes thick, elastic, and resilient.
- Adopt a professional hygiene framework to prevent irritation and maintain the long-term aesthetics of your curated ear.
The Biology of the Fistula: How Ear Stretching Actually Works
Ear stretching is far more than a simple cosmetic adjustment. It is a biological journey of tissue expansion. At its core, the process involves the deliberate and gradual enlargement of the fistula, the healed tube of skin that forms around a piercing. This isn't about "tearing" or "ripping" a hole; it is about encouraging your body to grow more skin. When done correctly, the skin adapts through a process of cellular remodeling that respects your body's natural limits.
Your skin relies on two primary proteins: collagen and elastin. Collagen provides the necessary structural support, while elastin allows the tissue to bounce back. During Stretching (body piercing), gentle pressure signals the body to produce more of these proteins. If you move too quickly, you exceed the "elastic limit" of the tissue, causing micro-tears that lead to scar tissue. This is why patience isn't just a suggestion; it's a biological requirement for maintaining healthy, thick lobes.
Every journey has a threshold. For most individuals, 0g (8mm) is considered the point of no return. Beyond this size, the expansion typically becomes permanent as the structural integrity of the lobe is fundamentally altered. Understanding this biological boundary helps you approach your aesthetic goals with the discipline of a specialist. You aren't just wearing jewelry; you are cultivating living tissue.
The Anatomy of a Healthy Earlobe
A healthy stretch involves multiple layers of skin, specifically the epidermis and the nutrient-rich dermis. Blood flow is the engine of this growth. It carries the oxygen and essential building blocks required for skin cell mitosis. When you stretch too fast, you compress the blood vessels, which can lead to tissue thinning or necrosis. To keep your lobes thick and resilient, you must ensure the tissue remains hydrated and well-circulated from the very first gauge. Massaging the area daily with natural oils helps maintain this vital blood flow.
Wait Times: The Golden Rule of Healing
The standard interval for a safe ear stretching experience is 6 to 12 weeks. This timeframe allows the skin to "relax" into its new diameter and reinforce the fistula with new, healthy cells. Rushing this process is the most common cause of "ear funk" and blowouts. You'll know you're ready to level up when your current jewelry feels loose, there is no lingering tenderness, and the skin feels supple to the touch. If you feel any resistance, your body is telling you it needs more time to heal and strengthen.
Choosing Your Tools: The Anatomy of an Ear Stretching Kit
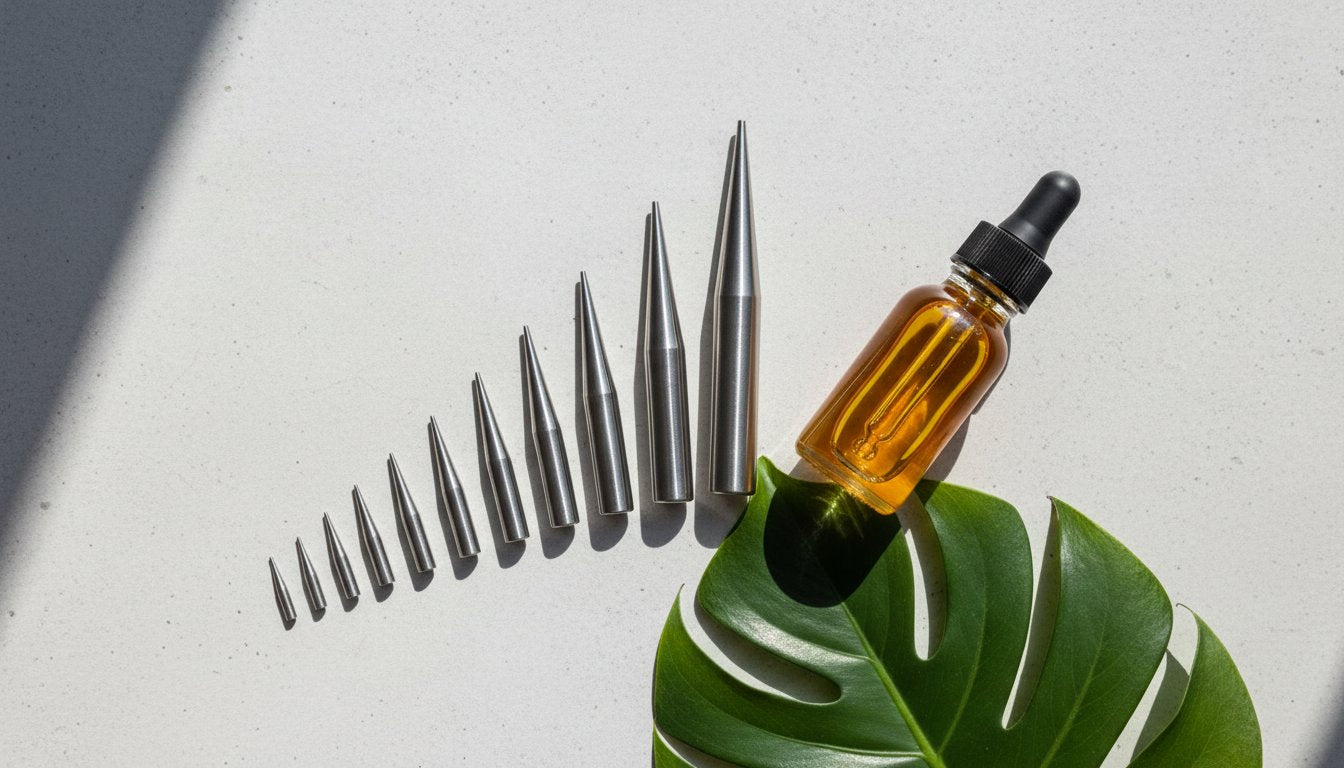
Successful ear stretching depends entirely on the instruments you choose for the journey. A professional gauge stretching kit isn't just a collection of jewelry; it's a curated set of biological expansion tools designed to respect your skin's integrity. When you select a kit, you must prioritize materials that are non-porous and hypoallergenic. While acrylic kits are often accessible, they are porous at a microscopic level. This allows bacteria and dead skin cells to become trapped, leading to irritation or the common "ear funk" that many beginners fear. Surgical steel and implant-grade titanium are the industry standards for a reason. They offer a smooth, non-reactive surface that minimizes the medical concerns of body piercing such as localized infections, scarring, or allergic reactions.
To ensure a safe experience, we follow the Rule of Three for kit selection. First is Quality, which refers to the material's finish and biocompatibility. Second is Completeness. A professional kit should include every size in small, 1mm increments to avoid forced jumps. Third is Care. The best kits include the necessary lubricants and instructions to support your healing process. If you're ready to start your journey, you can level up with an expert-crafted kit that prioritizes these standards.
Tapers: The Professional Precision Tool
Tapers are graduated tools designed to act as a bridge between your current size and the next. They provide a smooth, controlled path for the new jewelry to follow. However, it is vital to remember that ear tapers are tools, not jewelry. Wearing them for extended periods creates uneven weight distribution. This pressure can cause the tissue at the bottom of your lobe to thin, which compromises the "thick, healthy lobes" we aim to cultivate. A high-quality taper should have a mirror-like finish, a gradual incline, and no visible burrs or seams that could snag the delicate fistula.
Plugs and Tunnels: Your Long-Term Companions
Once the stretch is performed, you'll immediately transition to wearable jewelry like plugs or tunnels. For fresh stretches, single-flare jewelry is the gold standard. The flat front and secure o-ring on the back allow the ear to swell and breathe without the restrictive pressure of a double-flare lip. Surgical steel remains the preferred material for this stage because it can be easily sanitized. Before any new piece of jewelry touches your skin, clean it thoroughly with a mild, non-comedogenic soap or a dedicated saline wash to ensure a sterile environment for your healing cells.
Primary Techniques: Tapering vs. Dead Stretching vs. Taping
Ear stretching is a personal evolution that requires a customized strategy for every stage of the process. While many beginners assume there is only one way to size up, experienced enthusiasts know that different methods serve different biological needs. Choosing the right technique ensures your fistula remains healthy, thick, and resilient. Whether you are just starting at a 14g or you are eyeing a larger milestone, mastering the art of ear stretching means listening to your body's subtle cues and respecting the time it takes for skin cells to regenerate.
Dead stretching is often considered the gold standard for experienced users. This method relies on the natural weight of high-quality jewelry, such as solid surgical steel or glass plugs, to gradually expand the fistula over several months. It is the most "passive" approach, requiring no external force. Conversely, a common mistake is using heavy ear weights to achieve a stretch. Weights concentrate pressure on a single point at the bottom of the lobe, which can cause the "cheese-cutter" effect. This leads to irreversible thinning and significantly increases the risk of an ear blowout, where the internal tissue is forced out through the back of the piercing.
When to Use the Taper Method
The taper method is the most effective way for beginners to transition between smaller gauges, typically from 14g up to 8g. To use this method, apply a generous amount of organic lubricant to both the taper and your lobe. Slowly guide the taper through the fistula until the thickest part is reached, then immediately follow it with your new plug. If you feel anything beyond a slight tingle, stop. Resistance is a signal that your collagen hasn't yet relaxed enough to accommodate the new size. If it stings, stop and wait. A Wise Guardian knows that a two-week delay is better than a two-month recovery from a tear.
The Taping Method for Intermediate Gauges
Once you reach the 2g to 0g range, the jumps between sizes become larger and more challenging for the skin to handle in a single session. This is where the taping method becomes essential. By wrapping two or three layers of non-adhesive PTFE (plumber's tape) or bondage tape around your current jewelry, you can increase the diameter by fractions of a millimeter. This gradual approach is the safest way to reach 0g ears without compromising tissue thickness. To maintain hygiene, you must change the tape every 24 hours. Old tape can harbor bacteria and moisture, which leads to irritation and the dreaded "ear funk."
Step-by-Step: How to Stretch Your Ears Safely
Executing a successful stretch requires more than just a steady hand. It demands a ritual of preparation that respects the biological needs of your skin. By now, you've chosen a professional kit and understood the mechanics of the fistula. Now, it's time to translate that knowledge into action. This step-by-step process is designed to minimize trauma, prevent scarring, and ensure your lobes remain thick and resilient throughout your journey. Every movement should be intentional, rhythmic, and guided by the feedback your body provides.
The "Warm Massage" Preparation
Heat is your greatest ally in the ear stretching process. Before you even touch your jewelry, spend 10 to 15 minutes in a warm shower. The steam and heat increase localized blood flow, which softens the collagen fibers and significantly improves skin elasticity. Once the skin is warm and supple, it's time for a manual massage. Use a high-quality, non-comedogenic oil like Jojoba or Castor oil. These organic lubricants mimic the skin's natural sebum, providing a protective barrier that reduces friction. The massage-and-stretch technique is the safest entry point for successful ear stretching. Spend at least 5 minutes massaging each lobe to ensure the tissue is fully saturated and relaxed.
The Insertion and Transfer Process
Proper lubrication is the difference between a seamless transition and a painful tear. Apply a generous layer of oil to both your earlobe and the taper. Position the thin end of the taper at the front of the fistula and begin a slow, rhythmic movement forward. You should feel pressure, but never sharp pain. If you encounter significant resistance, your skin isn't ready. Stop immediately and try again in two weeks. A Wise Guardian knows that forcing a stretch only leads to setbacks.
Once the taper is fully inserted, the transfer to your new jewelry must be immediate. Align the concave end of the taper with the front of your single-flare plug. In one fluid motion, push the jewelry through while the taper exits the back of the lobe. This "follow-through" technique ensures the fistula doesn't have time to contract, which makes the insertion of the new gauge much easier. If the jewelry won't follow the taper, don't force it. Downsize to your previous size and focus on daily oil massages for another week to improve the tissue's "give."
The first 24 hours after a stretch are critical for stabilization. Your skin is in a state of mild inflammation as it adapts to the new diameter. Leave the jewelry alone. Don't twist, pull, or change the o-rings during this window. Keep the area clean with a simple saline spray and avoid sleeping on your ears if possible. To ensure you have all the tools necessary for this precise ritual, shop our expert-crafted stretching kits and begin your journey with confidence.
Aftercare Mastery: Managing Healing and Hygiene
Aftercare is the final, most critical pillar of your journey. It is where your biological expansion transitions into a permanent, healthy aesthetic. To ensure your lobes remain resilient, we utilize the "Cleanse, Hydrate, Protect" framework. This professional approach stabilizes the tissue and supports the skin’s natural healing cycle. By treating your ear stretching journey as a wellness ritual rather than a simple modification, you ensure the longevity of your self-expression. We've seen thousands of successful journeys over twenty years, and they all share one common trait: disciplined aftercare.
The "Cleanse" phase relies on the use of a Saline Piercing Aftercare Spray. This sterile solution flushes out debris without the irritation caused by harsh, pH-unbalanced soaps. Common retail soaps often strip the skin of its natural defenses, leading to micro-tears and dryness. Next, you must "Hydrate." Stretched skin requires a consistent lipid barrier to stay elastic. Finally, "Protect" your lobes by avoiding cross-contamination from dirty pillowcases or frequent, unnecessary touching during the first 24 hours of a new stretch.
Combating Ear Funk and Hygiene
Sebum buildup is a natural biological process where the skin produces oils to protect the fistula. In a stretched ear, this oil becomes trapped behind the jewelry, mixing with dead skin cells to create what is commonly known as "ear funk." Once your ears are fully healed, a daily ritual of removing your jewelry and cleaning both the lobe and the plug is essential. Applying a specialized Gauges Balm after cleaning helps maintain the skin’s lipid barrier. These organic, vegan-friendly ingredients ensure your skin stays soft and non-porous, which prevents the bacterial overgrowth that leads to odors.
Troubleshooting: What to Do When Things Go Wrong
Even with the most cautious approach, setbacks can happen. Blowouts are the primary enemy of a healthy lobe. A blowout occurs when the internal fistula is pushed out the back of the ear due to excessive force. If you notice a red, fleshy ring forming behind your piercing, don't ignore it. The most effective solution is to downsize immediately. Moving to a smaller gauge relieves the pressure and allows the tissue to retract and heal properly.
You should also watch for signs of infection, such as extreme heat, localized swelling, or green discharge. While minor irritation can often be managed with saline and rest, a true infection requires professional attention. Don't hesitate to consult a professional piercer or a doctor if your symptoms persist for more than 48 hours. A Wise Guardian knows that temporary downsizing is a small price to pay for a lifetime of healthy, beautiful lobes.
Level Up Your Aesthetic Journey
Your path toward bold self-expression is a marathon, not a sprint. By prioritizing the biological needs of your fistula and respecting the 12 week healing window, you ensure your lobes remain thick and resilient for years to come. You've learned that the right tools, specifically non-porous surgical steel and medical-grade glass, are essential for a safe expansion. Combining these high-quality materials with a disciplined "Cleanse, Hydrate, Protect" aftercare ritual prevents the common setbacks that stall so many journeys.
Mastery over ear stretching requires more than just patience; it requires a partnership with experts who prioritize your skin health. BodyJ4You brings over 20 years of industry expertise to your modification ritual, offering precision-crafted tools and USA-manufactured aftercare solutions. We are proud to be trusted by thousands of modification enthusiasts who value clinical safety alongside vibrant creativity. Our mission is to support your evolution with products that are healthy, safe, and effective.
Find your perfect starting point with a BodyJ4You Ear Stretching Kit and begin your transformation with the confidence of a specialist. Your curated, professional look is within reach. Stay disciplined, stay hydrated, and enjoy the process of becoming your most authentic self.
Frequently Asked Questions
Does ear stretching hurt?
Proper ear stretching should not hurt. While you might feel a slight tingle or a sense of localized pressure, sharp pain or bleeding indicates that you've moved too quickly and caused a micro-tear. If you experience significant discomfort, stop immediately and wait another 14 days before attempting to size up again to ensure your tissue remains healthy.
How long should I wait between ear stretches?
You should wait a minimum of 6 to 12 weeks between each stretch. This specific timeframe allows your collagen fibers to relax and your skin cells to undergo mitosis, which creates the new tissue needed for the larger diameter. Rushing this biological process is the primary cause of scarring and permanent tissue damage in the modification community.
Can I stretch my ears with tapers and leave them in?
Tapers are precision tools designed for the stretching process only and should never be worn as jewelry. Leaving tapers in your ears creates uneven weight distribution that can lead to thinning at the bottom of the lobe. Always follow your taper with a single-flare plug or tunnel immediately to ensure the weight remains balanced and the fistula stays healthy.
What is the "point of no return" for ear gauges?
The "point of no return" is generally considered to be 0g (8mm). While every individual's skin elasticity varies, stretches up to 2g (6mm) often shrink back to a standard piercing size if jewelry is removed. Once you level up beyond 8mm, the expansion of the fistula is typically permanent and may require medical intervention to close fully.
How do I get rid of the smell in my stretched ears?
Eliminating the odor in stretched ears requires a daily hygiene ritual and the use of non-porous jewelry like surgical steel or glass. "Ear funk" occurs when sebum and dead skin cells become trapped behind your plugs. To resolve this, remove your jewelry daily, cleanse the area with a saline spray, and apply a thin layer of organic Gauges Balm to maintain a healthy lipid barrier.
What is a blowout and how do I fix it?
A blowout is a flap of internal tissue that has been forced out through the back of the piercing due to excessive pressure or forced tapering. To fix a blowout, you must downsize to a smaller gauge immediately to relieve the tension and allow the tissue to retract. Consistent massages with Jojoba oil can help break down scar tissue and restore the lobe's integrity over a period of 4 to 6 months.
Is acrylic or surgical steel better for stretching?
Surgical steel is significantly better than acrylic for the ear stretching process. Acrylic is a porous material that can harbor microscopic bacteria and cause irritation or allergic reactions in a fresh stretch. Surgical steel is non-porous, hypoallergenic, and can be easily sanitized, providing a much safer environment for your healing skin cells.
Can I use Vaseline to stretch my ears?
You should avoid using Vaseline as a lubricant because it is petroleum-based and non-breathable. Petroleum products can clog your pores and trap bacteria against the healing fistula, leading to irritation. Instead, choose USDA Certified organic oils like Jojoba or Castor oil, which mimic your skin’s natural sebum and support the elasticity required for a safe, healthy stretch.


