

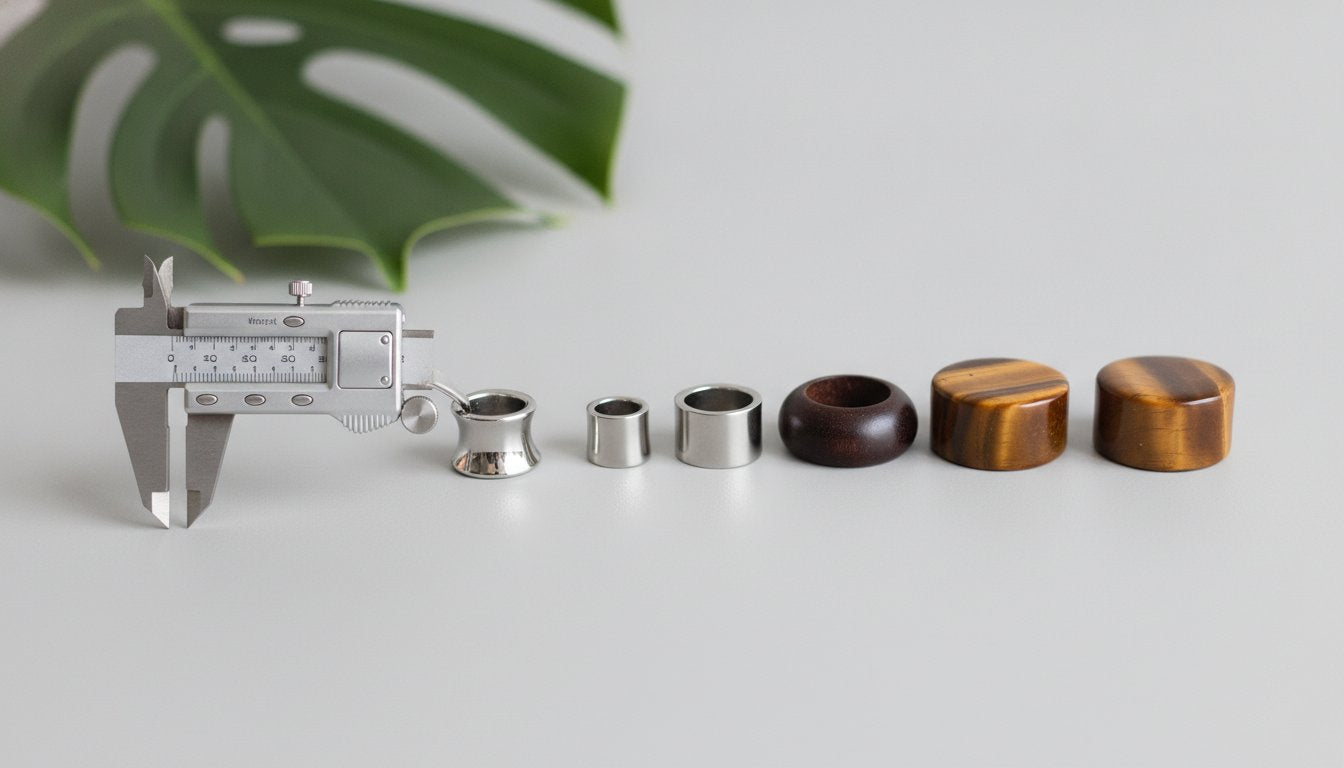
Why does the path to self-expression require a math degree? If you have ever stared at a 2g plug and wondered why it is physically larger than an 8g, you have felt the central frustration of the stretching community. Interpreting ear gauge sizes is often a confusing blend of counterintuitive numbers and millimeter conversions that can lead to painful blowouts if misunderstood. We understand the physical vulnerability involved in this process. You deserve a journey defined by safety, precision, and personal expression.
This guide provides the professional authority and nurturing care you need to adopt a milestone mindset. You will gain a clear understanding of the gauge scale, identify your personal point of no return, and learn to measure your jewelry with absolute accuracy. We are exploring the definitive reference charts and expert safety protocols that ensure your journey is one of empowerment rather than injury. From the first 16g stretch to the significant 00g milestone, we act as a supportive specialist for your aesthetic evolution.
Key Takeaways
- Decode the inverse logic of ear gauge sizes to confidently navigate the transition between gauge numbers and millimeter diameters.
- Master the math of stretching with a comprehensive conversion chart that includes essential half-size increments for a safer progression.
- Identify the biological "point of no return" to understand the long-term permanence and health of your earlobe tissue.
- Learn the professional technique for measuring jewelry flares and wearable areas to ensure a precise, comfortable fit.
- Establish a safe stretching protocol by selecting the right kit and adhering to the "Golden Rule" to prevent blowouts and damage.
Decoding the Ear Gauge Size System: Why Numbers Get Smaller as Sizes Get Bigger
Understanding the logic behind ear gauge sizes requires a brief look at industrial history. Most body jewelry follows the American Wire Gauge (AWG) system, a standard originally developed in the 19th century for electrical wiring. This system operates on an inverse scale that often confuses beginners. A higher number indicates a thinner wire because the gauge represents how many times the metal was pulled through a sizing die during manufacturing. Consequently, a 20g piercing is delicate and narrow, while a 00g plug is substantial and bold. This counterintuitive math is the first hurdle every enthusiast must clear to ensure a safe transition between sizes.
As the gauge number decreases, the physical volume of the jewelry increases at an accelerating rate. This is not a linear progression. For instance, the jump from 14g to 12g is a mere 0.4mm, but the leap from 2g to 0g is a full 2mm. This logarithmic gap is why many individuals encounter resistance or "blowouts" at larger milestones. Understanding this mathematical shift allows you to prepare your skin for the increased tension. By recognizing that the physical distance between sizes grows as the numbers get smaller, you can approach each stretch with the patience and precision your body requires.
The Difference Between Gauge, Millimeters, and Inches
Precision is the cornerstone of a healthy stretching journey. While gauges provide a convenient shorthand for the industry, millimeters offer the clinical accuracy required to prevent micro-tears. In the context of body jewelry, a "gauge" is a unit of measurement defined by the standardized diameter of a wire according to the American Wire Gauge system. Once your journey progresses beyond 00g, the gauge system typically yields to millimeters or fractions of an inch. This transition ensures that as the jewelry becomes larger and heavier, the measurements remain exact and predictable. Professionals rely on millimeters because they eliminate the guesswork inherent in the AWG scale.
Common Starting Sizes for Standard Ear Piercings
Most standard lobe piercings are performed at 20g or 18g. These sizes represent the delicate baseline of your aesthetic journey. It is vital to remember that Stretching (body piercing) should never begin on a fresh wound. Tissues must be fully matured and stabilized before any increase in size is attempted. A professional piercer acts as a supportive specialist during this initial phase. They assess your lobe density and placement to ensure your foundation can support future growth. Starting with a healthy, centered piercing is the first step toward reaching your ultimate style goals with confidence and safety.
The Master Ear Gauge Size Chart: 18g to 2 Inches
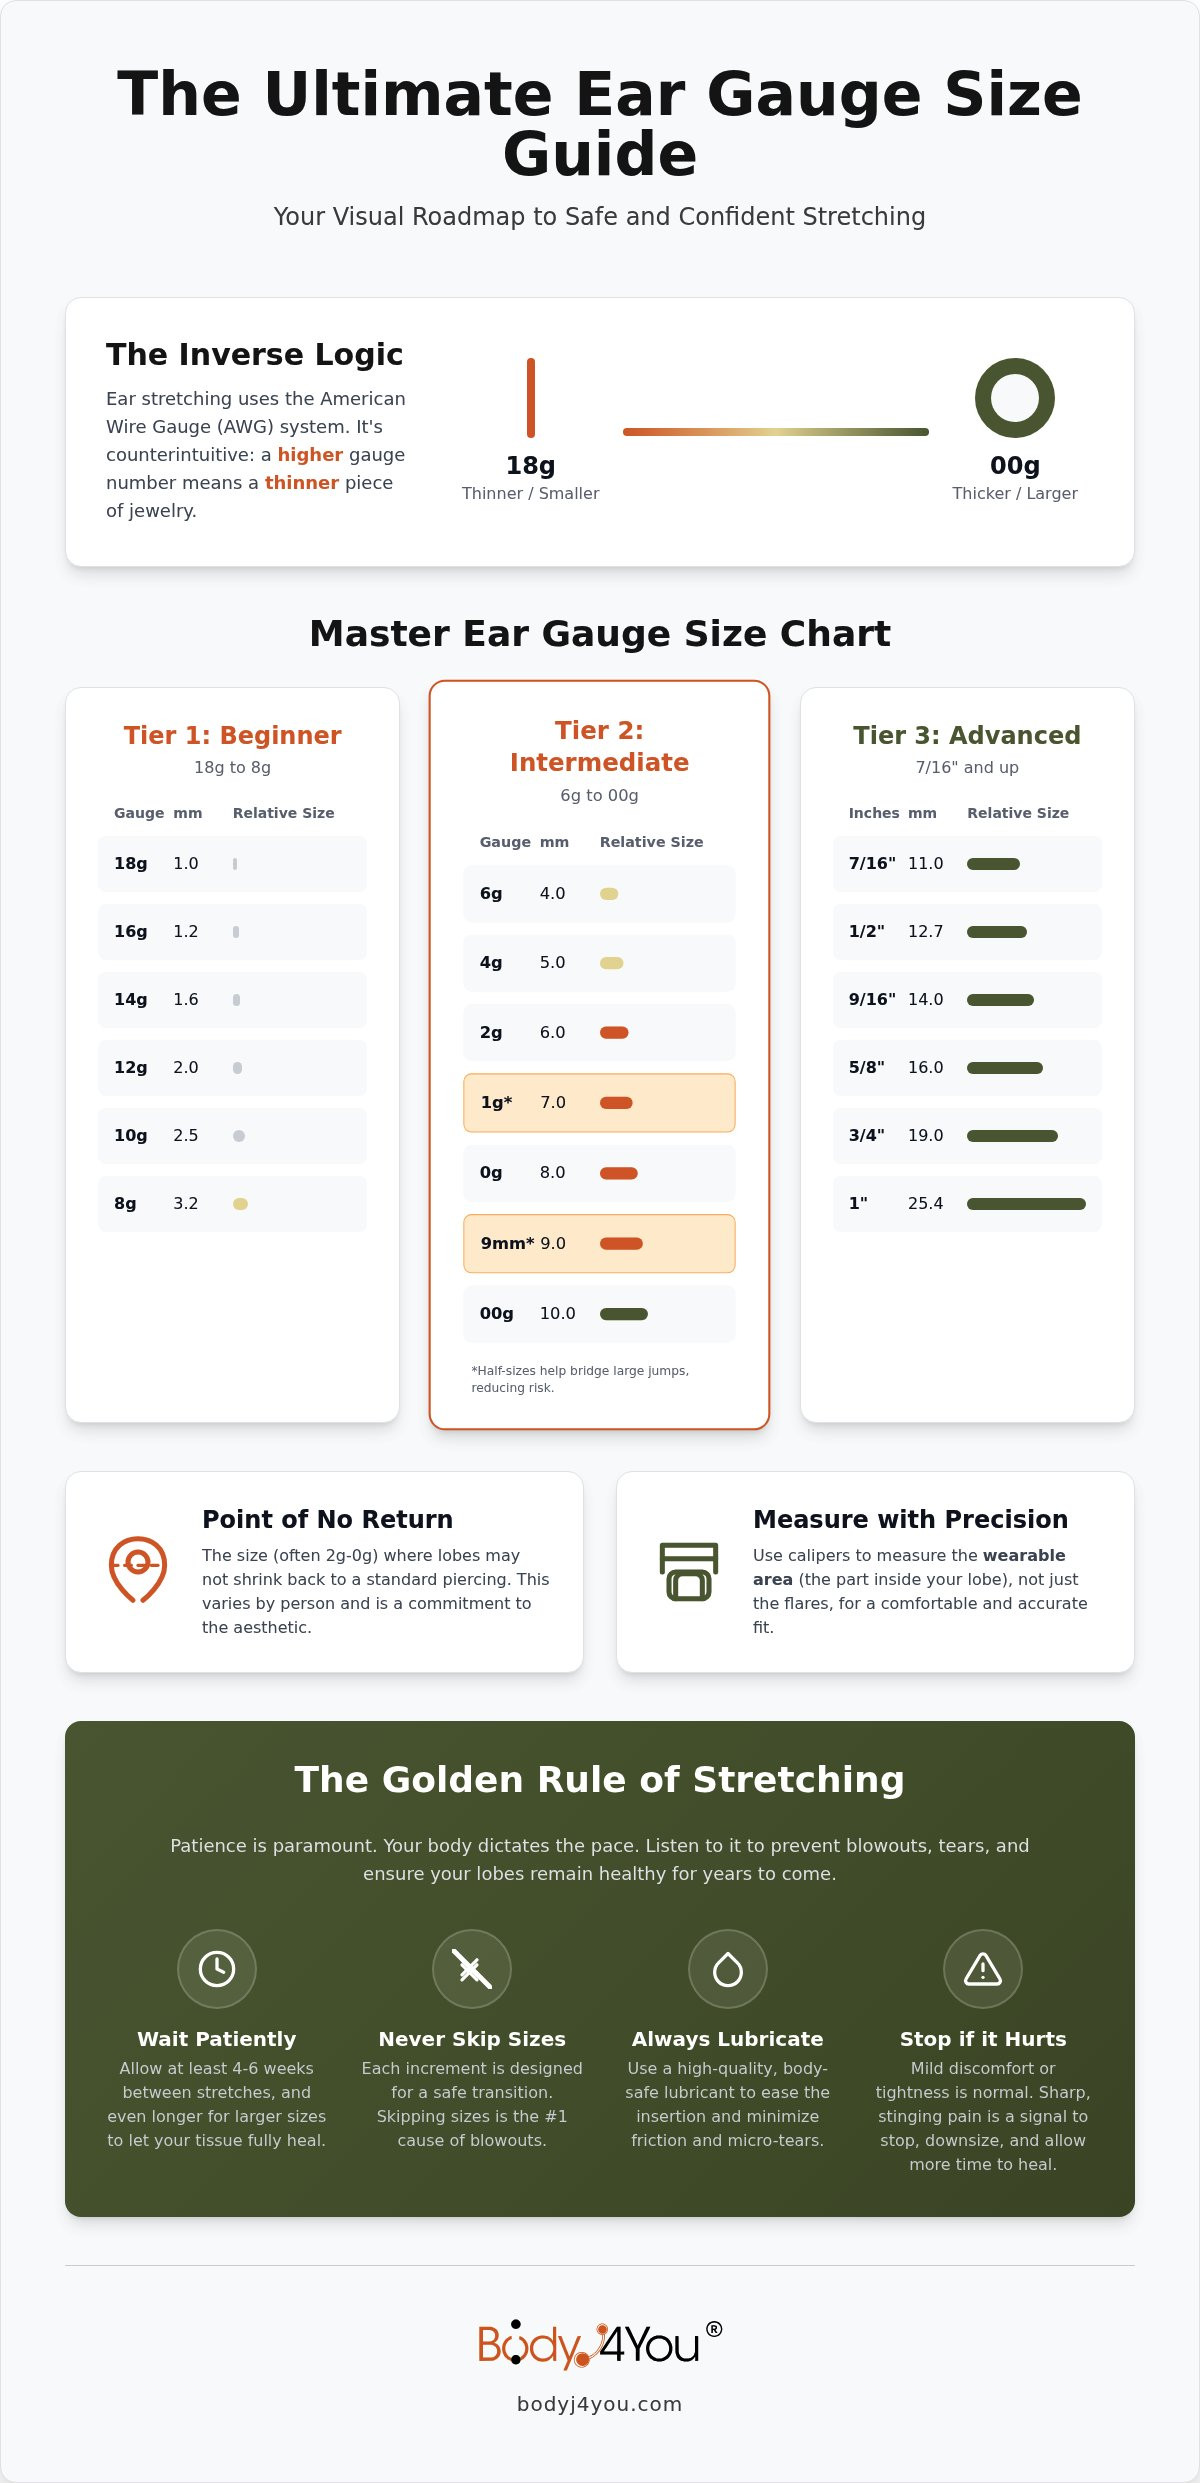
Precision is the foundation of a successful stretching journey. Navigating ear gauge sizes requires more than a casual glance at a chart; it demands an understanding of how millimeters, gauges, and inches interact to impact your physical health. The following roadmap categorizes sizes into three distinct tiers to help you visualize your progress and prepare for the unique challenges of each stage. We recommend focusing on the millimeter (mm) measurement for the most accurate results, as gauge numbers can vary slightly between manufacturers.
- Beginner (Tier 1): 18g (1.0mm) to 8g (3.2mm). Small, manageable increments.
- Intermediate (Tier 2): 6g (4.0mm) to 00g (10.0mm). Larger jumps, including the notorious 2mm leap.
- Advanced (Tier 3): 7/16" (11.0mm) to 2" (50.8mm). Transitioning to fractional inches and significant weight.
To ensure a safe transition, many enthusiasts now utilize "half-size" increments. These include 1g (7mm) and 9mm plugs. These intermediate steps bridge the gap between the standard sizes on the chart, reducing the risk of micro-tears and maximizing your comfort. If you're feeling resistance, don't force the stretch; instead, look for these specialized sizes to keep your journey moving forward safely.
Beginner Sizes: 18g to 8g
The earliest stages of stretching are often the most exciting. During this phase, the increments between ear gauge sizes are minimal, usually ranging from 0.2mm to 0.8mm. This makes the initial stretches feel relatively easy and quick to heal. For those just beginning their transformation, we recommend starting with an Acrylic Ear Stretching Kit. Acrylic is lightweight, affordable, and perfect for the rapid transitions of the beginner tier. However, if you have sensitive skin, surgical steel is a reliable alternative that offers clinical purity and durability.
Intermediate Sizes: 6g to 00g
This is where the math becomes challenging. The jump from 2g (6mm) to 0g (8mm) is a full 2.0mm increase, which is a 33% expansion of the piercing. This is the most common trouble spot for enthusiasts. At this stage, you must choose between tapering, dead stretching, or the taping method. Reaching 00g (10mm) is a significant milestone, often serving as the primary goal for many because it's widely considered the largest "standard" size before entering the advanced category. To maintain lobe elasticity during these larger jumps, applying a nutrient-rich Gauges Balm daily is essential for maintaining skin integrity.
Advanced and Large Gauges: 7/16" to 2 Inches
Once you pass the 00g threshold, the sizing system shifts from gauges to fractional inches and millimeters. Precision becomes paramount because the weight of the jewelry increases significantly. At sizes over 1 inch, you must pay close attention to the "wearable area" of your jewelry to ensure it doesn't thin your lobe tissue. We advise transitioning to millimeters exclusively for your measurements at this scale. This clinical approach eliminates the confusion of US fractional sizing and ensures a perfect fit for every piece in your growing collection.
Milestones and the 'Point of No Return' in Ear Stretching
Every journey toward self-expression reaches a definitive crossroads. In the world of ear gauge sizes, this is known as the "Point of No Return." For the majority of enthusiasts, this threshold sits between 2g (6mm) and 0g (8mm). Before reaching this milestone, your earlobes generally retain enough natural elasticity to shrink back to a standard piercing diameter if the jewelry is removed. However, once you cross the 0g threshold, you are likely committing to a permanent physical modification. Your individual biology plays a decisive role in this process. Factors such as age, genetic skin elasticity, and how well you have managed your aftercare determine your tissue's ability to "bounce back."
Listening to your body is a skill that requires discipline and self-awareness. It's easy to get caught up in the excitement of reaching a new size, but your skin has a finite speed at which it can generate new cells. If you ignore the warning signs of resistance, you risk permanent thinning or the formation of dense scar tissue. This scarring, often called a "blowout," is a ring of irritated skin that pushes out from the back or front of the piercing. It isn't just an aesthetic issue; it's a sign of biological trauma that can stop your stretching journey in its tracks. Respecting your body's timeline is the only way to ensure your lobes remain healthy and thick for years to come.
The 2g to 0g Jump: The Greatest Hurdle
This specific transition is the most significant hurdle on the standard chart. While earlier steps involve increments of 1mm or less, this jump requires a full 2mm expansion of the tissue. This sudden increase in diameter often results in blowouts or painful micro-tears if the process is rushed. We strongly advise using a 1g (7mm) plug as a vital bridge between these ear gauge sizes. This intermediate step respects your body's limits and prevents the trauma associated with forced stretching. Exercising extreme patience at this specific milestone prevents lifelong lobe damage and ensures your skin remains thick and resilient throughout your journey.
Maintaining Lobe Health at Larger Sizes
As you progress toward larger jewelry, maintaining robust blood flow becomes your primary clinical concern. The increased weight of larger plugs can compress the delicate vessels in the lobe, leading to tissue "thinning" over time. This is why a disciplined maintenance routine is non-negotiable for long-term health. Regular massages with Jojoba oil stimulate micro-circulation and keep the skin supple and hydrated. You must learn to identify the "thinning spot"—typically found at the bottom-most point of the lobe—where the skin may feel noticeably cooler or appear more translucent. If you detect these signs, downsizing by one or two sizes is the most responsible action you can take to allow the tissue to recover its density.
How to Measure Your Jewelry and Verify Gauge Sizes
Relying on visual estimation is a dangerous gamble. While a piece of jewelry may look like the correct fit, even a fraction of a millimeter can mean the difference between a successful transition and a painful tear. Ear gauge sizes are clinical measurements, not mere suggestions. Manufacturing tolerances often result in "size creep," where a plug labeled as 10mm might actually measure 10.2mm or 9.8mm. This variation is particularly common in handmade or organic pieces. To maintain the integrity of your lobes, you must verify every piece before it touches your skin.
Understanding the anatomy of your jewelry is equally vital. You must distinguish between the "wearable area" and the "flares." The wearable area is the center of the plug that sits inside your ear, and this is the dimension that must match your current gauge. The flares are the wider edges that keep the jewelry in place. Measuring the flares by mistake will give you an inaccurate reading, leading to unnecessary confusion. Precision, verification, and safety are the three pillars of a responsible stretching routine.
Step-by-Step: Measuring Plugs with a Digital Caliper
Digital calipers are the gold standard for accuracy. They provide the clinical precision required to navigate the complexities of ear gauge sizes without guesswork. Follow these steps to ensure your measurements are verified:
- Set to Millimeters: Always use the millimeter setting. It offers the most granular data and aligns with professional piercing standards.
- Measure the Wearable Surface: Place the jaws of the caliper around the center of the plug. Ensure you aren't touching the flares, as this will skew the reading.
- Verify the Pair: Measure both plugs in a pair. Don't assume they're identical; manufacturing inconsistencies can occur even in high-quality batches.
If you discover that your existing jewelry doesn't match your goals, it's time to return to a standardized baseline. We recommend using a Surgical Steel Taper and Plug Kit to ensure every step of your journey is backed by predictable, high-quality measurements.
Using a Gauge Card or Wheel for Quick Reference
Gauge wheels offer a convenient, rapid-response solution for standard metal jewelry. They're ideal for verifying the size of surgical steel tapers or industrial barbells before a stretch. Simply slide the jewelry into the corresponding slot until you find a snug fit. However, be mindful that metal gauge wheels can scratch delicate finishes. Use them with a gentle touch to maintain the aesthetic purity of your collection.
While helpful, gauge wheels have significant limitations when it comes to organic materials. Wood, stone, and bone are subject to environmental changes and natural variations that a standard wheel cannot always account for. For these materials, the digital caliper remains the only reliable method for ensuring a safe fit. By adopting these professional measurement habits, you act as the wise guardian of your own health and self-expression.
Safe Stretching Practices: Choosing the Right Kit for Your Size
The foundation of a safe transformation is built on the "Golden Rule" of body modification: never skip a size. While the temptation to reach a larger milestone is strong, your skin requires time to generate new collagen and maintain thickness. Skipping steps on the chart of ear gauge sizes creates uneven tension, which leads to micro-tears and permanent scarring. A disciplined approach involves selecting the correct method for your specific stage. Tapering is effective for the smaller beginner sizes, while dead stretching and the taping method provide the controlled, gradual expansion required for intermediate and advanced tiers.
Clinical hygiene and tissue elasticity are the two pillars of successful aftercare. We recommend a dual-action routine to protect your investment in your self-expression. First, use a Sterile Saline Spray twice daily to remove debris and prevent bacterial buildup. Second, incorporate a nutrient-dense Gauges Balm into your daily massage routine. This topical application maintains the skin's suppleness, ensuring that your lobes remain thick and resilient as the surface area of your jewelry increases.
Acrylic vs. Surgical Steel Stretching Kits
Material choice is a strategic decision that impacts both health and comfort. Acrylic kits are an excellent entry point for beginners because they're lightweight, vibrant, and cost-effective for the rapid transitions of early stretching. However, as ear gauge sizes increase, the physical weight of the jewelry becomes a functional tool. Surgical steel is non-porous and hypoallergenic, offering a clinical standard of purity. At larger scales, the density of surgical steel assists in "dead stretching," where the natural weight of the plug helps create the space needed for the next increment. This gravity-assisted method is safer for mature piercings than forcing a taper through dense tissue.
Signs You Are Moving Too Fast
Patience is your most valuable asset. If you notice a "cat-butt" texture—a wrinkled, irritated appearance of the inner piercing—it's a definitive signal that your tissue is under too much stress. This texture is often the precursor to a blowout and should be addressed immediately by downsizing. If you experience sharp pain, see blood, or notice significant swelling, you must follow the "Downsize Rule" and return to a smaller, comfortable size until the tissue has fully recovered. The 2026 standard for wait times has shifted toward longevity; three months is now the recommended minimum between stretches. This extended period allows the blood vessels to stabilize and the skin to regain its natural density, ensuring a lifetime of healthy self-expression.
Master Your Aesthetic Transformation with Precision and Care
Your exploration of ear gauge sizes is a powerful act of self-expression. By mastering the inverse logic of the AWG system and adopting a milestone mindset, you protect your body's long-term health. Precision is your greatest ally. You've learned to bridge the gaps with half-sizes and verify your jewelry with clinical accuracy. These habits transform a simple body modification into a wellness-oriented lifestyle choice. Whether you are navigating the initial beginner tiers or approaching the advanced fractional inch scale, your commitment to safety defines your success.
At BodyJ4You, we act as your supportive specialist. With over 20 years of industry expertise, we provide the tools you need for a safe and stylish evolution. Our collection features premium Surgical Steel and lightweight Acrylic options designed for every stage of your growth. We supplement your journey with comprehensive aftercare support to ensure your lobes remain thick, resilient, and healthy. Shop our complete collection of Ear Stretching Kits and Plugs to begin your next chapter with confidence. Your path to self-expression deserves the highest standard of care.
Frequently Asked Questions
What is the smallest ear gauge size?
The smallest standard size for ear piercings is 20g, which measures approximately 0.8mm. Most professional piercings are performed at either 20g or 18g to provide a stable foundation for your aesthetic journey. Starting at these delicate diameters allows your tissue to mature and stabilize before you begin the intentional process of expansion.
Is 00g the point of no return for ear stretching?
While 00g is a permanent size for most, the actual point of no return typically occurs earlier, between 2g (6mm) and 0g (8mm). Reaching 00g (10mm) involves a substantial displacement of tissue that rarely shrinks back to a standard piercing size. Your individual skin elasticity, age, and stretching history will ultimately determine your ears' ability to recover.
How many mm is a 0 gauge ear?
A 0 gauge ear measures exactly 8mm in diameter. This is one of the most popular ear gauge sizes because it offers a bold aesthetic without the extreme weight of much larger plugs. Because this size requires a 2mm jump from the previous 2g milestone, it's a phase that demands maximum patience and precise measurement to avoid injury.
Can I skip gauge sizes if my ears feel loose?
You must never skip sizes, even if your jewelry feels loose or your lobes seem ready for a change. Skipping steps bypasses the critical time your body needs to generate new skin cells and maintain lobe thickness. This shortcut often results in thinning or traumatic blowouts that can permanently damage your tissue and halt your progress for months.
Why are gauge sizes numbered backwards?
The numbering system follows the American Wire Gauge (AWG) standard, where the number refers to the times a wire was pulled through a sizing die. A higher number means the wire was pulled more times, making it thinner. This industrial history explains why an 18g plug is thin and delicate, while a 2g plug is significantly thicker and heavier.
How do I know what size my current gauges are?
Using a digital caliper is the only way to verify your jewelry size with clinical precision. You should measure the center of the wearable area rather than the flares to get an accurate reading in millimeters. For standard metal jewelry, a gauge wheel also serves as a reliable reference tool for identifying your current size quickly and safely.
What is the difference between 0g and 00g?
The difference between 0g and 00g is a significant 2mm increase in diameter. A 0g plug is 8mm, while a 00g plug is 10mm. This transition is often considered the most difficult jump in the stretching journey. Many enthusiasts utilize intermediate 9mm plugs to bridge this gap safely and prevent micro-tears in the delicate lobe tissue.
How long should I wait between gauge sizes?
You should wait a minimum of 6 to 8 weeks between smaller stretches and significantly longer for larger milestones. The 2026 industry consensus suggests a 3 to 4 month waiting period for the healthiest results. This duration ensures your skin has fully recovered its elasticity and blood flow before you introduce any new tension to the area.


