

The cheapest helix piercing jewelry you can find might be the most expensive mistake you ever make for your ear. That persistent irritation bump, the clasp that won't stay closed, the mysterious rash that appears days after a new piece arrives — these aren't bad luck. They're the predictable result of choosing the wrong material, the wrong gauge, or the wrong threading system for a piercing that sits in one of the most delicate cartilage structures on your body.
You already know that your helix deserves better than a fast-fashion afterthought, and you're right. Cartilage piercings heal slowly and react hard to substandard metals, which means every jewelry decision carries real consequences for your comfort and your look.
This guide gives you everything you need to choose helix piercing jewelry with genuine confidence: a clear breakdown of gauge sizing, an honest look at why internal threading outperforms external threading for long-term wear, and a practical framework for finding biocompatible materials that support healing rather than fighting it. Whether you're curating a stacked ear aesthetic or simply replacing one tired stud, you'll finish here knowing exactly what to reach for and why.
Key Takeaways
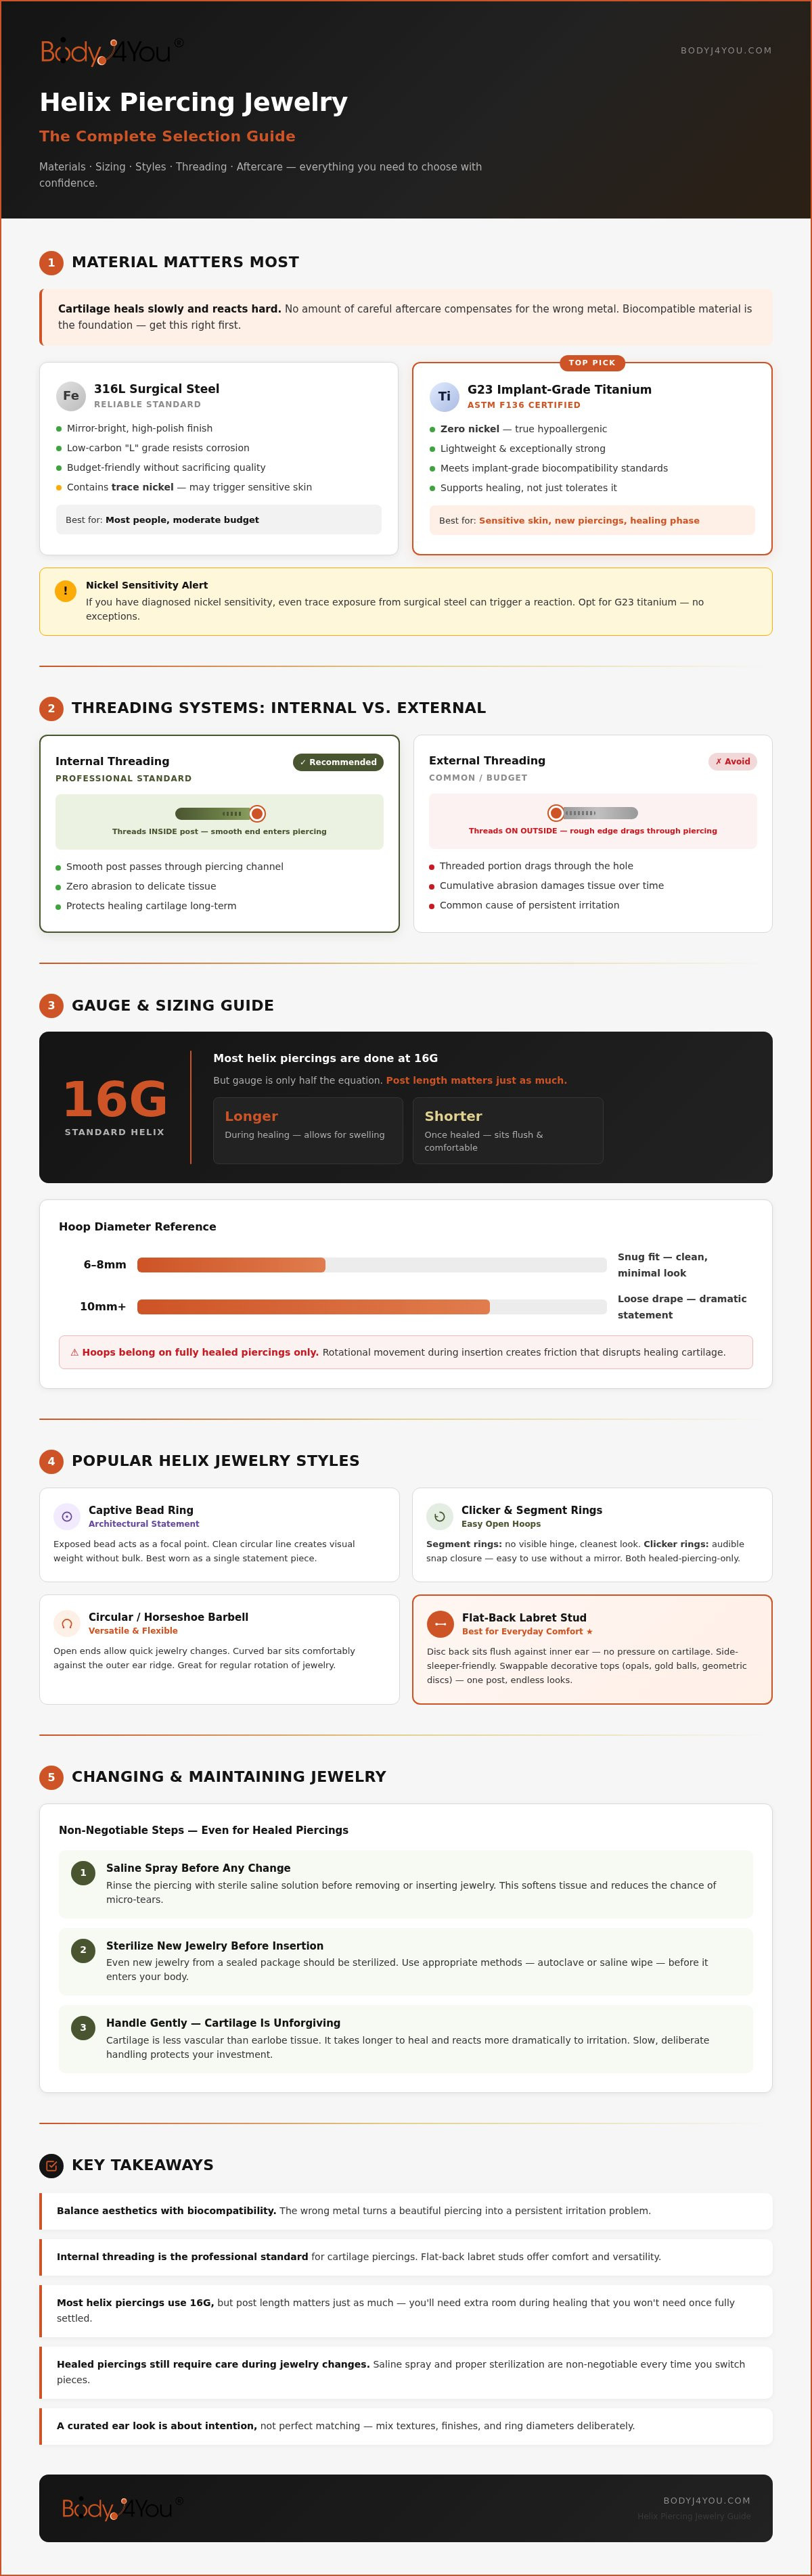
- Choosing the right helix piercing jewelry means balancing your personal aesthetic with biocompatible materials — the wrong metal can turn a beautiful piercing into a persistent irritation problem.
- Internal threading is the professional standard for cartilage piercings, and flat-back labret studs offer both comfort and versatility for everyday wear and curated ear styling.
- Most helix piercings are sized at 16G, but post length matters just as much as gauge — you'll need extra room during healing that you won't need once your piercing has fully settled.
- A healed piercing still requires care during jewelry changes; saline spray and proper sterilization are non-negotiable steps that protect your cartilage every time you switch pieces.
- Building a cohesive stacked ear look is less about matching everything perfectly and more about understanding how to mix textures, finishes, and ring diameters with intention.
Popular Helix Piercing Jewelry Styles for 2026
Style trends in cartilage jewelry have matured considerably. The maximalist stacking aesthetic that dominated earlier years has given way to something more intentional: fewer pieces, better quality, and a sharper eye for how individual items interact with each other. For the helix specifically, four styles continue to anchor most curated ear looks, each with its own logic for when and how to wear it.
Captive bead rings bring an architectural quality that nothing else quite replicates. The exposed bead sits at the front of the ear like a deliberate focal point, and the clean circular line of the ring itself creates visual weight without bulk. They work best as a single statement piece rather than layered with other rings at the same height. Circular barbells and horseshoe rings offer a related silhouette with more flexibility; the open ends allow for quick changes and the curved bar sits comfortably against the outer ear ridge, making them a practical choice for anyone who rotates their jewelry regularly.
Hoops and Seamless Rings
Hoops remain the most versatile category in helix piercing jewelry, but the details matter more than most people realize. Segment rings, where a small section of the ring detaches entirely, offer a cleaner look because there's no visible hinge. Clicker rings trade that seamlessness for convenience; the hinged closure snaps shut audibly and holds securely, which makes them far easier to open and close without a mirror. For diameter, a snug fit typically falls between 6mm and 8mm, while a looser, more dramatic drape reads better at 10mm or above. One firm rule: hoops belong on fully healed piercings only. The rotational movement required to insert a hoop creates friction that actively disrupts healing cartilage tissue.
Labret Studs and Flat-Backs
For everyday comfort, flat-back labret studs are the clear frontrunner. The disc-shaped back sits flush against the inner ear rather than pressing a threaded post into the cartilage, which makes an immediate difference for side-sleepers. The real safety advantage, though, comes from the threading system. Internal threaded labret studs keep the threaded portion inside the post, so the smooth end passes through the piercing channel without catching on delicate tissue. External threading drags those threads directly through the hole, and over time that abrasion adds up.
The decorative end is where personal style enters the picture. Prong-set opals, simple gold balls, and geometric flat discs all attach to the same post, which means one well-chosen flat-back stud can shift from understated to striking simply by swapping the top.
Material Matters: Surgical Steel vs. Titanium
Your helix piercing jewelry is only as good as what it's made from. Full stop. Cartilage tissue is less vascular than earlobe tissue, which means it heals more slowly and responds to irritants more dramatically. Choosing a biocompatible metal isn't a bonus feature; it's the foundation everything else builds on. Get this wrong, and no amount of careful aftercare will fully compensate.
The two materials that consistently earn professional endorsement are 316L surgical steel and implant-grade titanium. Both are biocompatible. Both resist corrosion. But they serve different needs, and understanding that distinction protects your cartilage over the long term.
316L Surgical Steel: The Reliable Standard
316L surgical steel is the workhorse of the body jewelry world, and for good reason. Its high-polish finish delivers a bright, mirror-like shine that holds up through daily wear without dulling or tarnishing. The "L" designation matters here; it indicates low carbon content, which improves corrosion resistance and reduces the risk of surface breakdown inside a piercing channel. For anyone with a moderate budget who wants quality helix piercing jewelry without compromise, surgical steel hits the mark cleanly.
It's worth being honest about one limitation: surgical steel does contain trace amounts of nickel. For most people, the nickel is bound tightly enough within the alloy that it doesn't migrate into tissue in meaningful quantities. For those with diagnosed nickel sensitivity, though, even trace exposure can trigger a reaction.
Hypoallergenic Options for Sensitive Ears
This is where G23 implant-grade titanium earns its reputation as the Wise Guardian of body jewelry materials. Titanium contains no nickel whatsoever. It's lightweight, exceptionally strong, and biocompatible at a level that meets ASTM F136 implant standards. If you've experienced unexplained irritation bumps, persistent redness, or prolonged healing times, switching to titanium is often the single most effective intervention available.
Colored titanium jewelry uses a PVD (Physical Vapor Deposition) coating process rather than paint or plating, which means the color bonds at a molecular level rather than sitting on top of the metal. The result is a finish that resists chipping and doesn't introduce additional allergens into the equation.
Knowing which warning signs to watch for matters just as much as choosing the right metal. Early indicators of metal sensitivity include:
- Persistent itching that doesn't resolve after the initial healing period
- A raised, fluid-filled bump forming directly around the jewelry post
- Discoloration of the surrounding skin, particularly a grayish or greenish tinge
- Prolonged tenderness that flares up rather than gradually diminishing
If any of these appear, remove the jewelry and assess the metal before reintroducing it. The one category to avoid entirely is what professionals call "mystery metals": unlabeled alloys sold at low price points with no material disclosure. These frequently contain brass, copper, or nickel-heavy blends that actively fight healing rather than supporting it. Explore surgical steel and titanium body jewelry made to verifiable standards, and you'll sidestep the most common source of cartilage complications before they start.
Finding Your Fit: Helix Gauge and Length
Sizing is where good intentions go wrong most often. You can choose the right material, the right style, and the right threading system, then undermine all of it with a post that's 2mm too short for a swollen fresh piercing or a hoop diameter that presses into the ridge of your ear. Fit isn't a secondary concern in helix piercing jewelry. It's foundational.
Understanding Gauge Sizes
Gauge numbers work inversely to their physical size: the higher the number, the thinner the jewelry. A 20G post is noticeably finer than a 16G post, and that difference matters enormously for cartilage stability. Most professional piercers default to 16G for initial helix piercings precisely because the slightly larger diameter creates a more stable channel through the tissue, reducing the likelihood of the jewelry shifting or migrating during the healing period. An 18G piece, while common in retail jewelry, can feel loose in a 16G channel and create micro-movement that irritates healing tissue without any obvious cause.
Transitioning between sizes should always move gradually. Jumping from 16G to 14G without allowing adequate time between changes risks small tears in the fistula wall, the skin-lined tunnel that forms around your jewelry. Those micro-tears don't just cause discomfort; they create scar tissue that complicates every future jewelry change.
Measuring for Your Anatomy
Post length is measured as the wearable length: the distance between the flat back disc and the decorative end, excluding both. During active healing, most piercers recommend a post with extra length to accommodate swelling, typically 8mm to 10mm for a standard helix placement. Once healing is complete, dropping down to a 6mm post eliminates the excess that catches on hair, clothing, and pillowcases.
For hoops, diameter determines whether the ring drapes elegantly or digs in. A ring that fits too snugly can't rotate freely, and rotation is how you'll insert and remove it safely. The goal is a fit that allows gentle movement without visible gapping from the ear.
A practical framework worth keeping is the Rule of Three: every piece of helix jewelry should be Snug enough to stay in place without shifting, Secure enough that the closure holds through daily movement, and Safe enough that no part of the jewelry presses against the piercing channel under normal conditions. When you're uncertain whether a piece meets all three criteria, consulting an ear gauge size chart gives you a precise reference point rather than a guess.
Improper sizing is one of the leading causes of piercing migration, where the jewelry slowly shifts position as tissue reacts to constant low-level pressure. Catching a poor fit early protects the long-term placement of your piercing.
Styling Your Curated Ear: Beyond the Single Piercing
A single helix piercing is a statement. Multiple helix piercings, composed thoughtfully, become a signature. The difference between a curated ear that looks intentional and one that looks cluttered comes down to three things: spacing, proportion, and restraint. Not everything needs to match, but everything needs to belong.
The Wise Guardian principle applies directly here. Before adding another piece, ask whether it serves the overall composition or simply fills a gap. Filling gaps is how ears end up looking busy. Serving the composition is how they end up looking considered.
The Double and Triple Helix
Stacking two or three pieces along the helix ridge creates the most opportunity for visual storytelling, and the most room for error. The approach that consistently reads as polished is the descending waterfall effect: larger or bolder jewelry at the top of the ridge, scaling down in size or visual weight toward the lower helix. A textured stud at the upper helix, a smaller smooth ball stud in the middle, and a fine seamless ring at the lower position creates movement without chaos.
Mixing jewelry types within a single row works well when the metal finish stays consistent. A captive bead ring and a flat-back labret stud look intentional together when both are in the same gold tone. In mismatched metals, the same pairing reads as accidental. One practical note: stacked piercings are still individual piercings. Each one requires its own aftercare routine during healing, and a problem with one piece doesn't mean ignoring the others.
Color Theory and Themes
Choosing a metal uniform is the fastest way to elevate a multi-piercing look. All gold, all silver, or all rose gold across every placement creates a quiet cohesion that reads as high-end without requiring perfectly matched styles. Accent stones introduce personality within that framework. Opals, with their shifting iridescence, bring warmth to summer ear stacks. Clean steel or dark onyx reads sharper and moodier for colder months.
Coordinating your helix piercing jewelry with other placements like the tragus or conch follows the same logic. The tragus sits closer to the face and draws more attention, so keeping it slightly simpler than the helix lets the stacked ridge remain the focal point rather than competing with it.
- Upper helix: bolder texture or a larger decorative end
- Mid helix: transitional piece that bridges the two extremes
- Lower helix or conch: cleaner, simpler, lets the stack breathe
- Tragus: a fine stud that complements without competing
Building this kind of intentional stack takes time and the right foundational pieces. Explore internal threaded labret studs and captive bead rings designed to work together across placements, so every addition strengthens the look rather than complicating it.
Changing and Maintaining Your Helix Jewelry
The golden rule is simple and non-negotiable: never change jewelry in an unhealed piercing. Cartilage takes anywhere from six months to a full year to heal completely, and that timeline isn't a suggestion. Swapping pieces before the fistula has fully formed introduces bacteria, disrupts tissue, and is one of the most reliable ways to turn a straightforward piercing into a prolonged problem. If you're unsure whether your helix is healed, visit your piercer for an assessment before touching the jewelry.
When the time does come for a change, sterilizing your new piece before insertion is non-negotiable. Rinse the jewelry with sterile saline, not tap water, not rubbing alcohol. Alcohol dries the tissue surrounding the piercing channel and can trigger the very irritation you're trying to avoid. Sterile saline spray for piercings is purpose-formulated for this; it cleans without disrupting the delicate moisture balance that healthy cartilage tissue depends on.
Safe Insertion Techniques
Opening a captive bead ring requires two pairs of ring-opening pliers, not your fingernails. Grip the ring on either side of the bead and apply gentle lateral pressure to spread the opening just wide enough to remove the bead. Forcing it wider than necessary warps the ring's shape and compromises the closure. For internal threaded labret studs, thread the decorative end on with fingertip pressure only. Snug is correct. Tight is a problem. Over-tightening compresses the tissue between the disc and the end, which creates pressure bumps that look like infections but aren't.
Some jewelry changes genuinely warrant a professional. If your helix piercing jewelry hasn't been changed in years, if the post seems embedded, or if you're downsizing gauge for the first time, a piercer's steady hands and proper tools are worth the trip.
Long-term Care and Troubleshooting
Distinguishing irritation from infection matters enormously because the responses are different. Irritation presents as a localized bump, mild redness, and tenderness that correlates with a specific trigger, a new product, a poorly fitted piece, sleeping on the piercing. Infection involves spreading redness, warmth radiating beyond the piercing site, thick discharge, and sometimes fever. Irritation is managed; infection requires medical attention.
For irritation bumps that develop during a jewelry transition, piercing bump treatment oil applied with clean hands can accelerate resolution. Formulations containing jojoba oil and rosehip oil support skin recovery without introducing harsh chemicals into a sensitive channel.
The LITHA method, Leave It The Heck Alone, remains the most underrated tool in aftercare. Resist the urge to rotate the jewelry, pick at crusting, or apply unnecessary products. Crusting is normal. Movement is the enemy. Daily saline spray, clean hands, and consistent restraint are what healthy helix piercings are built on.
Your Next Step Toward a Helix You're Proud Of
Good helix piercing jewelry isn't a luxury. It's a decision that affects how your cartilage heals, how your ear looks, and how confidently you wear both. The principles covered here are straightforward: biocompatible materials like 316L surgical steel and implant-grade titanium protect your tissue, internal threading reduces trauma during insertion, and proper gauge sizing prevents the migration and irritation that derail so many otherwise healthy piercings.
The right foundation makes everything else easier. A well-fitted flat-back labret stud, a quality captive bead ring, and a consistent saline aftercare routine aren't complicated. They're just the standard your cartilage deserves.
BodyJ4You brings over 20 years of body modification expertise to every piece in its collection, with expertly crafted 316L surgical steel jewelry and USA-manufactured aftercare solutions designed to support your piercing at every stage. Whether you're starting fresh or refining a curated stack, the right pieces are ready when you are.
Shop BodyJ4You's curated helix jewelry collection and build your look on a foundation that actually holds.
Frequently Asked Questions About Helix Piercing Jewelry
When can I change my helix piercing jewelry for the first time?
Wait until your helix is fully healed before attempting your first jewelry change, which typically takes six months to a full year. Cartilage heals more slowly than earlobe tissue, and the fistula needs to be completely formed before it can tolerate the disruption of a change. If you're unsure whether you've reached that point, visit your piercer for an honest assessment rather than guessing.
When the time does come, sterilize your new piece with sterile saline spray beforehand and work with clean hands. If the post feels difficult to access or the jewelry seems embedded, don't force it. That's a situation where a piercer's tools and experience are genuinely worth the trip.
What gauge is a standard helix piercing?
Most professional piercers use 16G as the standard gauge for helix piercings. The slightly larger diameter creates a more stable channel through cartilage tissue, which reduces the risk of the jewelry shifting or migrating during the healing period. An 18G piece, while widely available in retail settings, can sit loosely in a 16G channel and cause low-level irritation that's difficult to trace back to its source.
Always confirm your gauge before purchasing helix piercing jewelry, especially if your piercing was done at a non-specialist retailer. When in doubt, your original piercer can measure the channel and give you a definitive answer.
Can I wear a hoop in a fresh helix piercing?
No. Hoops are not suitable for unhealed helix piercings. Inserting a hoop requires rotational movement through the piercing channel, and that friction actively disrupts the tissue trying to form a stable fistula. Even a seamless ring that looks gentle creates more contact with healing cartilage than a straight labret post does. Wearing a hoop too early is one of the most reliable ways to extend your healing timeline or trigger a persistent irritation bump.
Save the hoops for after your piercing is fully healed. A flat-back labret stud is the far better choice during the healing phase; the smooth post passes cleanly through the channel without the rotational stress a hoop demands.
Is surgical steel or titanium better for a helix piercing?
Both 316L surgical steel and implant-grade titanium are biocompatible and professionally endorsed, but they serve different needs. Surgical steel is a reliable, accessible option for most people and delivers a bright, durable finish. Titanium is the stronger recommendation for anyone with a history of metal sensitivity, prolonged healing times, or unexplained irritation bumps, because it contains zero nickel and meets ASTM F136 implant standards.
If you've never experienced a reaction to metal jewelry, surgical steel helix piercing jewelry is a perfectly sound choice. If you have, don't experiment with cartilage. Switch to implant-grade titanium and remove the variable entirely.
How do I get rid of a bump on my helix piercing?
First, identify the cause before treating the symptom. Most bumps on helix piercings are irritation bumps, not infections, and they typically trace back to a specific trigger: poorly fitted jewelry, external threading, pressure from sleeping on the piercing, or a new product introduced near the site. Addressing the root cause matters more than any topical treatment. Check that your jewelry fits correctly, is made from a biocompatible material, and uses internal threading.
Once you've resolved the underlying issue, a piercing bump treatment oil containing jojoba oil or rosehip oil, applied with clean hands, can support skin recovery. Avoid alcohol, tea tree oil, and hydrogen peroxide; these dry the tissue and often worsen the bump rather than resolving it. Consistent saline spray and restraint from touching the area are your most reliable tools.
What is the best jewelry for sleeping with a helix piercing?
A flat-back labret stud is the clear answer for anyone who sleeps on their side. The disc-shaped back sits flush against the inner ear rather than pressing a raised closure into the cartilage, which makes a meaningful difference in comfort and reduces the pressure that leads to irritation over time. Choose the shortest post length that still accommodates any residual swelling; excess post length catches on pillowcases and creates the kind of micro-movement that disrupts healing.
A travel or piercing pillow with a center cutout is also worth considering during the healing period. It lets you sleep on your side without putting any direct pressure on the helix at all, which removes one of the most common sources of cartilage irritation entirely.
How do I measure my helix for a hoop?
Hoop diameter for a helix is measured as the internal diameter, the distance across the inside of the ring. To find your size, hold a ruler flat against your ear and measure from the center of your piercing hole to the outer edge of the cartilage ridge, then double that number. That gives you a baseline internal diameter. Most snug helix fits fall between 6mm and 8mm; a looser, more dramatic drape typically reads better at 10mm or above.
If you're between sizes, go slightly larger rather than smaller. A ring that fits too snugly can't rotate freely during insertion and removal, which creates unnecessary friction against the fistula wall. A small amount of visible movement is correct and intentional.
Why is my helix piercing jewelry so hard to unscrew?
The most common reason is that the threading has tightened over time from daily movement, which causes the end to self-tighten rather than loosen. The fix is counterintuitive: internally threaded jewelry on the right ear typically unscrews counterclockwise, but this can vary. Try applying very gentle, steady pressure in both directions to identify which way releases the tension before applying more force.
If the end still won't budge, don't use pliers directly on the decorative top. Grip the flat back disc firmly against the inner ear with one finger while turning the decorative end with your other hand. Dry hands grip better than moisturized ones. If it remains stuck after a genuine attempt, visit a piercer; they have the proper tools to release it without damaging the threading or the surrounding tissue.


