Your new navel piercing is a biological construction site, not just an accessory. Your body doesn't see a fashion trend. It sees a wound that requires a meticulous, year-long architectural rebuild. We understand the vulnerability that comes with this journey. You want your self-expression to be permanent, painless, and perfect. It's frustrating to face the friction of clothing or the confusion of "normal" crusting versus pus, especially when you're eager to switch to that minimalist barbell you've been eyeing.
This guide empowers you to master the belly button piercing healing stages through a lens of clinical safety and aesthetic refinement. In 2026, the resurgence of Y2K fashion makes a healthy navel piercing more desirable than ever, but success requires a disciplined approach to aftercare. You'll gain the expert insights needed to identify complications before they escalate, ensuring your jewelry doesn't migrate or reject. We'll walk you through the twelve-month recovery timeline, explain the biological "why" behind every phase, and provide the proof of efficacy you need for clear, irritation-free skin. From the initial inflammation to the final maturation of the fistula, your journey starts here. Purity. Integrity. Expression.
Key Takeaways
- Discover why your body requires a full 6 to 12 month biological commitment to build a secure fistula around your jewelry.
- Master the four belly button piercing healing stages to ensure your new aesthetic remains stable, healthy, and irritation-free.
- Learn to decode your body's signals by distinguishing between normal healing crusty residue and genuine warning signs of infection.
- Adopt a professional aftercare protocol that prioritizes cellular integrity by avoiding the common mistake of over-cleaning.
- Transition your jewelry safely by understanding the critical six month milestone and why patience is the ultimate guardian of your skin.
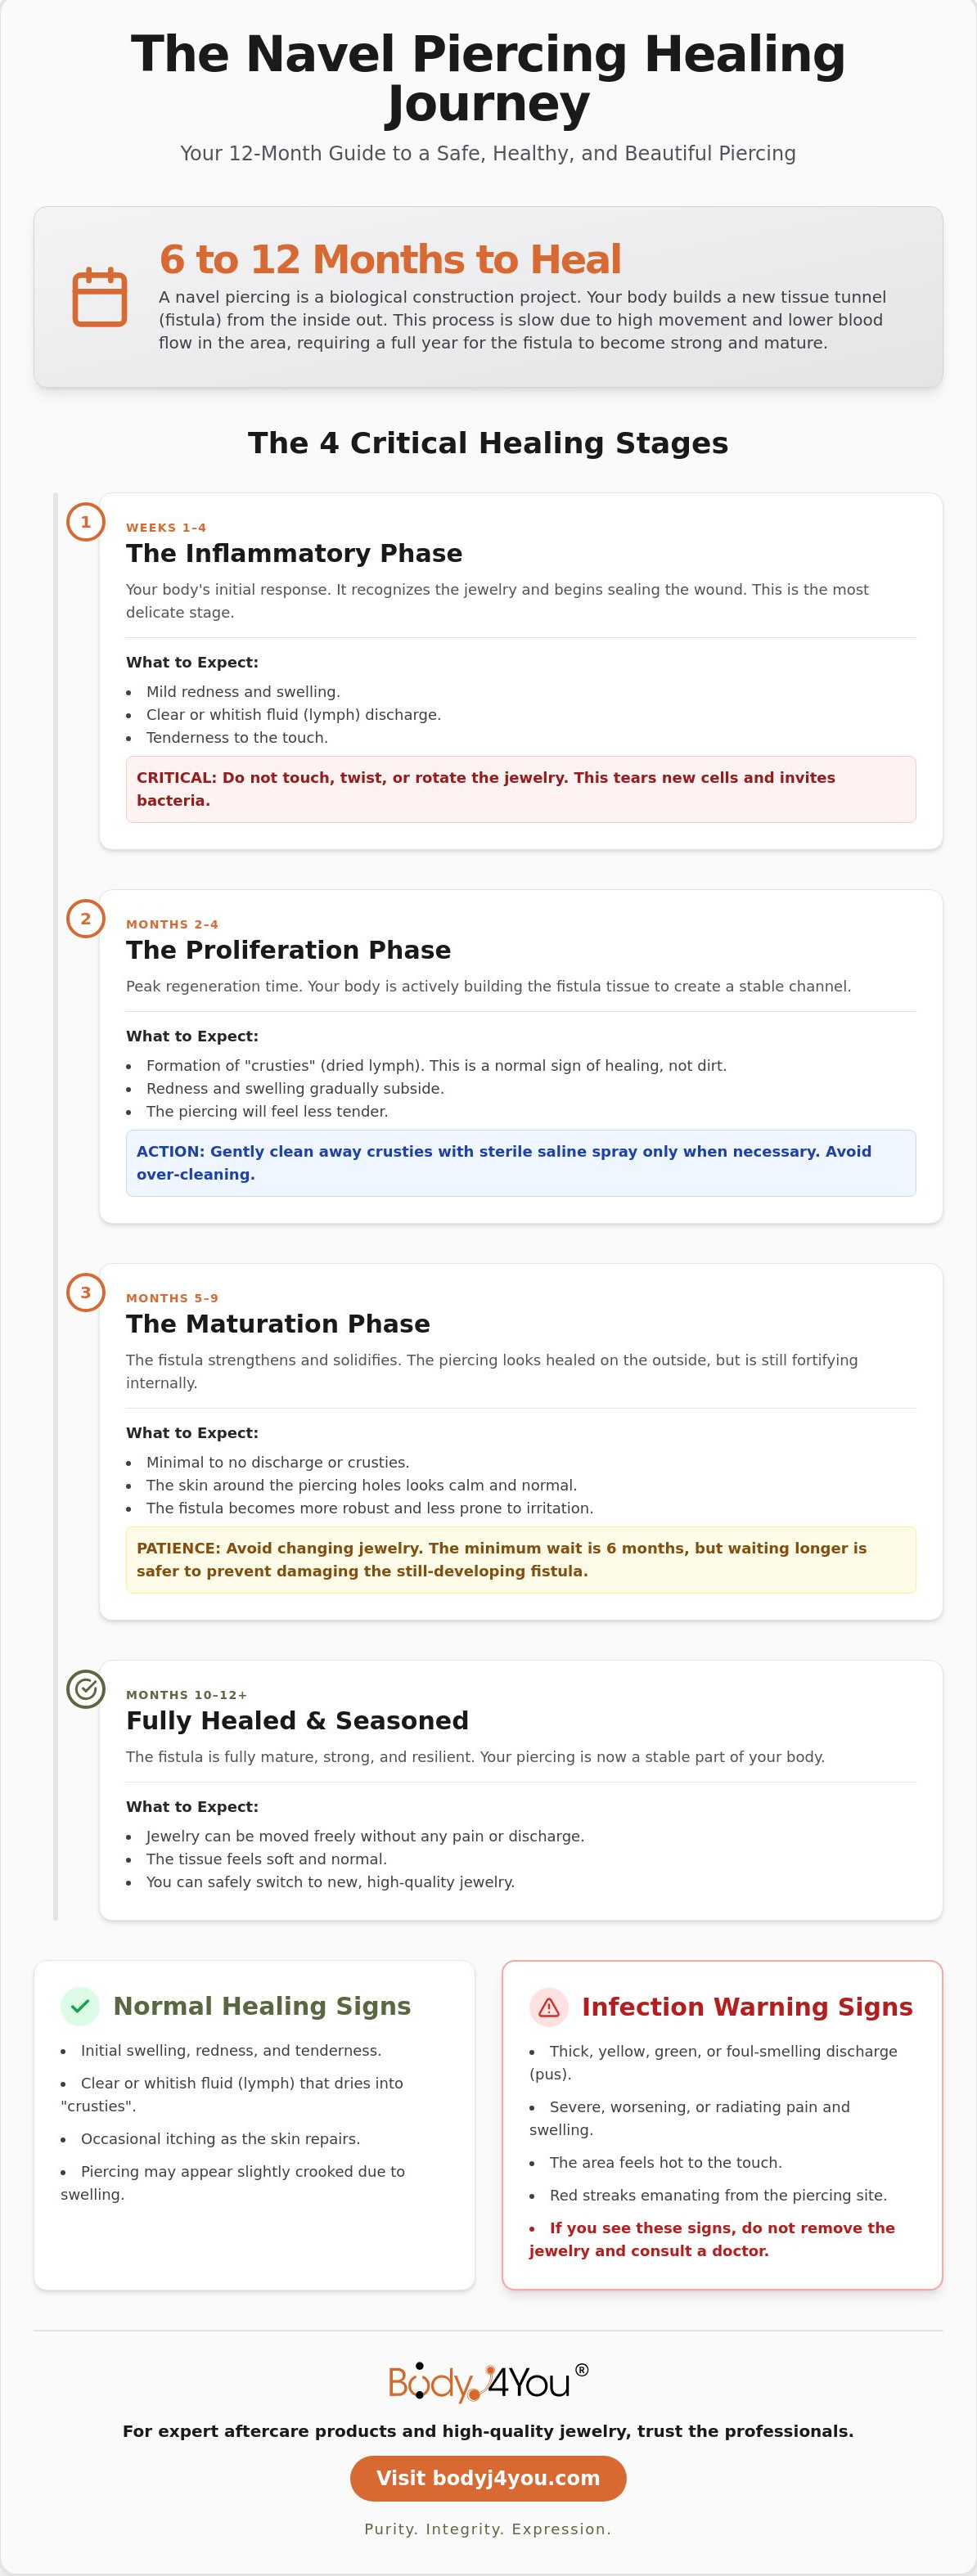
The Biological Timeline: Why Navel Piercings Take 6-12 Months to Heal
A belly button piercing is more than a simple aesthetic choice; it's a long-term biological commitment. While an earlobe might feel settled in weeks, the navel requires a full calendar year to reach true maturity. This discrepancy exists because your body is performing a complex architectural feat: building a fistula. This tube of scar tissue must form completely from the inside out to protect your internal tissues from the jewelry. Understanding the belly button piercing healing stages requires looking past the surface. What you see in the mirror is often just the facade of a much deeper, more delicate construction project.
The standard Navel piercing healing time typically spans six to twelve months. This duration is non-negotiable because the navel is a high-stress zone. Constant movement from walking, sitting, and even breathing puts mechanical pressure on the wound. Add in the moisture and friction from waist-high clothing, and you have a uniquely challenging environment for cellular repair. Surface healing is deceptive. It may look calm and clear within eight weeks, but the deep tissue maturity that prevents rejection takes much longer to solidify.
The Anatomy of a Healing Navel
Blood flow is the lifeblood of recovery. Unlike the highly vascularized earlobe, the skin around the navel receives a more indirect supply of nutrients and oxygen. This slower metabolic rate means cells regenerate at a measured pace. A professional piercer looks for the "sweet spot," which is the specific ridge of tissue that can support the weight of jewelry without excessive tension. Think of your navel as a biological construction site. If you rush the workers or remove the scaffolding too early, the entire structure may collapse. Respecting this anatomy is the first step toward a successful journey.
Factors That Accelerate or Delay Your Progress
Your choice of jewelry material acts as the foundation for this project. High-quality materials like surgical steel or titanium are non-negotiable during the first year. These metals are biocompatible. They don't leach irritants that trigger your immune system to "reject" the piercing. Lifestyle variables also play a silent but significant role. Quality sleep and consistent hydration provide the raw materials your body needs for tissue synthesis.
The myth of the "fast healer" is a dangerous trap. Even if the skin looks calm after three months, the internal fistula is still fragile. Skipping belly button piercing healing stages by changing jewelry too soon or wearing restrictive clothing often leads to migration. This is where the body slowly pushes the jewelry toward the surface. Patience isn't just a virtue here; it's a requirement for safety. Focus on the long-term integrity of your skin rather than fleeting trends.
The Four Critical Stages of Belly Button Piercing Recovery
Mastering the belly button piercing healing stages requires more than just patience. It demands a shift in how you interact with your body. The recovery journey is divided into four distinct biological phases: Acceptance, Proliferation, Maturation, and Seasoning. Each phase dictates a specific level of discipline, moving from active protection to a more hands-off approach. Proliferation is the peak period for cellular regeneration, where the body works hardest to stabilize the new channel. Throughout these phases, using a sterile saline spray for piercings ensures the environment remains conducive to repair without introducing harsh chemicals or irritants.
Stage 1: The Inflammatory Phase (Weeks 1–4)
This is the "Acceptance" stage. Your body reacts to the jewelry as a foreign object and begins the immediate work of sealing the entry and exit points. Expect redness, slight swelling, and a clear "lymph" discharge. These are natural, healthy responses. The critical rule during this first month is the "No-Touch" mandate. Twisting or rotating the jewelry tears the microscopic new cells trying to take hold. This physical disruption effectively resets your progress and invites bacteria into the fresh wound.
Stage 2: The Proliferation Phase (Months 2–4)
During this peak regeneration time, the fistula walls begin to thicken and organize. You'll likely encounter the "crusty" stage. These dried plasma and skin cells are signs of progress, not dirt. Avoid the urge to pick at them with your fingernails. Over-cleaning or using harsh, non-neutral products during this time is a primary cause for piercing bumps to appear. According to Healthline's navel piercing aftercare guide, maintaining a consistent but gentle routine is vital for long-term stability.
Stage 3: The Maturation Phase (Months 5–9)
The tissue thickens and sensitivity drops significantly. This is the "false finish line." Many people stop aftercare too early here because the piercing looks healed externally. However, the internal lining remains fragile. It stays prone to tearing if snagged by high-waisted jeans, heavy belts, or dangling jewelry. Your body is still reinforcing the channel. Stay disciplined. Continue your gentle cleansing to ensure the deep tissue reaches full maturity without setback.
Stage 4: The Seasoned Piercing (Months 10–12+)
The fistula is finally fully lined, flexible, and permanent. A seasoned navel shows no discharge, no tenderness, and has a relaxed appearance of the skin. The biological construction is officially complete. Your body has successfully built a protective barrier around your jewelry. To maintain this level of health and prevent future irritation, a gentle Saline Piercing Aftercare Spray remains an excellent tool for your ongoing wellness routine.
Normal Healing vs. Warning Signs: How to Read Your Body
As you navigate the belly button piercing healing stages, your body will communicate its progress through a series of physical signals. It's your responsibility to act as a "Wise Guardian" for your skin. This means staying calm enough to allow natural biological processes to unfold while remaining vigilant enough to spot genuine distress. Understanding the difference between a temporary flare-up and a clinical complication is the foundation of a successful recovery. Your piercing is a living, breathing interface between your jewelry and your anatomy. It requires a balanced approach of observation, patience, and swift action when necessary.
The "Normalcy Checklist" includes symptoms that often alarm beginners but are actually signs of a healthy immune response. You should expect clear or pale yellow discharge, known as lymph, which eventually dries into crusties. Localized redness around the entry and exit points is standard during the first few months. Minor itching is also common as new skin cells regenerate within the fistula. Conversely, the "Red Alert Checklist" demands immediate attention. If you experience radiating heat, persistent throbbing pain, thick green discharge with a foul odor, or a systemic fever, your body is signaling a true infection. Always prioritize safety over aesthetics.
A frequent source of anxiety is the appearance of a small protrusion near the piercing site. Most beginners immediately fear they've developed a keloid, but these are actually rare genetic overgrowths of scar tissue. In the vast majority of cases, you are dealing with an irritation bump. These are localized inflammatory responses to friction, moisture, or improper aftercare. Distinguishing between the two allows you to treat the root cause rather than panicking over a permanent scar.
Migration and Rejection: The Silent Threats
Migration occurs when your body slowly pushes the jewelry toward the surface of the skin. You can identify this by a "thinning" of the tissue between the entry points or if the metal bar becomes increasingly visible over time. Heavy, dangling jewelry or frequent snagging on waistbands are the primary culprits. If you suspect your body is rejecting the piercing, follow the "Consult, don't remove" rule. Taking the jewelry out yourself can trap bacteria inside a closing wound. A professional can determine if a jewelry change or a different placement is required to save the piercing.
Irritation vs. Infection: A Comparison
True infections are less common than severe irritation. Sweat, tight clothing, and harsh soaps often mimic the symptoms of an infection by causing significant redness and swelling. To manage these non-infectious flare-ups, you can use a piercing bump treatment oil to soothe the area and reduce localized inflammation. To tell the difference, use the "Line of Redness" test. If the redness stays localized within a few millimeters of the hole, it's likely irritation. If red streaks begin to spread across your abdomen, seek medical intervention immediately. Trust your instincts. Protect your progress. Empower your healing.
The Proactive Aftercare Protocol: Maximizing Success
Transitioning from understanding the biological timeline to executing a daily routine is where many people falter. Success in the belly button piercing healing stages is built on a "less is more" philosophy. Over-cleaning is a common pitfall. It strips away the delicate new cells your body is working so hard to produce. We advocate for a disciplined, minimalist approach using US-made aftercare products. Domestic production ensures strict quality control and ingredient purity. These standards are essential for a wound located in such a high-friction, high-movement area of the body.
The Daily Saline Ritual
Consistency is your greatest ally. We recommend the "mist and pat" method twice daily. Spray a fine mist of sterile saline directly onto the piercing, let it sit for a moment to loosen any debris, and then gently pat the surrounding skin dry with a clean paper towel. Never leave the area damp. A moist navel is a breeding ground for bacteria; this moisture can stall your progress or lead to painful inflammation. Avoid the temptation of homemade salt mixtures. It's nearly impossible to achieve the correct 0.9% sodium chloride concentration at home, and table salt often contains anti-caking agents that irritate the delicate fistula. For precision work, piercing cleaning swabs allow you to remove stubborn crusties without the need to rotate or slide the jewelry.
Protective Habits for the First 6 Months
Your lifestyle must adapt to your anatomy during this period. The "Low-Rise" lifestyle is a necessity, not a choice. High-waisted leggings and tight jeans create a greenhouse effect of heat and pressure that can trigger rejection. Opt for loose, breathable fabrics that respect the piercing's space. Sleeping positions also require adjustment. If you're a stomach sleeper, try using a travel pillow on your abdomen. This creates a protective "nest" that prevents direct pressure on the jewelry while you rest. Finally, manage your activity levels. Sweat contains salts and bacteria that can crystallize around the fistula. Clean the area immediately after every workout to maintain a pristine environment. To support your journey with professional-grade tools, explore our Saline Piercing Aftercare Spray for a reliable, sterile solution.
Transitioning Your Jewelry: When and How to Safely Switch
The most anticipated moment in the belly button piercing healing stages is the first jewelry change. It represents the transition from a clinical necessity to a personal style statement. While you might feel ready at week twelve, the six-month mark is the true biological threshold for safety. We recommend that your first transition be performed by a professional piercer. This ensures the delicate internal lining of the fistula isn't compromised during the swap. A specialist can assess the structural integrity of the tissue, verify the health of the channel, and ensure the new piece is sized correctly for your unique anatomy. Rushing this step often leads to microscopic tears. These tears invite unwanted inflammation and can set your progress back by months.
Inserting new jewelry requires a steady hand and a deep respect for the healing tissue. If you choose to change it yourself later in the journey, never force the jewelry through the channel. Move slowly and with intention. If you feel resistance or see any spotting, stop immediately. Your body is telling you that the internal maturation is not yet complete. A safe transition is a silent one. It should feel effortless and painless. By following this disciplined approach, you protect the long-term viability of your piercing and avoid the risk of sudden rejection.
Choosing Your First 'Fashion' Piece
Not all jewelry is created equal. For your first transition, prioritize stability over style. Heavy "dangle" rings or elaborate charms exert significant downward pressure on the healing channel. This weight can lead to migration or thinning of the skin if introduced before the tissue is fully seasoned. We advise waiting until the twelve-month mark for heavy or ornate pieces. Stick to high-quality materials like surgical steel to maintain dermatological standards. This material is non-porous and resists bacterial buildup. Opt for internal threaded jewelry where the screw is on the ball rather than the bar. This design is significantly gentler on the fistula. It prevents the scraping effect that external threads can have on sensitive internal cells.
The Long-Term Maintenance Mindset
A healed piercing is a lifelong commitment to skin health. Even after the twelve-month maturation phase, your navel remains a unique anatomical pocket. It can trap sweat, dead skin cells, and daily debris. Occasional saline flushes help maintain purity. They prevent minor irritation bumps from returning and keep the skin supple. If you experience sudden redness, persistent itching, or localized tenderness after a jewelry change, it's a signal. Your body might be reacting to the material or the weight of the new piece. It could also mean you've switched too early. Listen to these signals with the perspective of a Wise Guardian. Your patience during these belly button piercing healing stages is the bridge to a lifetime of confident self-expression. You've protected your progress this far. Continue to prioritize the integrity of your skin as you explore new aesthetics; for instance, those seeking to refresh their overall complexion can explore Skin Peel 4000 as part of a total skin wellness strategy. Purity. Integrity. Expression.
Empowering Your Path to Permanent Self-Expression
Navigating the belly button piercing healing stages is a profound test of patience that rewards you with a lifetime of aesthetic confidence. By respecting the twelve month biological timeline and maintaining a disciplined aftercare routine, you ensure the long term stability of your piercing. Remember that your body is an intricate construction site. It requires the right materials, a protective environment, and a hands-off approach to thrive. True beauty is built on the foundation of biological health and dermatological safety.
With over 20 years of body modification expertise, we act as a supportive specialist for your recovery journey. Our US-manufactured aftercare products undergo strict quality control to guarantee the purity and integrity your skin deserves. We provide nurturing, expert-led support to empower every step of your self-expression. Protect your healing journey with our Saline Piercing Aftercare Spray. Your commitment to safety today is the essential foundation for your creative expression tomorrow. Stay patient, stay vigilant, and embrace the transformation toward your most authentic self.
Frequently Asked Questions
How do I know if my belly button piercing is healing or infected?
Healing presents as clear discharge, localized pinkness, and minor itching. Infection signals a biological emergency through radiating heat, throbbing pain, and foul smelling green or brown discharge. If you experience a systemic fever or red streaks spreading from the site, seek medical attention immediately. Stay calm, stay vigilant, and trust your body's signals. Purity. Integrity. Expression.
Is it normal for my belly piercing to still be red after 3 months?
Persistent redness at the three month mark is a standard feature of the belly button piercing healing stages. During the proliferation phase, your body is aggressively rebuilding tissue and establishing blood flow to the new fistula. As long as the area isn't hot or excessively swollen, this pinkish hue is simply a sign of active cellular repair. It indicates that your "biological construction site" is still hard at work.
Can I change my belly button jewelry after only 2 months?
Changing your jewelry after only two months is highly discouraged. Although the surface may look calm, the internal lining is still incredibly fragile and prone to microscopic tearing. We recommend waiting for the six month milestone before your first jewelry swap. Rushing this process can lead to permanent migration, rejection, or severe irritation bumps that compromise your long term results.
What should I do if a bump starts forming on my navel piercing?
Don't panic, but do investigate the root cause of the inflammation immediately. Most bumps are localized irritation responses to friction, moisture, or improper jewelry materials. Switch to loose clothing, ensure your jewelry is high quality surgical steel, and apply a specialized treatment oil to soothe the tissue. Avoid picking or squeezing the bump. This physical trauma only resets the healing clock and invites bacteria.
Is clear or white discharge normal for a 6-month-old piercing?
Clear or white discharge, known as lymph, is perfectly normal even six months into the journey. This fluid is a byproduct of your body's internal maturation process. It signifies that your immune system is still actively reinforcing the walls of the fistula. Simply rinse the area with sterile saline to remove any dried residue without disrupting the delicate new skin cells forming inside.
Can I swim in a pool or the ocean while my belly piercing is healing?
You should avoid swimming in any body of water for at least the first eight weeks of the recovery process. Pools contain harsh chlorine, while oceans and lakes harbor unpredictable bacteria that can easily compromise a fresh wound. If you must swim later in the journey, use a waterproof bandage to seal the site. Clean the piercing immediately afterward with sterile saline to remove any lingering contaminants.
How often should I really be cleaning my piercing in the maturation stage?
Once daily or every other day is sufficient during the maturation stage. Over cleaning at this point can dry out the skin and cause unnecessary sensitivity or cracking. Your goal is to maintain a clean environment without stripping away the natural oils that keep the fistula flexible. Use a gentle saline mist and always pat the area dry with a clean, disposable paper towel.
What happens if I accidentally snag my piercing during the proliferation phase?
Snagging a piercing can cause a temporary setback, but it isn't always a catastrophe. Clean the area immediately with sterile saline to flush out any potential bacteria introduced by the trauma. Watch the site closely for increased swelling or a shift in the jewelry's position. If the piercing begins to look shallow or the skin becomes thin, it may be a sign of migration triggered by the physical stress.


