

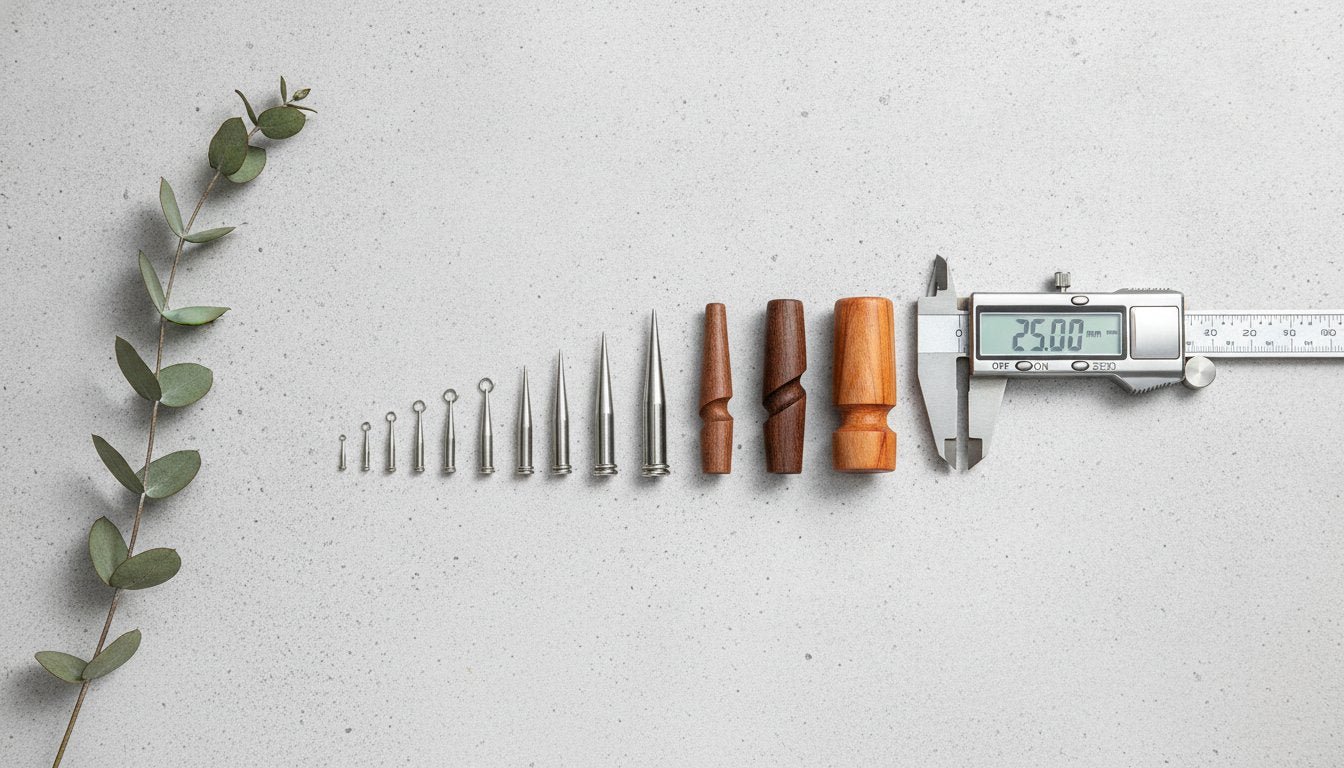
The difference between a flawless stretch and a painful blowout isn't just patience; it's a precise understanding of the math behind your jewelry. You've likely felt that familiar sting of confusion when staring at a chart, wondering why the numbers get smaller as the jewelry gets larger. It's a common frustration to feel caught between the American Wire Gauge system and the clinical accuracy of millimeters. Mastering ear stretching sizes is the essential first step to protecting your biological integrity while achieving your aesthetic goals.
We understand that this journey is as much about safety as it is about self-expression. You deserve a clear path that prioritizes your health, your comfort, and your style. This guide demystifies the sizing scale, provides a safe stretching schedule, and gives you the confidence to select the right kit for your unique anatomy. You'll learn the exact millimeter equivalents for every gauge, the recommended wait times between sizes, and how to maintain the long-term health of your lobes.
Key Takeaways
- Understand the inverse logic of the gauge system and why millimeters are the gold standard for clinical precision.
- Reference our definitive conversion chart to accurately track ear stretching sizes across gauges, millimeters, and inches.
- Master the transition between 0g and 00g by using 9mm half-sizes to bridge the dangerous 2mm gap.
- Select the safest tools for your current stage, from beginner taper kits to advanced dead stretching techniques.
- Identify your personal "Point of No Return" and learn which factors influence your earlobes' ability to shrink back.
Understanding Ear Stretching Sizes: Gauges, Millimeters, and Inches
The sizing system for body modification is often the biggest hurdle for beginners. In the world of ear stretching sizes, the numbers don't follow a standard linear path. Most traditional earlobe piercings are performed at 20g or 18g, which translates to roughly 0.8mm to 1.0mm in diameter. As you begin your journey, you'll notice the numbers decrease as the jewelry gets thicker. This inverse relationship is the foundation of the American Wire Gauge (AWG) system, a standard that has historically dominated the industry but is slowly giving way to more precise metric measurements. Using metric increments allows for a safer, more predictable transition for your skin.
The Origin of the Gauge System
The American Wire Gauge system was originally designed for industrial electrical wiring, not human anatomy. Over time, it was adopted by the jewelry industry to categorize the thickness of wire. In this context, "Gauge" refers specifically to the diameter of the jewelry post that passes through your skin. Most professional piercers recommend starting with a 14g (1.6mm) piece for new lobe piercings because it provides a stable foundation for future growth. Understanding this history helps demystify why a 00g plug is significantly larger than a 12g taper. It is a system built on heritage, safety, and industry standards.
Millimeters vs. Inches: Which Should You Use?
While the gauge system is iconic, modern enthusiasts increasingly rely on millimeters for clinical precision. Millimeters allow for incremental progress that the gauge system cannot always capture, especially as you reach larger milestones. For instance, the jump between 2g and 0g is a full 2mm, a distance that can cause trauma if not managed carefully. Metric measurements provide a clear, mathematical way to track your progress and ensure your skin has time to adapt. This shift toward metric is not just a trend; it's a safety-first approach to body modification.
Once you surpass the 1/2" (12mm) mark, the conversation often shifts toward inches. However, you should remain cautious of "fractional" sizing found in mass-produced jewelry. These approximations often vary by manufacturer, leading to inconsistent ear stretching sizes that can irritate your lobes. Relying on Stretching (body piercing) standards rooted in metric accuracy is the most reliable way to maintain your health. Precision prevents blowouts. Accuracy ensures longevity. Measurement builds confidence. By focusing on millimeters, you eliminate the guesswork that often leads to setbacks.
The Complete Ear Stretching Size Chart and Conversion Guide
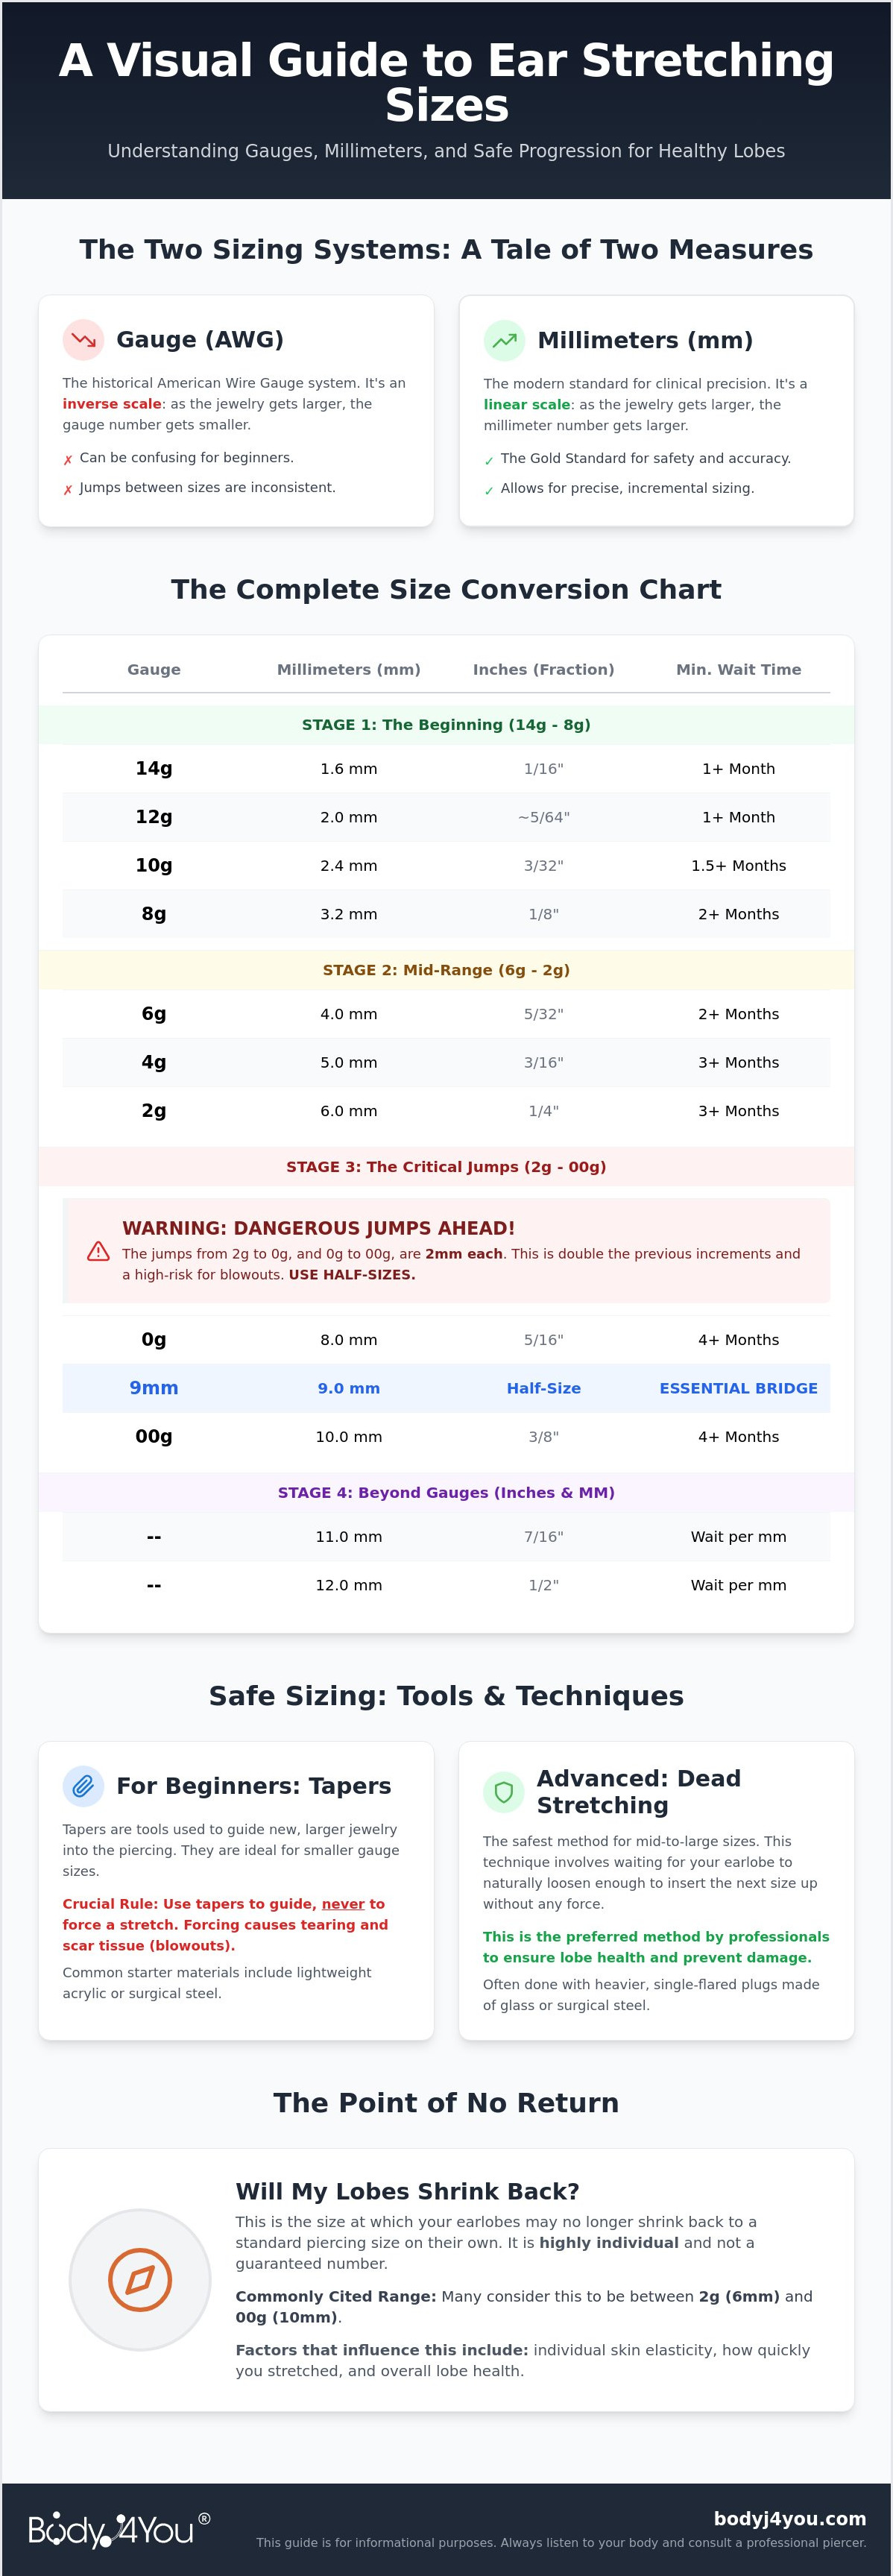
Consistency is the foundation of a successful stretch. To ensure your journey is both safe and aesthetically pleasing, you need a reliable reference for ear stretching sizes. While the gauge system is the traditional standard, the millimeter equivalent is what your skin actually experiences. For a full-screen printable version of these measurements, see our Ear Gauge Size Chart. Tracking these increments prevents the trauma of over-stretching and helps you maintain long-term skin health. It's a process that requires clinical precision, nurturing care, and a deep respect for your body’s limits.
Small Gauge Conversions (14g to 8g)
Starting your journey at 14g (1.6mm) and moving toward 12g (2.0mm) represents a modest 0.4mm increase. At these initial stages, the skin is often more resilient and elastic. Because the jumps are smaller, the standard waiting time between these transitions is typically 4-6 weeks. An Acrylic Ear Stretching Kit provides the lightweight, accessible entry point needed for these early steps. It's about building a routine, honoring your body, and staying patient. Small steps lead to significant results without compromising your tissue's integrity.
Mid-Range Conversions (6g to 2g)
As you move into the 4mm (6g) and 6mm (2g) range, the physical demands on your tissue increase. Many enthusiasts consider 2g the first significant milestone because it's where the jewelry begins to show distinct character. However, larger increments bring higher stakes. Understanding the risks and complications of stretched ears is vital as you reach these mid-range sizes. To support this growth, transitioning to a Surgical Steel Taper and Plug Kit offers the necessary biocompatibility, weight, and stability for healthy lobes.
Notice the pattern in the increments as you progress through the ear stretching sizes chart. While the jump from 14g to 12g is only 0.4mm, the jump from 8g to 6g increases to 0.8mm. This doubling of the stretch distance is why your waiting periods must lengthen as your gauge number decreases. Listen to your body. Wait for the heal. Stretch with intention. If you're ready to begin your first transition, our beginner-friendly stretching kits provide everything you need for a safe and confident start.
The Critical Jumps: Navigating 0g, 00g, and Beyond
The transition from 0g to 00g is the most significant hurdle in the progression of ear stretching sizes. While previous jumps were often 1mm or less, this specific step requires a 2mm increase in diameter. This 25% increase in size is the primary catalyst for blowouts, scarring, and permanent tissue trauma. To protect your aesthetic integrity, you must approach this milestone with clinical precision and extreme patience. Your body requires time to produce new skin cells; rushing this process only leads to setbacks.
Using a 9mm half-size plug is the most effective way to bridge this gap safely. It reduces the stress on the fistula. It maintains skin thickness. It ensures a smoother transition. Most standard kits skip from 8mm (0g) to 10mm (00g), leaving your lobes vulnerable to tearing. By sourcing a 9mm intermediary, you split the 2mm jump into two manageable 1mm steps. This method is the gold standard for enthusiasts who prioritize the long-term health of their piercings over immediate results.
Before attempting any major jump in ear stretching sizes, you must assess your readiness. Perform a gentle "tug" test by pulling your current jewelry downward. If you see a visible gap between the plug and your skin, your lobes have likely gained the necessary elasticity. However, you must also monitor skin thickness. If the bottom of your lobe feels thin or cold to the touch, you should postpone the stretch. Massaging daily with Jojoba oil or Castor oil can help stimulate blood flow and support the production of healthy collagen.
Mastering the 00g Milestone
00g is the most popular goal size because it offers a bold look without being overwhelming. It's the perfect balance of style, visibility, and biology. Interestingly, the logic used in a septum stretching kit applies here too; dense tissue requires incremental, millimeter-based progress. While a 9mm plug and a 10mm plug look nearly identical to the naked eye, your ears feel every fraction of a millimeter. Respecting that difference is what separates a professional result from a painful mistake.
Sizing Beyond 00g
Once you pass the 10mm mark, you enter the era of inches and large-scale millimeters. You'll move toward 7/16" (11mm) and eventually the 1/2" (12mm) milestone. At these dimensions, the weight of your jewelry begins to aid the stretching process naturally. Solid stone plugs or specialized ear weights can provide a gentle, gravity-led stretch that requires very little manual intervention. Crucially, tapers should never be used for sizes larger than 10mm. They create uneven pressure. They risk severe tearing. They are physically too large to be a safe tool for insertion.
Safe Sizing Strategies: Tools and Techniques for Every Stage
Choosing the right method depends on your current tier within the spectrum of ear stretching sizes. For beginners working through the smaller gauges, taper stretching is the most accessible entry point. Using a high-quality Acrylic Ear Stretching Kit or a Surgical Steel Taper and Plug Kit allows for a controlled, guided insertion. However, a common mistake is wearing tapers as jewelry. They are tools. They are temporary. They are unbalanced. Wearing them long-term creates uneven weight distribution that can thin your lobes and compromise your skin's integrity.
As you advance, dead stretching becomes the gold standard for experienced enthusiasts. This involves using single-flare plugs that naturally slide into the fistula once the skin has loosened on its own. For those caught between standard increments, the taping method offers a solution for the larger jumps. By wrapping thin layers of PTFE or bondage tape around your existing plugs, you can achieve micro-stretches that are less than 0.5mm. This gradual approach is incredibly gentle on your tissue. Regardless of the method, the "Wise Guardian" rule remains: if you feel sharp pain or resistance, stop immediately and wait another two to three weeks.
Lubrication: The Secret to Frictionless Sizing
Never attempt a stretch on dry skin. Friction is the enemy of healthy lobes; it causes micro-tears that lead to scarring and permanent damage. Jojoba oil and Castor oil are exceptional choices for increasing skin elasticity and promoting blood flow. For daily maintenance, applying a specialized Gauges balm provides a protective barrier and helps thicken the tissue over time. These natural emollients ensure the jewelry glides into place without causing unnecessary trauma. Lubrication is a necessity, not an option.
Aftercare During Size Changes
Your skin is vulnerable during and after a size change. Using a Saline Piercing Aftercare Spray twice daily keeps the area sterile and helps flush out debris. If you notice localized swelling or redness, you might be developing a piercing bump. Early intervention with a specialized treatment oil can prevent these bumps from becoming permanent scars. Daily hygiene is just as important; clean your lobes and jewelry with warm water to prevent the buildup of sebum, often called "ear cheese."
Proper tools make the difference between a successful journey and a painful setback. If you're ready to move to the next level of ear stretching sizes, you can shop our professional-grade stretching kits and aftercare solutions to ensure your lobes stay healthy and strong.
Sustaining Your Size: Maintenance and the Point of No Return
Reaching your goal is a moment of quiet pride. Whether you've settled at a subtle 2g or pushed toward the bold 00g, the health of your lobes remains a lifelong commitment. Sustaining these ear stretching sizes requires more than just wearing jewelry; it requires a deep understanding of your body's biological limits. Your skin is a living, breathing organ that responds to the environment, your health, and the quality of the materials you choose for daily wear. Professional maintenance ensures your self-expression remains a source of confidence rather than a medical concern.
The "Point of No Return" is a frequent topic of debate within the community. It refers to the specific diameter at which the fistula can no longer shrink back to a standard piercing size. While individual anatomy varies, 10mm is the generally accepted limit for permanent modification. If you intend for your ears to close in the future, most specialists recommend staying below 2g (6mm). Beyond this threshold, the structural integrity of the lobe is permanently altered. Respecting these boundaries allows you to enjoy your aesthetic journey with full awareness of the long-term outcomes.
The Science of Earlobe Shrinkage
Your skin's ability to bounce back depends on two vital proteins: collagen and elastin. Collagen provides the structure. Elastin provides the snap. When you stretch too quickly, you risk tearing these fibers and creating scar tissue. Blowouts are particularly damaging because scar tissue is rigid and lacks the elasticity of healthy skin. This tough tissue acts as a physical barrier that prevents the ear from shrinking back even if the jewelry is removed. 10mm is the generally accepted "no return" limit for most individuals. To maintain healthy tissue, you must prioritize patience and proper lubrication at every stage.
Choosing Your Final Jewelry Style
Once your lobes are fully healed, you can explore a curated collection of styles. Plugs offer a solid, statement-making look, while tunnels provide a window through the lobe that highlights the precision of your stretch. Hangers and weights add a touch of artistic flair but should only be worn for short durations to prevent thinning. To ensure a perfect fit, use a digital caliper to measure your jewelry regularly. Inconsistent ear stretching sizes from different manufacturers can cause irritation if they vary by even a fraction of a millimeter. Ready to start your journey? Explore our Acrylic Ear Stretching Kits today to begin with safety and style.
For long-term wear, Surgical Steel and Titanium are the gold standards. These materials are non-porous. They are biocompatible. They are easy to sanitize. Avoid wearing porous materials like wood or bone in unhealed ears, as they can trap bacteria and cause infections. Every night, spend a few minutes with "naked" lobes. Removing your jewelry allows for maximum blood flow, which nourishes the skin and maintains the thickness of your fistula. Cleanse. Massage. Restore. This simple ritual is the hallmark of a responsible enthusiast who cares for the long-term well-being of their community.
Master Your Transformation with Clinical Precision
Success in body modification is found at the intersection of patience and precision. You now understand the mathematical logic of ear stretching sizes, the critical safety of 9mm half-sizes, and the biological necessity of daily aftercare. By prioritizing the health of your tissue over the speed of your progress, you protect your body’s long-term integrity while achieving your aesthetic goals. Rushing the process only leads to setbacks; honoring the timeline leads to excellence.
BodyJ4You has acted as a supportive specialist for the community since 2001. With over two decades of industry expertise, we provide the specialized tools required for a seamless transition. Our kits are trusted by professional piercers and beginners alike for their reliability, safety, and quality. We pair these high-grade materials with USA-manufactured aftercare solutions to ensure every stretch is a step toward your most authentic self. We believe in purity, ethics, and the power of self-expression.
Start your journey with a BodyJ4You Ear Stretching Kit today. Your journey is a rhythmic process of growth, care, and discovery.
Frequently Asked Questions
What is the smallest ear stretching size to start with?
Most standard earlobe piercings are performed at 20g (0.8mm) or 18g (1.0mm). Your first step into the world of ear stretching sizes should typically be a 16g (1.2mm) or 14g (1.6mm) piece of jewelry. Starting with these small, manageable increments ensures that your initial transition is gentle on your tissue and sets a healthy foundation for future growth.
How long should I wait between ear stretching sizes?
Patience is the cornerstone of healthy modification. For smaller gauges, you should wait a minimum of 4 to 6 weeks before moving to the next size. Once you reach 0g and larger, the recommended wait time increases to 8 to 12 weeks; for sizes exceeding one inch, you should allow 3 to 6 months for the tissue to fully stabilize and produce new skin cells.
Is 0g to 00g a big jump for my ears?
Yes, the transition from 0g to 00g is a significant 2mm jump, moving from 8mm to 10mm in diameter. This represents a 25% increase in size, which is the most common catalyst for blowouts and permanent scarring. We strongly recommend using a 9mm half-size plug to bridge this gap safely and protect the biological integrity of your lobes.
What size is the "point of no return" for ear stretching?
The "point of no return" is generally considered to be between 0g (8mm) and 00g (10mm). If you wish to ensure your piercings can shrink back to a standard size, it's best to stay under 2g (6mm). Individual anatomy, skin elasticity, and the speed at which you stretched all influence how effectively your lobes will close if you decide to remove your jewelry.
Can I skip sizes if my ears feel loose?
You should never skip sizes, regardless of how loose your ears may feel. Skipping increments creates uneven tension that leads to micro-tears, infections, and thinning of the lobe wall. Even if your current jewelry feels effortless, your tissue needs time to densify and strengthen before it can safely support the next level of the ear stretching sizes scale.
Why are gauge numbers smaller for larger ear sizes?
The gauge system follows an inverse scale rooted in the American Wire Gauge (AWG) standards. Historically, these numbers represented the number of times a wire was pulled through a sizing die; more pulls resulted in a thinner wire and a higher number. This is why a 14g plug is significantly smaller than a 2g plug. After 00g, the industry transitions to millimeters for greater clinical precision.
What should I do if my ear bleeds during a size up?
Bleeding is a clear signal of tissue trauma. If you see blood, you must immediately remove the jewelry and downsize to your previous comfortable size. Clean the area twice daily with Saline Piercing Aftercare Spray to prevent infection and allow the lobe to heal completely before attempting to stretch again. Never force jewelry into a bleeding or painful piercing.
Which material is best for stretching: Acrylic or Surgical Steel?
Surgical Steel is the superior choice for active stretching because it's non-porous and can be fully sterilized. Our Surgical Steel Taper and Plug Kit provides the necessary weight and biocompatibility for a safe transition. While an Acrylic Ear Stretching Kit is a popular and lightweight entry point for beginners, acrylic should only be worn in fully healed piercings to avoid irritation from the material's porous surface.


