Ear stretching is not a test of physical endurance; it is a delicate biological process of skin cell regeneration. Learning how to stretch ears requires a blend of clinical precision and patient care to avoid the common pitfalls of blowouts or thinning tissue. You likely want a curated, aesthetic look but fear the horror stories of painful tearing and permanent damage. It's natural to feel overwhelmed by gauge sizes or the persistent itch of healing lobes. You deserve a journey that is safe, steady, and entirely pain-free.
We believe your self-expression shouldn't come at the cost of your physical health. This guide provides the professional techniques needed to master your stretching journey with confidence and ease. We'll explore the essential materials for success, including surgical steel kits and nourishing jojoba oil, while establishing a clear timeline for your progress. You will learn to cultivate symmetrical, thick, and resilient earlobes that reflect a commitment to both personal style and biological integrity.
Key Takeaways
- Respect the biological "rest and repair" cycle of your skin to ensure your journey results in thick, symmetrical, and resilient earlobes.
- Discover how to stretch ears using professional-grade tools, such as surgical steel taper kits, that prioritize clinical precision and material safety.
- Master preparation techniques like the "hot shower" method and the application of jojoba oil to maximize skin elasticity and minimize physical stress.
- Implement a disciplined aftercare ritual featuring saline piercing sprays and the LITHA phase to protect your lobes from irritation and external contaminants.
- Learn to identify early warning signs like blowouts and thinning, and why prioritizing tissue integrity over size is the key to sustainable self-expression.
The Foundation of Safe Ear Stretching: What to Expect
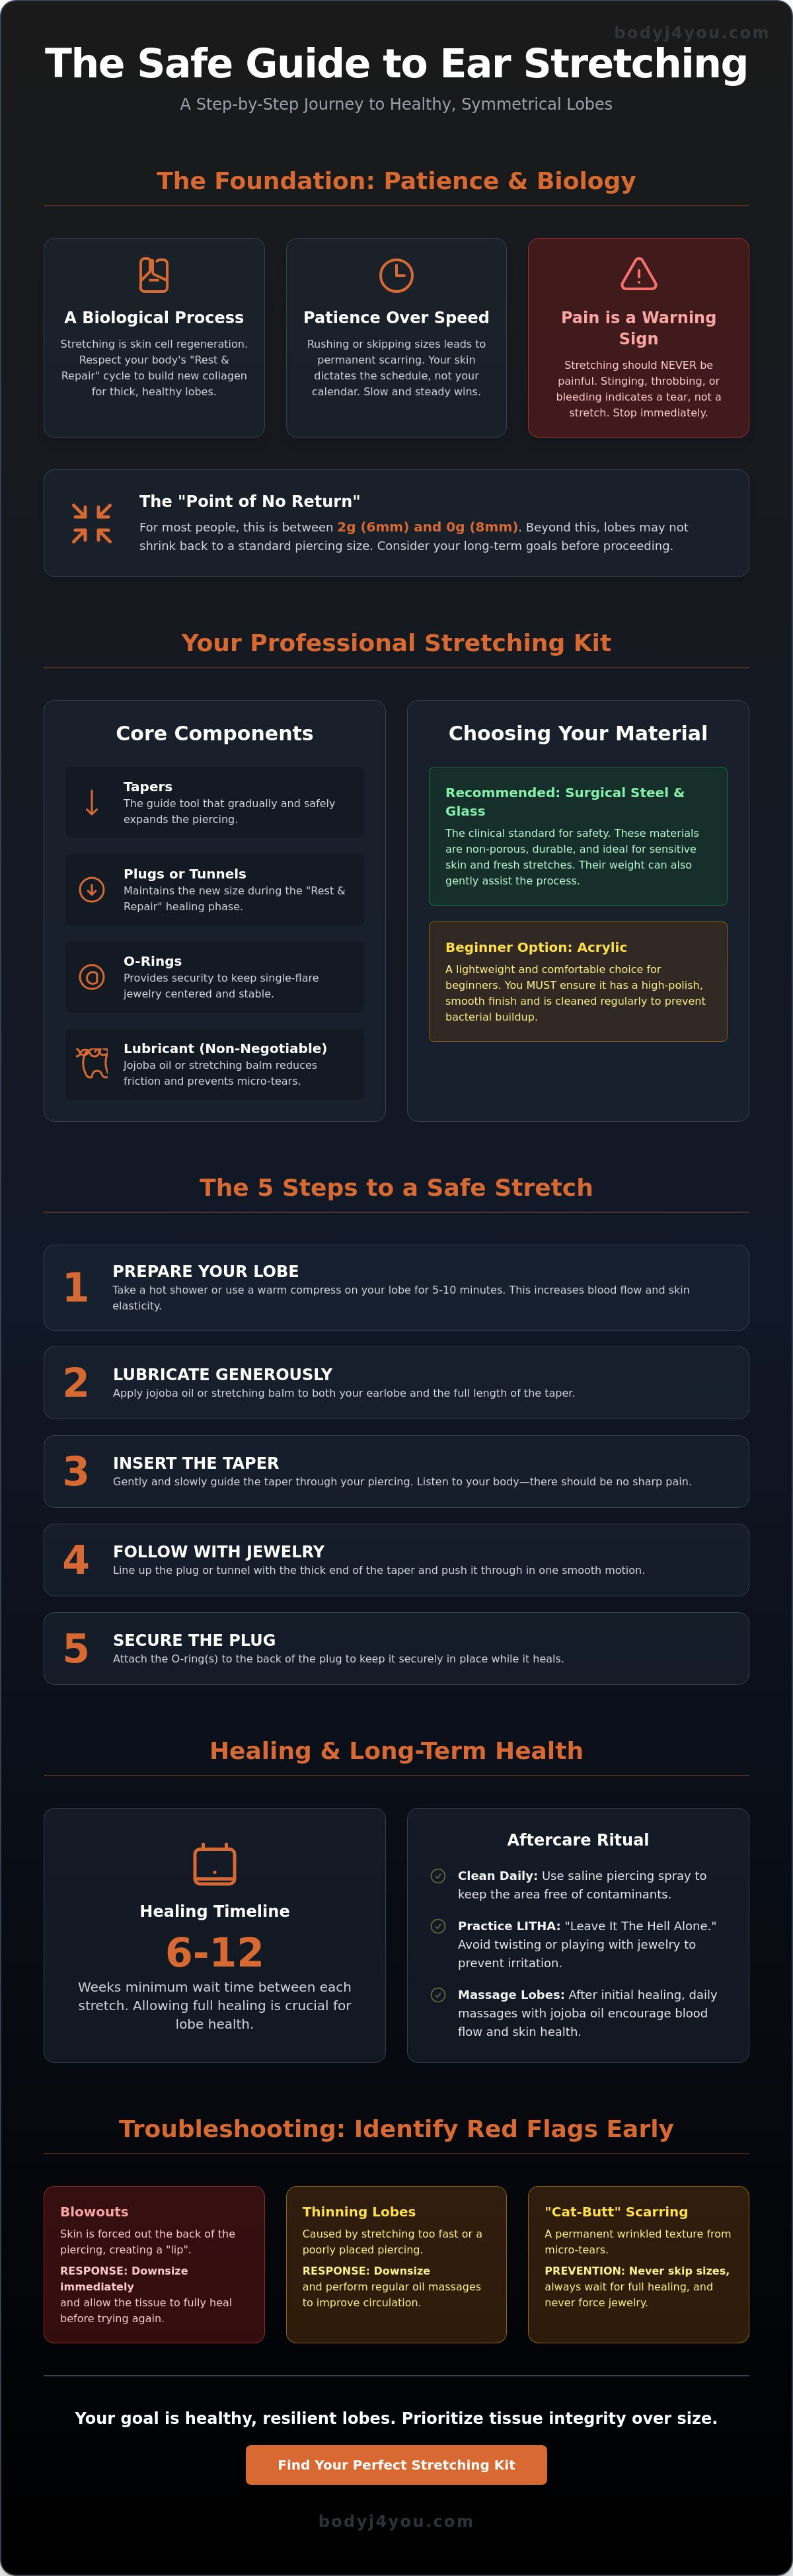
Ear stretching is the intentional, controlled expansion of a fully healed piercing. It is a biological transformation, not a mechanical tug-of-war. When you learn how to stretch ears, you are essentially guiding your body through a cycle of microscopic cell generation. This "rest and repair" phase allows the skin to create new collagen, maintaining the thickness and elasticity of the lobe. By respecting this biological rhythm, you ensure your aesthetic journey remains a healthy one.
The 2026 safety standard is absolute: stretching should never be painful. Modern techniques prioritize tissue integrity over rapid results. If you experience stinging, throbbing, or bleeding, your body is signaling a tear rather than a stretch. You should also consider your long-term goals before crossing the "Point of No Return." For most individuals, this threshold sits between 2g (6mm) and 0g (8mm). Beyond this size, the earlobe may lose its ability to shrink back to a standard piercing size if you ever choose to retire your jewelry.
A look at the history and methods of ear stretching reveals that this practice has always relied on gradual progression. It is a commitment to your future self.
Anatomy and Lobe Health
A successful stretch begins with a centered, professional initial piercing. If your original hole is too low or off-center, you risk creating "thin spots" as the jewelry grows larger. These areas of compromised tissue can lead to poor blood flow and, eventually, necrosis. Before you begin, palpate your lobes to feel for uniform thickness. Healthy blood flow is the lifeblood of your stretch. Regular massages with high-quality oils encourage circulation, ensuring your skin remains supple and capable of supporting heavier gauges.
The Golden Rule: Patience Over Speed
Speed is the enemy of aesthetics. Skipping sizes or forcing jewelry into a tight hole creates permanent scarring, often referred to as "cat-butt" texture due to the wrinkled, uneven appearance of the fistula. To maintain a smooth, professional look, you must adhere to a strict timeline. The standard wait time is 6 to 12 weeks between small increments. Using a dedicated ear gauge size chart is the best way to track your progress and ensure you aren't rushing the process. Your skin dictates the schedule, not your calendar.
Essential Tools: Choosing Your First Stretching Kit
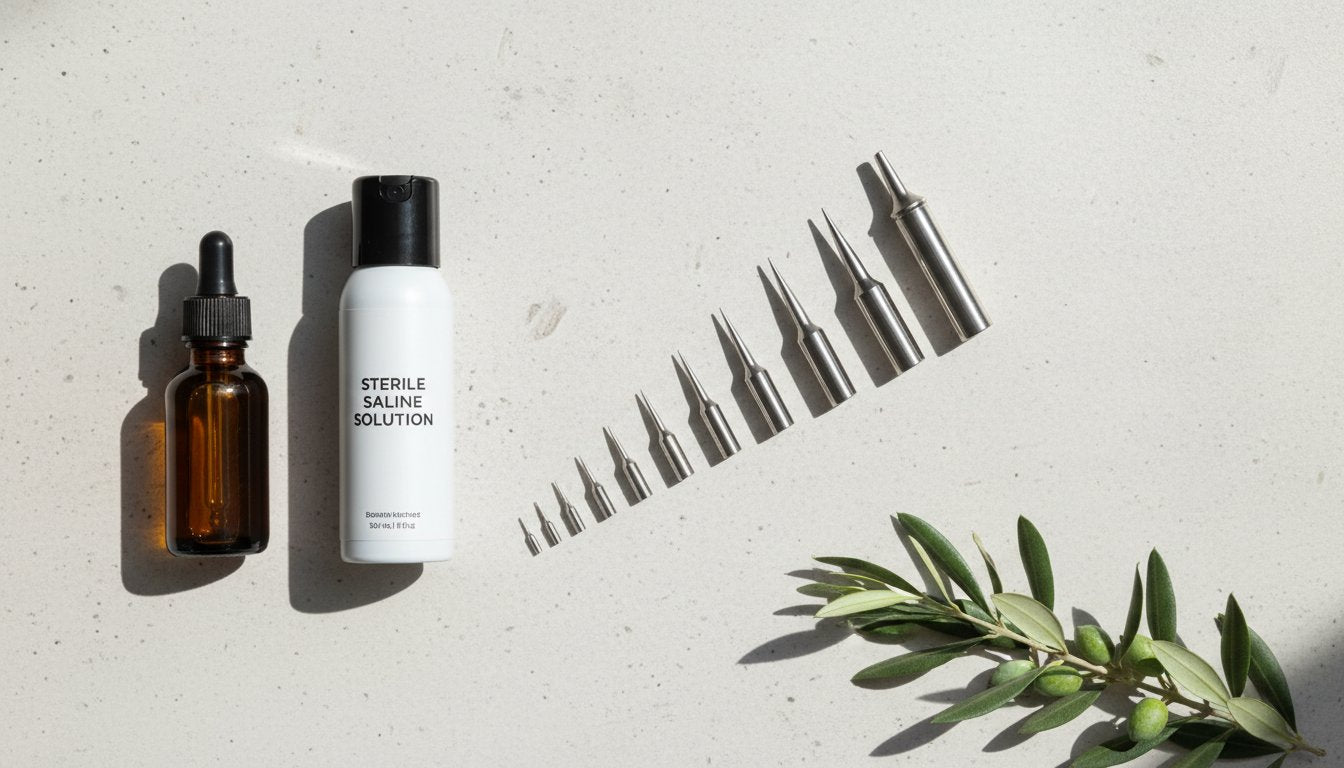
Precision tools ensure predictable results. Your stretching kit is the bridge between your current size and your aesthetic goals. A professional kit consists of three essential components: tapers, plugs, and O-rings. Tapers act as the guide, gradually expanding the fistula with clinical accuracy. Plugs serve as the structural support that maintains the new diameter while the skin heals. O-rings provide the security needed to keep your jewelry centered and stable. When you research how to stretch ears, you'll find that skipping any of these components invites unnecessary risk.
Friction is the enemy of healing. You should never attempt to stretch your skin while it's dry. Using a high-quality lubricant, such as jojoba oil or a dedicated gauges balm, is non-negotiable. These substances reduce surface tension and prevent the microscopic tears that lead to permanent scarring. Avoid the temptation of using "found objects" or household items. These materials are often porous, carry bacteria, and lack the precise millimetric increments required for safety. Safe. Steady. Symmetrical. This is the only philosophy that guarantees a successful outcome.
Acrylic Ear Stretching Kits for Beginners
An Acrylic Ear Stretching Kit offers a lightweight, accessible entry point for those beginning their journey. These kits are valued for their comfort and the variety of styles they provide. However, material integrity is paramount. You must ensure your acrylic jewelry features a high-polish, smooth finish to prevent bacterial trap-points. Because acrylic is lightweight, it's an excellent choice for those who find heavier materials distracting during the initial phases of a stretch. Regular irrigation with saline piercing aftercare spray ensures these pieces remain clean and body-safe.
Surgical Steel and Glass Options
For individuals with heightened skin sensitivities, a Surgical Steel Taper and Plug Kit provides the clinical standard of safety. These materials are non-porous and incredibly durable, making them ideal for the "fresh" stretch phase where the skin is most vulnerable. The inherent weight of steel jewelry also assists in the natural stretching process. This gentle, constant downward force helps the skin adapt more readily to the next size without the need for aggressive tapering. Understanding the risks and complications of stretched ears highlights why choosing medical-grade materials is a vital protective measure for your long-term health.
Step-by-Step: The Safest Methods to Size Up
Mastering how to stretch ears is a ritual of patience. It begins long before you touch your jewelry. Success relies on three foundational pillars: preparation, lubrication, and observation. By following a disciplined sequence, you minimize the risk of trauma and ensure a symmetrical result. Prepare. Lubricate. Insert. This rhythmic approach transforms a mechanical task into a wellness-oriented practice that respects your body's limits.
Heat is your primary ally in increasing skin elasticity. Spend ten to fifteen minutes in a hot shower to encourage blood flow and soften the tissue. This makes the lobe significantly more pliable. Once the skin is warm, apply a generous amount of Jojoba oil or Gauges balm to both the earlobe and the jewelry. Lubrication isn't optional. It reduces surface tension and prevents microscopic friction tears that lead to permanent scarring. A well-lubricated stretch should feel like a gentle slide, not a forced entry.
During insertion, adopt the "stop if it stings" philosophy. Pain is never a requirement for progress. If you feel resistance or a sharp sting, your body is telling you the tissue hasn't fully remodeled. Back off. Wait another week. Your ego might want the next size, but your skin dictates the timeline. Once the jewelry is seated, secure it with O-rings, but avoid over-tightening them against the lobe. Your skin needs air circulation to maintain a healthy environment for the healing fistula.
The Taper Method
Tapers are often misunderstood. In a professional context, a taper is a bridge, not a permanent accessory. You should never wear tapers as jewelry, as their uneven weight distribution can cause thinning or slanted holes. Match your taper size perfectly to your new plug before you begin. The transition from taper to plug should be a single, seamless movement. By adhering to professional ear stretching standards, you ensure the taper acts as a guide rather than a wedge that forces the skin beyond its capacity.
The Dead Stretching Method
As you reach larger sizes, your ears may begin to stretch naturally under the weight of your jewelry. This is known as dead stretching. Gravity and time do the heavy lifting here. It's best achieved using single-flare glass or surgical steel plugs, which provide a consistent, gentle downward force. You'll know you're ready for a dead stretch when your current jewelry feels loose or a visible gap appears when you gently pull on the lobe. If the next size doesn't slide in with zero resistance, you aren't ready to size up.
Healing and Maintenance: The Secret to Thick, Healthy Lobes
Healing is an active choice. While the initial insertion is the most visible step in learning how to stretch ears, the subsequent recovery phase determines the long-term viability of your lobes. We advocate for the "Leave It Alone" (LITHA) protocol for the first 48 hours. This period of stillness allows the delicate internal lining of the fistula to stabilize without the trauma of constant rotation or adjustment. Once this window closes, daily irrigation with a saline solution becomes your primary defense against external contaminants and irritation. Purity. Patience. Precision.
The 2026 standard for lobe health emphasizes thickness as the ultimate indicator of success. Thinning is not an inevitable part of the journey; it is usually the result of poor circulation or rushing. Once your stretch is no longer tender, typically after seven to ten days, you should begin a regimen of daily massages. This practice encourages blood flow to the area, providing the nutrients necessary for skin cell regeneration. As you reach larger gauges, you may eventually transition to sleeping without jewelry to allow the tissue to breathe and rest. This prevents the jewelry from putting constant pressure on the same spots, which can lead to localized thinning.
The Power of Natural Oils
Nourishing your skin requires ingredients that mimic your body's natural chemistry. Jojoba oil is our primary recommendation because its molecular structure is the closest match to human sebum. This allows for deep, non-greasy hydration that keeps the skin supple. For those focusing on tissue repair, a blend of Vitamin E and Rosehip oil can help reduce the appearance of minor scar tissue and promote a smooth, healthy texture. A five-minute daily oil massage is a protective ritual. It softens the skin, breaks down micro-scarring, and ensures your lobes remain resilient enough for future stretches.
Managing the "Ear Cheese" (Odors)
Stretched ears naturally accumulate a buildup of sebum and dead skin cells, often colloquially known as "ear cheese." This is a normal biological occurrence, but it can lead to noticeable odors if not managed properly. To maintain a clean environment, remove your jewelry during your daily shower to wash both the lobe and the jewelry thoroughly. Using a sterile saline spray for piercings helps maintain a neutral pH balance, preventing the overgrowth of bacteria that contributes to odor. To keep your lobes in peak condition, we recommend using our Saline Piercing Aftercare Spray as part of your daily hygiene routine.
Troubleshooting: Blowouts, Tears, and Thinning
Biological limits are absolute. When you push beyond what the tissue can accommodate, the body reacts with protective measures that can compromise your aesthetic goals. A blowout is the most distressing setback. It manifests as a "lip" of skin, a protrusion of the internal fistula pushed through the back or front of the ear. This occurs when jewelry is forced too quickly, tearing the internal tissue rather than expanding it. Mastering how to stretch ears means recognizing this sign immediately. Do not ignore it. Do not attempt to wait it out with the current jewelry.
Ego is the enemy of healing. The "Downsize Immediately" rule is the only way to preserve the integrity of your lobes. If you experience bleeding, persistent throbbing, or the appearance of a blowout, you must accept that the stretch was unsuccessful. It's far better to lose a few millimeters of progress than to face permanent disfigurement or the need for surgical correction. If you notice signs of infection, such as extreme heat, green discharge, or red streaks, consult a medical professional or a senior piercer immediately. Safety. Integrity. Resilience.
The Emergency Downsize Protocol
A structured response minimizes long-term damage. If your ear is compromised, follow these steps with clinical care. First, remove the jewelry and irrigate the area with a saline piercing aftercare spray to remove debris and bacteria. Second, leave the jewelry out entirely for at least one to two weeks. This allows the swelling to recede and the tissue to settle back into its natural position. If you notice localized irritation or a raised, fluid-filled pocket, you might be dealing with a how to get rid of a piercing bump rather than a structural blowout. Bumps often respond to pressure relief and saline, whereas blowouts require a total reduction in size.
Restoring Lobe Integrity
Thinning lobes are a consequence of restricted blood flow or excessive pressure over time. To thicken lobes that have become dangerously thin, you must prioritize tissue health over gauge size. The "Naked Training" technique is essential for long-term comfort. By leaving your jewelry out for several hours a day or overnight, you allow the skin to contract and blood flow to return to its peak. Combine this with daily massages using Jojoba or Rosehip oil to encourage skin cell regeneration. Stretching is a marathon, not a sprint. It's a journey defined by self-expression, biological respect, and disciplined patience.
Embrace Your Aesthetic Evolution with Confidence
Your journey toward self-expression is a sophisticated balance of beauty and biology. True success is found in the details: patient timelines, material purity, and disciplined aftercare. By respecting your body’s natural limits, you've mastered the foundational principles of how to stretch ears without compromising your long-term health. Remember that your lobes are a living canvas. They require a steady hand, a patient mind, and the highest quality materials to thrive throughout the years.
We support your transformation with 20+ years of industry expertise and a commitment to your well-being. Our collection features high-quality 316L surgical steel options and dermatologically safe American-made aftercare designed to protect your skin at every stage. Begin your journey with a professional Acrylic Ear Stretching Kit from BodyJ4You and experience the stability that comes from specialist care. You’re not just changing your look; you’re mastering a craft with modern, clinical precision. Stay patient, stay informed, and enjoy the empowering path of personal growth.
Frequently Asked Questions
Does ear stretching hurt?
Safe ear stretching should never result in sharp pain, stinging, or bleeding. While you may feel a sensation of pressure or warmth during the process, actual pain is a signal that you are forcing the tissue too quickly. If you encounter significant resistance, stop immediately and allow your skin more time to remodel. Your journey should be characterized by patience, precision, and comfort.
How long should I wait between ear stretches?
You should wait a minimum of 6 to 12 weeks between each size increment. This duration allows the skin to complete its biological "rest and repair" cycle, generating the new cells required for a healthy expansion. Rushing this timeline often leads to permanent scarring and thinning. By adhering to this disciplined schedule, you ensure your lobes remain thick, resilient, and capable of future growth.
What is a blowout and how do I fix it?
A blowout is a protrusion of the internal fistula caused by forcing jewelry through a hole that isn't ready. To fix it, you must downsize your jewelry by at least two sizes immediately to relieve pressure. This reduction allows the displaced tissue to settle back into its natural position. Clean the area daily with saline and avoid all stretching until the lobe has fully stabilized and recovered.
Can I stretch my ears with tapers?
Tapers are effective tools when used as a guide for inserting new jewelry, but they should never be worn as permanent pieces. Their uneven weight distribution puts unnecessary stress on the healing fistula, which can cause slanted holes or localized thinning. When learning how to stretch ears, use the taper to facilitate a seamless transition to a plug, then remove it immediately to maintain lobe integrity.
Will my ears ever go back to normal if I stop stretching?
Most earlobes will shrink back toward a standard size if you stay below the "Point of No Return," typically considered 2g to 0g. Beyond this threshold, the skin may lose the elasticity required to fully contract. Individual anatomy and the health of your tissue also play significant roles. Maintaining lobe thickness through regular massages increases the likelihood of successful shrinkage if you ever choose to retire your jewelry.
What is the best jewelry material for stretching?
Non-porous materials such as 316L surgical steel and glass are the gold standard for active stretching. These materials don't harbor bacteria and provide a smooth surface that won't adhere to healing skin. While high-quality acrylic is a popular lightweight choice for healed piercings, surgical steel offers the clinical precision and durability required for a safe, irritation-free transition. Choose materials that prioritize your long-term dermatological health.
How do I know if my ear is ready for the next size?
Your ear is ready for the next size when your current jewelry feels loose and rotates easily without any discomfort. You may notice a small visible gap between the plug and your skin when you gently palpate the lobe. If there is any lingering tenderness, redness, or crusting, your body is still in the repair phase. Wait for total stability before you attempt to size up.
How do I clean my stretched ears and jewelry?
Clean your lobes daily using a saline piercing aftercare spray to remove sebum and dead skin cells. During your shower, remove your jewelry to wash both the lobe and the piece with a mild, fragrance-free cleanser. This prevents the accumulation of bacteria and the development of odors. Always dry the area thoroughly before reinserting your jewelry to maintain a balanced, healthy environment. Safe. Steady. Symmetrical.


