What if your dedicated scrubbing is actually the very thing preventing your new piercing from healing? Most of us are taught that "clean" means "scrubbed," but when it comes to delicate tissue, that friction often leads to painful bumps and unnecessary irritation. You want your curated aesthetic to feel effortless, yet the reality of "crusties" and the fear of infection can feel overwhelming. Mastering a proper piercing cleaning routine is about choosing irrigation over agitation. It's a shift from harsh DIY recipes to clinical standards that respect your body's natural biology.
You deserve a healing process that is safe, gentle, and predictable. We understand that your body modification is a vital part of your personal identity. This guide will help you master the clinical standards of piercing cleaning to ensure a fast, irritation-free healing journey for any modification. We'll examine the latest 2026 safety protocols, the benefits of sterile saline irrigation, and the simple daily habits that protect your health, preserve your jewelry, and elevate your style.
Key Takeaways
- Understand the biology of the fistula to protect your delicate skin tunnel from trauma, bacteria, and irritation.
- Build a professional toolkit using the Rule of Three: Saline, Swabs, and Patience to master your piercing cleaning routine.
- Adopt the "Irrigate, Soften, Dry" rhythm to remove debris safely without the risks of cross-contamination or physical agitation.
- Learn why "crusties" are a sign of healthy progress and how to manage them without violating the essential LITHA rule.
- Rely on US-manufactured aftercare products to ensure high-end quality, ingredient purity, and clinical-grade safety for your body art.
The Biology of Healing: Why Piercing Cleaning is Critical
A piercing isn't just a hole. It's a wound that your body is desperately trying to seal. To understand the biology of healing, you must view your new modification as a biological construction site. Your body's primary objective is to create a secure, epithelialized tunnel. This process requires a delicate balance of hygiene and patience. Consistent piercing cleaning acts as the stabilizing force that prevents bacteria from hijacking this natural repair work.
We approach aftercare through the lens of a Wise Guardian. Our goal is to protect the wound, stabilize the environment, and empower your body to heal. This philosophy shifts the focus from aggressive scrubbing to supportive irrigation. During the initial cleaning phase, your tissue is raw and highly reactive. Once the internal skin is fully formed, you enter the maturation phase. Here, the focus moves from preventing infection to ensuring long-term tissue flexibility and jewelry comfort.
The Fistula: Your Piercing’s Internal Shield
Skin cells are remarkable architects. When a needle passes through the tissue, cells at the surface edges begin to migrate inward. They slowly build a tube-like structure called a fistula. This microscopic new tissue is incredibly fragile and easily disrupted. You might feel the urge to rotate your jewelry to keep it from sticking, but this is a common mistake. Rotating the jewelry tears the developing skin cells, resets the healing clock, and introduces surface bacteria directly into the wound. The fistula is the biological foundation of a successful piercing.
Lymph vs. Pus: Identifying Normal Healing
Confusion often leads to unnecessary anxiety for many enthusiasts. During the first few weeks, you will likely notice a clear or pale yellow fluid. This is lymph. It's a healthy byproduct of cellular repair that often dries into what the community calls "crusties." Pus is fundamentally different. It is typically thicker, opaque, and may appear white, green, or gray. Pus is often accompanied by a foul odor and indicates that the body is fighting an active infection. Effective piercing cleaning removes excess lymph before it can trap harmful bacteria against the healing wound.
When to See a Professional:
- Sudden, throbbing pain that increases over several days.
- Intense heat radiating from the piercing site.
- Dark red or purple streaks extending away from the hole.
- Persistent, extreme swelling that causes the jewelry to press into the skin.
If you observe these symptoms, don't wait. Contact your piercer or a healthcare professional to ensure your safety and the integrity of your modification.
The Professional Piercing Cleaning Toolkit
Precision is the hallmark of professional care. To achieve clinical results at home, you must move beyond bathroom cabinet improvisations and adopt a specialized approach. The piercing cleaning process relies on what we call the Rule of Three: Saline, Swabs, and Patience. These three elements work in harmony to protect the developing fistula while removing the biological debris that can lead to irritation or infection. Without the right tools, even the most diligent routine can inadvertently cause trauma to the healing site.
Many enthusiasts fall for the "DIY Salt Water" myth, believing that a homemade mix of table salt and tap water is sufficient. This is a dangerous oversimplification. Concentration matters deeply for cellular health. A solution that is too salty will dehydrate and kill the very skin cells trying to heal your piercing. Conversely, a solution that is too weak won't provide the necessary osmotic pressure to cleanse the wound. This is why 0.9% Sodium Chloride is the biological gold standard. It perfectly mimics the salinity of your own blood and tears, providing a soothing, isotonic environment that supports rather than stresses your body.
Sterile Saline: The Science of 0.9% Sodium Chloride
Isotonic solutions are designed to match your body's natural chemistry. When you use a pressurized, sterile spray, you aren't just washing the surface; you're performing a controlled irrigation. You can read more about the molecular benefits in our guide to sterile saline spray for piercings. It's vital to avoid additives like alcohol, hydrogen peroxide, or tea tree oil during the initial healing phase. These substances are cytotoxic, meaning they destroy healthy cells along with the bad ones, often leading to chemical burns or prolonged redness.
Precision Tools: Swabs vs. Gauze
Choosing the right applicator is just as important as the solution itself. Non-woven gauze is excellent for broad irrigation or soaking a large area, such as an industrial piercing. However, for the intricate folds of an ear or the tight space of a nostril, you need precision. Pointed Piercing Cleaning Swabs allow you to reach stubborn debris without moving the jewelry or putting pressure on the wound. Always use disposable, single-use applicators. Reusing a swab or using a cloth towel introduces cross-contamination risks that can compromise months of progress. A Professional Piercing Cleaning Toolkit should always prioritize sterility to ensure the most predictable healing journey possible.
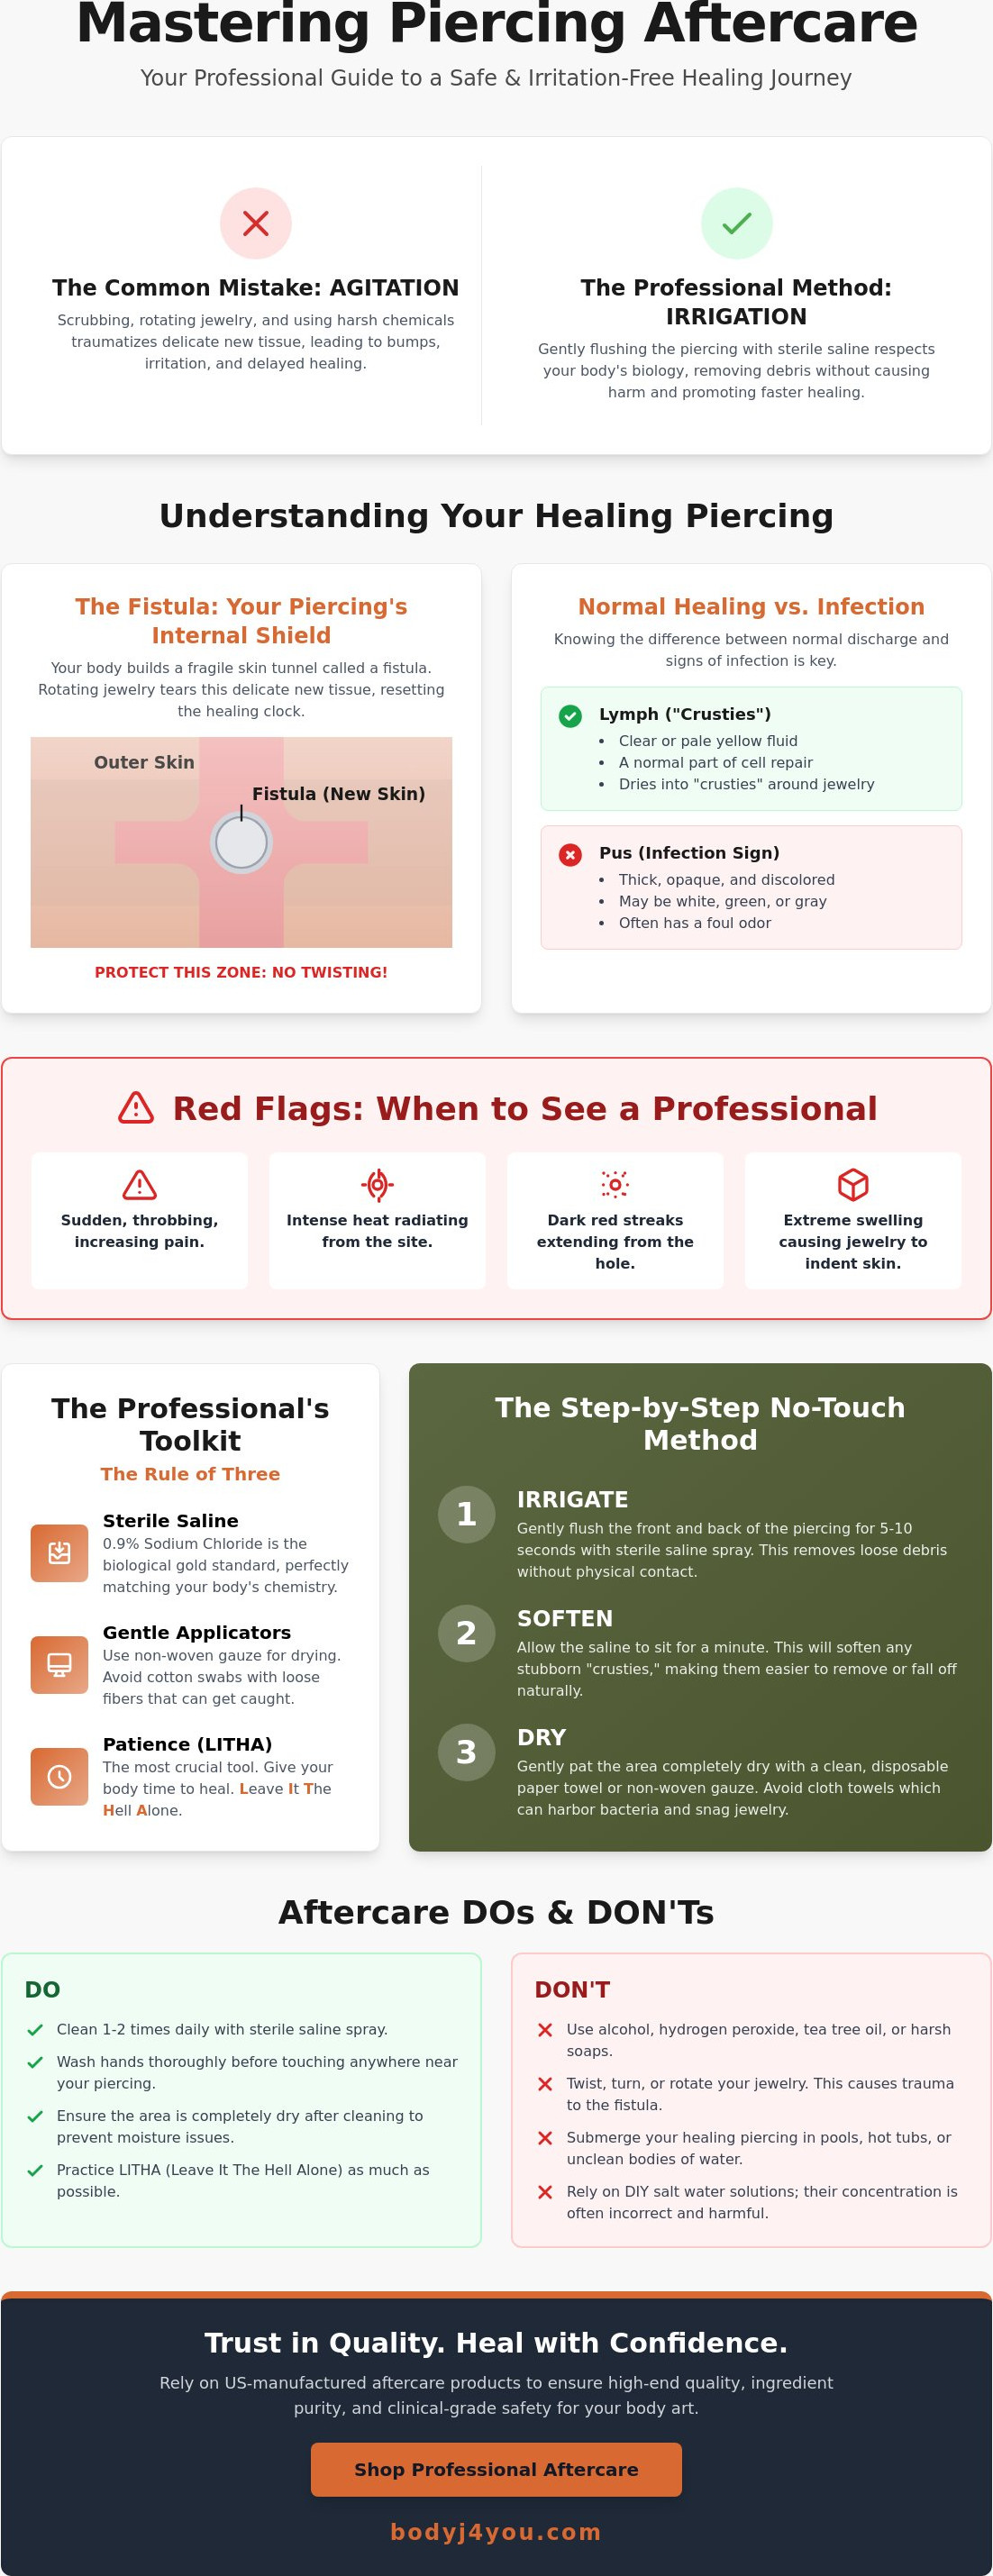
The Step-by-Step No-Touch Irrigation Method
Success in healing isn't about how hard you scrub. It's about how little you interfere. The "No-Touch" rule is the cornerstone of modern aftercare. By avoiding physical contact, you eliminate the risk of introducing external pathogens into the open wound. We recommend a rhythmic approach: Irrigate, Soften, Dry. This cycle ensures that debris is removed without trauma. For most skin types, performing this piercing cleaning ritual twice daily provides the perfect balance between hygiene and over-cleaning. Excessive washing can actually strip the skin of its natural oils, leading to dryness and cracks that invite bacteria.
This method focuses on mechanical irrigation rather than manual scrubbing. You're using the pressure of the saline to do the work. It's a supportive, gentle process that respects the fragility of the new fistula. Consistency is your greatest ally. Skipping sessions allows "crusties" to harden, while over-cleaning irritates the tissue. Stick to the morning and evening rhythm to maintain a stable, clean environment for cellular repair. For a deeper look at health safety, you can consult Mayo Clinic's guide to preventing piercing complications.
Step 1: Preparation and Hygiene
Your hands are the primary carriers of bacteria. Before you even touch your supplies, perform a full 20-second hand wash with antimicrobial soap. This isn't optional; it's the first step in stabilizing your healing environment. Once clean, find a position where gravity can assist the flow of the saline. If you have an ear piercing, tilt your head so the excess liquid drains away from your neck. Use a gentle "Mist" technique with your spray. This ensures even coverage across the entire site without the forceful impact that can irritate sensitive, raw tissue. Proper positioning prevents the saline from pooling, which can lead to skin maceration.
Step 2: The Irrigation and Drying Process
Precision is everything. Direct the saline spray at both the entry and exit points of the channel. The goal is to saturate the area until any accumulated lymph softens and naturally rinses away. Never pick at stubborn debris. Once the irrigation is complete, you must address the moisture. A damp piercing is a breeding ground for opportunistic fungi and bacteria. Moisture trapped against the skin can lead to localized "piercing bumps" or even infection.
Avoid cloth towels at all costs. They harbor microscopic germs and their tiny loops can snag on your jewelry, causing sudden, painful trauma. Instead, use a clean, disposable paper towel to gently pat the surrounding area dry. For those with intricate ear projects, a hair dryer on a "cool" setting is an excellent tool. It ensures the site is bone-dry without making any physical contact with the wound. This final step in your piercing cleaning routine is what separates a standard recovery from a truly elite healing journey.
Managing Crusties and Piercing Irritations
"Crusties" are a natural byproduct of your body’s sophisticated repair mechanism. They consist of dried lymph fluid and shed skin cells that accumulate around the jewelry. This material is a sign that your immune system is active and protective. However, if these deposits become too thick, they can trap bacteria against the healing wound. Effective piercing cleaning requires a delicate touch to manage this buildup without causing secondary trauma. You must view these deposits as a biological shield that simply needs occasional, gentle management.
Adhering to the LITHA (Leave It The Hell Alone) philosophy is essential for long-term success. Picking, scratching, or twisting your jewelry are the most common ways to stall your progress. When you manually remove debris, you often take a layer of new skin with it. This creates micro-tears that invite infection and trigger the formation of "piercing bumps." These bumps are often the body's way of signaling that it is being physically over-handled or irritated. Patience is a functional part of your toolkit.
The Safe Softening Technique
Stubborn debris requires patience, not pressure. Use a Saline Soak to gently dissolve hardened material. Saturate a clean gauze pad with sterile saline and apply it to the site for approximately 5 minutes. This hydration allows the debris to rinse away naturally during your next piercing cleaning session. If you have already noticed a persistent bump, consult our guide on how to get rid of piercing bump for clinical recovery steps. For targeted soothing during this process, our Piercing Bump Treatment Oil can help stabilize the skin and reduce redness.
What to Avoid: The "Never" List
Maintaining the integrity of your skin requires strict avoidance of certain substances. Hydrogen peroxide and rubbing alcohol are too harsh. They are non-selective killers that destroy the very cells building your new fistula. Harsh soaps with heavy fragrances can also cause chemical dermatitis. You must also account for mechanical irritation. Sleeping on your new modification can cause the jewelry to migrate, changing the angle of the piercing permanently. Additionally, avoid communal water like pools or oceans for at least several weeks to prevent bacterial colonization.
Cleanliness is not about aggression. It is about consistency, purity, and protection. By avoiding these common pitfalls, you empower your body to complete its creative work without the setbacks of unnecessary inflammation.
Advanced Aftercare: The BodyJ4You Standard
BodyJ4You stands as a Supportive Specialist in the world of body modification. With two decades of industry presence, we've refined our approach to balance biological safety with aesthetic excellence. Our commitment to quality is rooted in regional manufacturing. By producing our aftercare solutions within the United States, we ensure rigorous quality control and ingredient integrity. This heritage of reliability transforms a simple piercing cleaning routine into a professional-grade wellness ritual. We don't just provide products; we offer a protective framework for your self-expression. It's about safety, purity, and trust.
Healing is a marathon, not a sprint. Once the initial raw phase passes, the goal shifts to tissue maintenance and stabilization. Integrating botanical oils like Jojoba or Rosehip into your routine helps maintain the skin's natural elasticity. This is especially critical for long-term modifications where the skin must remain supple and resilient. A wellness-oriented mindset ensures that your jewelry remains a comfortable, vibrant part of your identity for years to come.
Location-Specific Cleaning Nuances
Every modification has its own anatomical personality. For those healing a septum piercing, the routine often involves cupping clean water in your hands to blow bubbles. This gently clears the nasal passage without the direct pressure of a spray. Conversely, an industrial piercing presents a dual-wound challenge. Because a single bar connects two separate holes, any movement on one side creates tension on the other. This requires a double dose of precision during your piercing cleaning to ensure both sites remain stable. Oral modifications require a different strategy entirely. Instead of saline spray, you should use an alcohol-free mouthwash to maintain hygiene without drying out the sensitive mucosal tissue.
Curating Your Long-Term Aftercare Ritual
Consistency builds the foundation for lasting beauty. If you are participating in ear gauge stretching, daily massage with Rosehip or Jojoba oil is non-negotiable. These oils penetrate the skin to provide deep hydration, preventing the micro-tears that lead to scar tissue. You should also adopt a "Check Your Jewelry" routine. With clean hands, gently ensure that your internal threads and captive beads are secure. This simple habit prevents accidental loss and reduces the risk of jewelry migrating due to loose components.
Your journey toward self-expression is a lifelong pursuit of growth. We invite you to Shop the BodyJ4You Professional Aftercare Collection to find the tools you need for every stage of your healing. Trust the process. Protect your art. Empower your style.
Elevate Your Healing Journey
Your body modification is more than a trend; it's a permanent piece of your personal narrative. Protecting it requires a sophisticated shift from manual scrubbing to clinical irrigation. By respecting the delicate biology of the fistula and adhering to the no-touch method, you ensure your aesthetic remains vibrant and irritation-free. BodyJ4You brings over 20 years of industry expertise to your daily routine through our locally manufactured skincare line. Our dermatologically minded formulations act as a stabilizing force, providing the purity and safety your skin demands during its most vulnerable phase.
A disciplined piercing cleaning habit is the ultimate act of self-care for the modern individual. It bridges the gap between a new wound and a healed masterpiece. Explore our US-made Saline Aftercare Spray to provide your modification with the professional support it deserves. You now possess the knowledge and the specialized tools to navigate your healing journey with absolute confidence. Your path to self-expression is secure, safe, and inspired.
Frequently Asked Questions
How many times a day should I clean my piercing?
You should clean your piercing twice daily, once in the morning and once in the evening. This steady rhythm provides the hygiene necessary to prevent infection without stripping the skin of its protective natural oils. Cleaning more than twice a day often leads to chemical irritation and delayed healing. Consistency is the primary goal for any successful modification journey.
Can I use Q-tips to clean my piercing?
You should avoid standard cotton swabs because their loose fibers can snag on jewelry or get trapped inside the raw wound. Instead, use specialized, tightly wound Piercing Cleaning Swabs. These precision tools allow you to remove debris without leaving behind irritating micro-fibers that can lead to inflammation or localized piercing bumps.
What happens if I don’t clean my piercing?
Neglecting your piercing cleaning routine allows bacteria and dead skin cells to colonize the area. This biological buildup can lead to localized infections, painful swelling, and even jewelry rejection. Without proper irrigation, your body may struggle to form a healthy fistula, potentially resulting in permanent scar tissue or the loss of the modification entirely.
Is it normal for a new piercing to be red and itchy?
Mild redness and itching are normal during the first few days as part of your body's inflammatory response. Your immune system is sending blood and white cells to the site to begin the repair process. However, if the redness spreads or the itching is accompanied by intense heat and opaque discharge, you should consult a professional to ensure your safety.
Can I make my own saline solution at home?
You shouldn't attempt to make saline at home because achieving the precise 0.9% concentration required for cellular health is nearly impossible in a kitchen. Homemade solutions often lack sterility and can contain too much salt, which dehydrates healing tissue. Using a professional, US-manufactured Saline Piercing Aftercare Spray ensures the perfect isotonic balance every time.
How do I clean a piercing that is hard to reach?
Use a mirror and the "Mist" technique for modifications in difficult locations like the back of the ear or the navel. Position your body so gravity allows the saline to flow through the channel naturally. A pressurized spray provides the necessary mechanical irrigation to reach these hidden areas without requiring you to twist or pull the jewelry.
When can I stop cleaning my piercing every day?
You can reduce the frequency of cleaning once the fistula has fully matured and the discharge has stopped. For earlobes, this might take six to eight weeks, while cartilage can take up to a year. Even after initial healing, occasional piercing cleaning remains a vital part of your long-term wellness and jewelry maintenance ritual.
Should I move the jewelry while cleaning?
You should never move, rotate, or slide the jewelry while cleaning. Physical movement tears the microscopic skin cells building the internal tunnel and introduces surface bacteria into the wound. Trust the irrigation process to remove debris. Your jewelry doesn't need to be moved to be thoroughly cleaned.


