

Your piercing hole doesn't close in seconds; however, your body's reaction to an improper jewelry swap can last for weeks. You might fear the sting of a sudden bleed or feel overwhelmed by the mechanics of a complex threadless post. It's completely normal to feel a surge of anxiety when learning how to change piercing jewelry for the first time. Your piercing is a vibrant expression of your identity; it's also a delicate biological site that requires clinical precision, patience, and a gentle touch.
We believe that self-maintenance should be a ritual of empowerment, not a source of stress. This guide will help you master the art of swapping your jewelry safely using professional techniques that prevent irritation, promote long-term healing, and protect your skin. You'll discover the secrets to handling internal threaded labrets, captive bead rings, and clickers with total confidence. From essential preparation with saline sprays to the final application of oils formulated with pure ingredients, we're here to ensure your transition is smooth, sterile, and successful.
Key Takeaways
- Identify your body’s readiness by applying the Wise Guardian rule, ensuring your specific anatomy is fully healed before attempting a swap.
- Establish a clinical-grade "clean zone" using the Rule of Three, which requires clean hands, clean surfaces, and clean jewelry, to prevent post-swap irritation.
- Master the professional technique of how to change piercing jewelry by following the natural fistula path to keep the channel open and protected.
- Navigate common mechanical challenges, such as tissue resistance or rapid hole shrinkage, with disciplined and non-aggressive maintenance strategies.
- Select high-integrity materials like implant-grade surgical steel and internal threading to support long-term dermatological health and aesthetic refinement.
Determining if Your Piercing is Ready for a Jewelry Change
Patience is the foundation of aesthetic longevity. When you are learning how to change piercing jewelry, you must act as a Wise Guardian for your own body. This role requires a disciplined commitment to patience, observation, and biological integrity. Swapping jewelry too early disrupts the delicate formation of the fistula, which is the protective tunnel of skin that forms around the post. Premature interference often results in micro-tears, localized swelling, or secondary infections that reset your healing clock entirely.
Anatomy dictates the pace of recovery. While an earlobe might feel stable in weeks, a dense cartilage piercing requires months of cellular reconstruction. Understanding safe piercing materials is vital during this transition, as even a stabilized channel can react poorly to low-quality metals. If you experience persistent resistance or significant bleeding, stop immediately. Consulting a professional is essential if the jewelry feels stuck or if you see signs of a persistent piercing bump. Knowing how to change piercing jewelry safely means knowing when to wait for the tissue to strengthen.
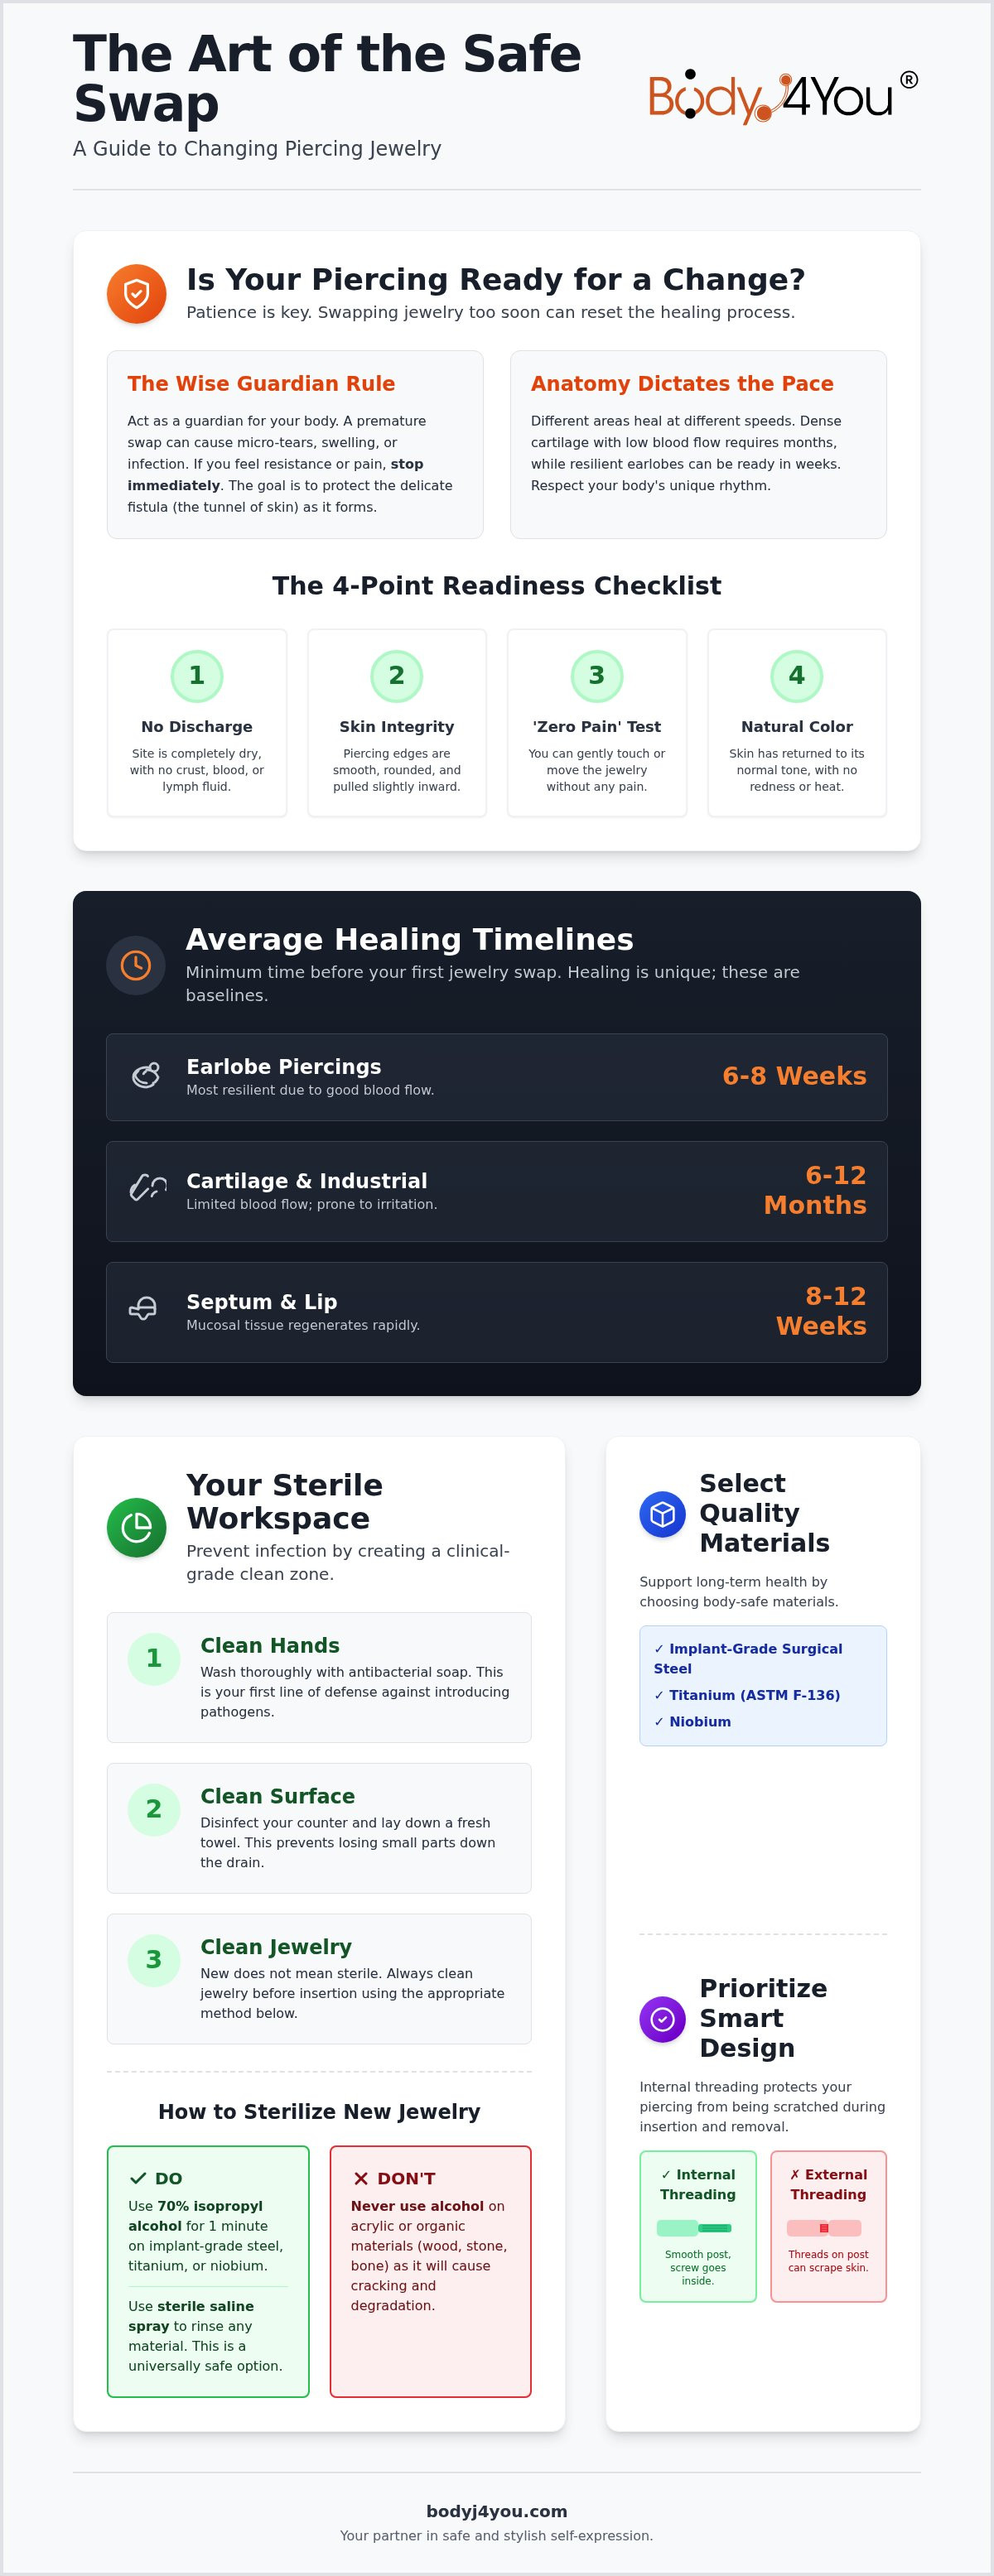
The 4-Point Readiness Checklist
Before you attempt a swap, your piercing must pass these four markers of clinical readiness. If you fail even one, your body isn't ready for the transition.
- Absence of discharge: Your piercing site must be completely dry. There should be no crusties, blood, or lymph fluid present on the jewelry or the surrounding skin.
- Skin integrity: Examine the entry and exit points. The edges of the piercing should look rounded, smooth, and slightly pulled inward toward the channel.
- The 'Zero Pain' test: You should be able to gently touch or rotate the jewelry without any stinging or pinching sensations.
- Color check: The skin should return to its natural tone. Any lingering redness or heat indicates that the tissue is still in an active inflammatory phase.
Average Healing Timelines by Piercing Type
Every body heals at a unique rhythm, but these industry standards provide a reliable baseline for your safety. These timelines reflect the time needed for the internal tissue to become robust enough for a jewelry swap.
- Earlobe piercings: These are the most resilient. Expect a 6 to 8-week minimum window before your first jewelry change.
- Cartilage and Industrial: These areas have limited blood flow and are prone to irritation. A 6 to 12-month period is the safer bet for internal stability.
- Septum and Lip: These piercings pass through mucosal tissue, which regenerates rapidly. They often allow for changes after 8 to 12 weeks if the checklist is met.
Preparing Your Workspace for a Sterile Jewelry Swap
Mastering how to change piercing jewelry starts long before you touch your skin. You must transform your environment from a standard bathroom into a dedicated clean zone. Bacteria are opportunistic; they thrive in the damp, high-traffic areas of a home. By establishing a clinical space, you protect the biological integrity of your piercing channel and prevent the introduction of pathogens. Before starting, ensure you have followed the steps for Determining if Your Piercing is Ready to avoid unnecessary trauma to the tissue.
The foundation of a safe swap rests on the Rule of Three: Clean Hands, Clean Surface, and Clean Jewelry. Clear your workspace of all clutter. Wipe the counter with a disinfectant and lay down a fresh, light-colored towel. This "towel method" is essential for safety. It provides a soft landing for dropped pieces and ensures you never lose a tiny bead down an open drain. Gather your essential tools: high-intensity lighting, a steady mirror, and piercing cleaning swabs to manage any minor debris around the site.
Sterilizing Your New Jewelry
New jewelry is not necessarily sterile jewelry. Even pieces straight from the packaging can carry dust or manufacturing residues. For surgical steel, titanium, or niobium pieces, a thorough soak in 70% isopropyl alcohol for one minute is effective. However, never use alcohol on acrylic or organic materials as it causes cracking and degradation. A safer, more versatile method involves using a sterile saline spray for piercings to rinse the jewelry. This ensures the piece is biologically neutral before it enters the fistula path. Understanding how to change piercing jewelry safely involves treating the jewelry with the same clinical respect as the piercing itself.
Hand Hygiene and Glove Use
Your hands are the most common vector for infection. Scrub your hands and forearms with antimicrobial soap for at least thirty seconds, paying close attention to the areas under your fingernails. For those seeking a professional level of precision, nitrile gloves are a superior choice. They provide an enhanced grip on small internal threaded posts and captive beads that can be slippery when handled with bare skin. Cross-contamination is the unintentional transfer of harmful bacteria or microorganisms from one surface, such as an unwashed hand or a phone, to your sterile jewelry or healing piercing site. Selecting high-quality internal threaded labret studs ensures your jewelry remains as clean as your workspace.
Step-by-Step Guide for Different Jewelry Mechanisms
Executing a jewelry swap requires a deep respect for the fistula path. This is the mature tunnel of tissue that defines your piercing's stability. When learning how to change piercing jewelry, your goal is to maintain the integrity of this channel without causing microscopic trauma. The "Follow-Through" method is the professional standard for this transition. By placing the new post directly against the exiting one, you ensure the hole never remains empty or collapses. To facilitate a frictionless glide, apply a drop of jojoba oil to the jewelry. This natural lubricant mimics the body's sebum, allowing for a smooth entry that respects the delicate skin.
Removal should be a slow, controlled process. If you feel a sharp pinch, stop and reassess. You might be encountering a small amount of "crust" or sebum buildup that needs to be cleared with a saline-soaked swab first. Never yank or force a piece out. The tissue surrounding a piercing is highly vascular and can bruise or bleed if handled with aggression. By maintaining a steady hand and a calm environment, you ensure that the swap is a positive step in your journey of self-expression rather than a setback in your healing process.
Threaded vs. Threadless (Press-Fit) Jewelry
Mechanical understanding is your best defense against irritation. We prioritize internal threaded labret studs because the screw is on the removable end, not the post. This design ensures that a smooth surface passes through your skin, unlike external threading which can act like a saw against healing tissue. Remember the "Righty-Tighty" rule: turn the top to the right to secure it. For threadless jewelry, also known as "press-fit," the decorative end features a small pin. A slight, intentional bend in this pin creates the tension needed to lock it into the post. Using Quality Materials for Long-Term Health ensures these mechanisms function perfectly without seizing or corroding over time.
Captive Bead Rings (CBR) and Clickers
Circular jewelry requires a different set of tactile skills. To remove a captive bead ring, gently pull the hoop away from the bead until the tension releases. You don't need professional pliers if the gauge is small; a steady, even pressure is usually enough. Clickers are more intuitive but require precise alignment. Listen for the audible "click" that signals the hinge is locked. For seam rings, never pull the ends apart to create a "C" shape. Instead, twist the ends in opposite directions laterally to preserve the circular arc. This technique prevents the metal from fatiguing and ensures a flush, comfortable fit. Mastering how to change piercing jewelry involves these small, disciplined movements that protect both the aesthetic and biological health of your piercing.
Handling Common Challenges and Post-Change Aftercare
Resistance is a signal. When you are learning how to change piercing jewelry, you must listen to what your skin is telling you about its current state of readiness. The "Don't Force It" mandate is the most critical rule for preserving your aesthetic health. If a piece of jewelry won't slide in with gentle guidance, your body is communicating that the fistula is not yet stable or has begun to contract. Aggression leads to micro-tears; micro-tears lead to scarring; scarring leads to permanent damage. Don't push. Don't panic. Don't ignore the signs of tissue distress.
You must also account for "The Shrink." A piercing is technically a wound that your body wants to close. In some individuals, a well-established channel can begin to tighten within minutes of the jewelry being removed. This rapid contraction is why the "Follow-Through" method mentioned earlier is so vital. If you find yourself in a situation where the new piece won't enter, the 48-hour settling period begins the moment the swap is complete. During this window, your body is adjusting to the new weight, shape, and material of the jewelry. It's a time for quiet observation and clinical care.
Troubleshooting a Stuck Piercing
If you encounter a block, start with a warm compress. The heat relaxes the surrounding tissue, increases localized blood circulation, and can soften any minor sebum buildup that might be obstructing the path. Apply the compress for five minutes before attempting the swap again with a fresh drop of lubricant. If the jewelry still won't pass through, the most responsible action is to reinsert your old, original piece. Saving the channel is always more important than wearing a new design today. You should stop and visit a professional immediately if you experience excessive bleeding, extreme pain, or if you cannot get any jewelry back into the site.
Your Post-Swap Aftercare Routine
The work doesn't end once the jewelry is secure. Your body treats a swap as a minor trauma, and you must respond with a disciplined aftercare ritual. Use a sterile saline spray twice daily to flush out any bacteria introduced during the handling process. This keeps the environment neutral and supportive of recovery. If you notice localized redness or a small elevation in the skin, apply a piercing bump treatment oil to soothe the inflammation and support skin integrity. Avoid touching, twisting, or rotating the new jewelry for at least 24 hours. This stillness allows the internal tissue to settle around the new post without constant disruption. Maintain the purity of your piercing by using professional aftercare essentials designed for long-term health.
Selecting Your Next Piece: Quality Materials for Long-Term Health
Your jewelry is the silent partner in your piercing's longevity. While the aesthetic appeal of a new piece is exciting, the biological impact of the material is what determines your long-term comfort. Self-expression is an act of empowerment, but it must be supported by clinical integrity. Selecting the right metal creates a stable environment for your skin to thrive. When you are mastering how to change piercing jewelry, you're not just choosing a style; you're choosing the future health of your tissue.
Biocompatibility is the standard by which all body jewelry should be measured. This refers to the material's ability to exist within your body without causing an adverse immune response. Approximately 20% of the population lives with a nickel sensitivity, making "nickel-free" the most vital label for anyone with sensitive skin. A March 2026 study highlighted that women with a history of jewelry allergies have a 6.11 times higher risk of metal sensitization. Choosing high-purity metals protects you from the irritation, swelling, and localized dermatitis often caused by the "mystery metals" found in cheap fashion jewelry.
Material Safety and Skin Sensitivity
The hierarchy of safe metals is clear: Surgical Steel, Titanium, and Niobium. 316L Surgical Stainless Steel remains the industry standard for durability, safety, and a high-luster finish. It's specifically engineered to be corrosion-resistant and non-reactive within the human body. For those seeking the gold standard, ASTM F-136 implant-grade titanium offers a lightweight, completely nickel-free alternative. Niobium is another excellent choice for extreme sensitivities, as it is a pure element that doesn't require alloying with other metals. Avoiding plated "costume" jewelry during the first year of a piercing's life is a disciplined choice that prevents long-term complications.
Finding the Perfect Fit
Precision matters as much as material. A piece that is too short can compress the tissue, while one that is too long may snag and cause trauma. You must measure your current jewelry to determine the "wearable length," which is the part of the post that actually sits inside the piercing channel. If you're exploring stretched lobes, consult an ear gauge size chart to ensure your new plugs or tunnels match your current diameter exactly. Understanding these measurements is a core part of learning how to change piercing jewelry without causing unnecessary stress to the site. Once you're confident in your size and material needs, you can browse our collection of high-quality piercing jewelry and aftercare to find your next statement piece.
Embrace Your Evolution with Confidence
Mastering your personal style is a journey of patience and clinical precision. Biological readiness is non-negotiable. Your body alone dictates the timeline for every jewelry swap. By maintaining a dedicated clean zone and selecting biocompatible metals, you ensure your self-expression remains a source of joy rather than irritation. Learning how to change piercing jewelry is a skill that matures with experience. It transforms a moment of physical vulnerability into a disciplined ritual of self-care.
BodyJ4You supports your journey with over 20 years of industry expertise. Our commitment to your health is reflected in our high-quality surgical steel and titanium options. We provide dermatologically focused, locally manufactured aftercare to protect your skin's integrity. We prioritize purity, safety, and the power of aesthetic refinement. You deserve jewelry that respects your biology as much as your style.
Shop BodyJ4You Piercing Jewelry and Aftercare
Your journey of self-expression is a beautiful, ongoing process. Treat your body with the respect it deserves, and your piercings will remain vibrant for years to come.
Frequently Asked Questions
Is it normal for a piercing to hurt when changing jewelry?
A mild sensation of pressure or a dull ache is common during a swap, but sharp, radiating pain is a signal to stop immediately. Your body uses pain to communicate that the tissue isn't ready or that you're causing trauma to the fistula. If you experience significant discomfort when learning how to change piercing jewelry, reinsert your original piece and wait. Patience protects your skin's biological integrity and prevents permanent scarring.
How long can I leave my piercing jewelry out before it closes?
Piercings can begin to contract within minutes, especially if they are less than a year old. The mucosal tissue in septums or lips heals faster than earlobes, making them particularly prone to rapid closure. While a fully seasoned piercing might stay open for days, you should never leave a channel empty for more than a few minutes during a swap. Always have your new, sterile jewelry ready before removing the old piece.
What if I can't get the bead back into my captive bead ring?
Reinserting the bead into a captive bead ring requires a balance of tension and alignment. You should gently pull the sides of the hoop apart to create a small gap, then seat one side of the bead into the indentation before snapping the other side into place. If you find this mechanism too difficult, consider switching to a clicker. These alternatives offer a similar aesthetic with a much simpler, more user-friendly locking system.
Can I change my piercing jewelry if I have a small bump?
You should not attempt a jewelry change if an active irritation bump is present. Manipulating the site during an inflammatory phase can worsen the swelling and potentially lead to an infection. Focus on recovery first by applying a specialized treatment oil designed to soothe the tissue. Once the bump has completely subsided and the skin appears healthy, you can proceed with a safe swap using high-quality materials like surgical steel or titanium.
What is the best lubricant to use when changing jewelry?
Pure jojoba oil is the professional standard for lubricating a jewelry swap. It closely mimics your skin's natural sebum, providing a frictionless glide that prevents micro-tears in the delicate fistula. Avoid using petroleum-based products or heavy ointments, as these can clog the piercing channel and trap bacteria. A single drop on the post of your new jewelry is all you need for a smooth, safe, and comfortable transition into your new style.
How do I know if my new jewelry is the right size?
Knowing your measurements is essential for a successful fit. You should measure the wearable length of your current post and match it to your new piece to ensure it doesn't compress your skin. If you're unsure about the thickness, consult an ear gauge size chart to verify the exact millimeter measurement. Wearing the wrong size can lead to migration, so always prioritize precision over guesswork when you are learning how to change piercing jewelry.
Is it safe to use tap water to clean my jewelry before a swap?
Tap water is not a sterile solution and should never be used to clean jewelry before a swap. It often contains minerals, chlorine, and microscopic pathogens that can irritate a sensitive piercing channel. Instead, use a sterile saline spray to rinse your jewelry and the surrounding skin. This clinical approach ensures that you aren't introducing harmful bacteria into your body. Purity in your aftercare routine is the best way to maintain long-term health.


