

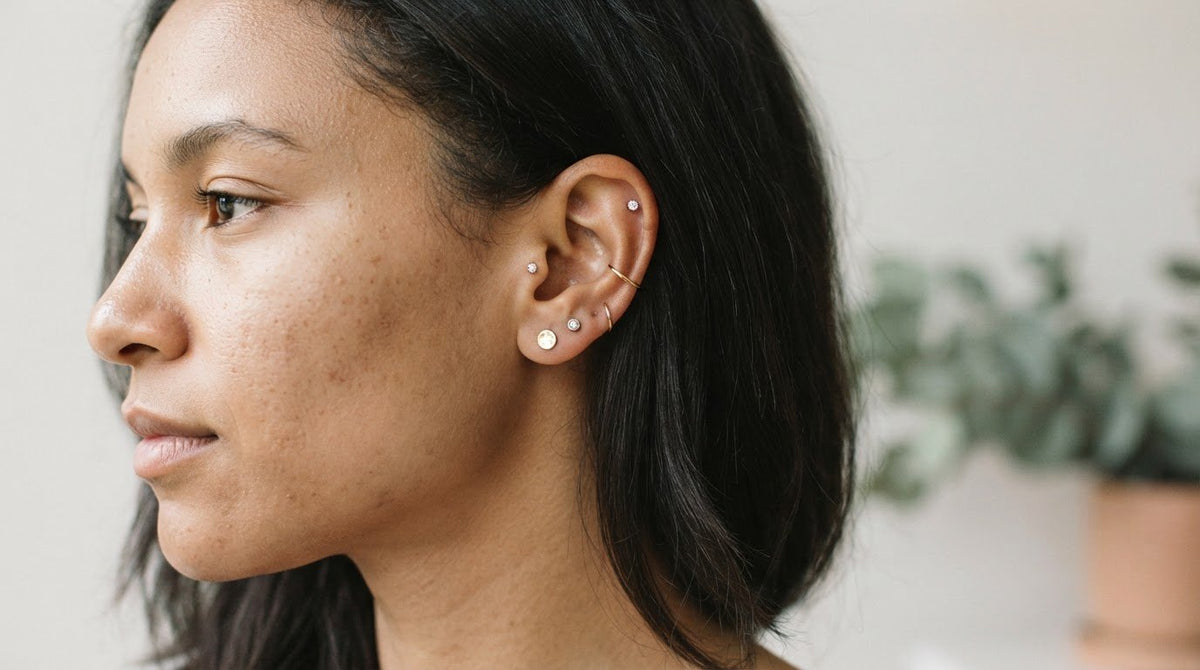
A curated ear is a deliberate mix of piercings and jewelry, planned to suit your ear rather than fill every available space. The most wearable ear curation ideas for small ears often start with a lobe stud and one helix piercing, then build to three to five jewelry pieces without crowding the ear. Tiny hoops and minimalist studs keep the look refined and let each placement stand out.
On small ears, jewelry can look crowded quickly, so it’s natural to wonder whether a layered look will leave enough room for each piece. The key is thoughtful spacing, not squeezing in more piercings. A few well-chosen details can create a balanced, personal look.
This guide covers choosing delicate jewelry, alternating hoops and studs, and planning placements with healing in mind. You’ll find a simple way to build your curation, from selecting a starting point to deciding what might complement it next.
Key Takeaways
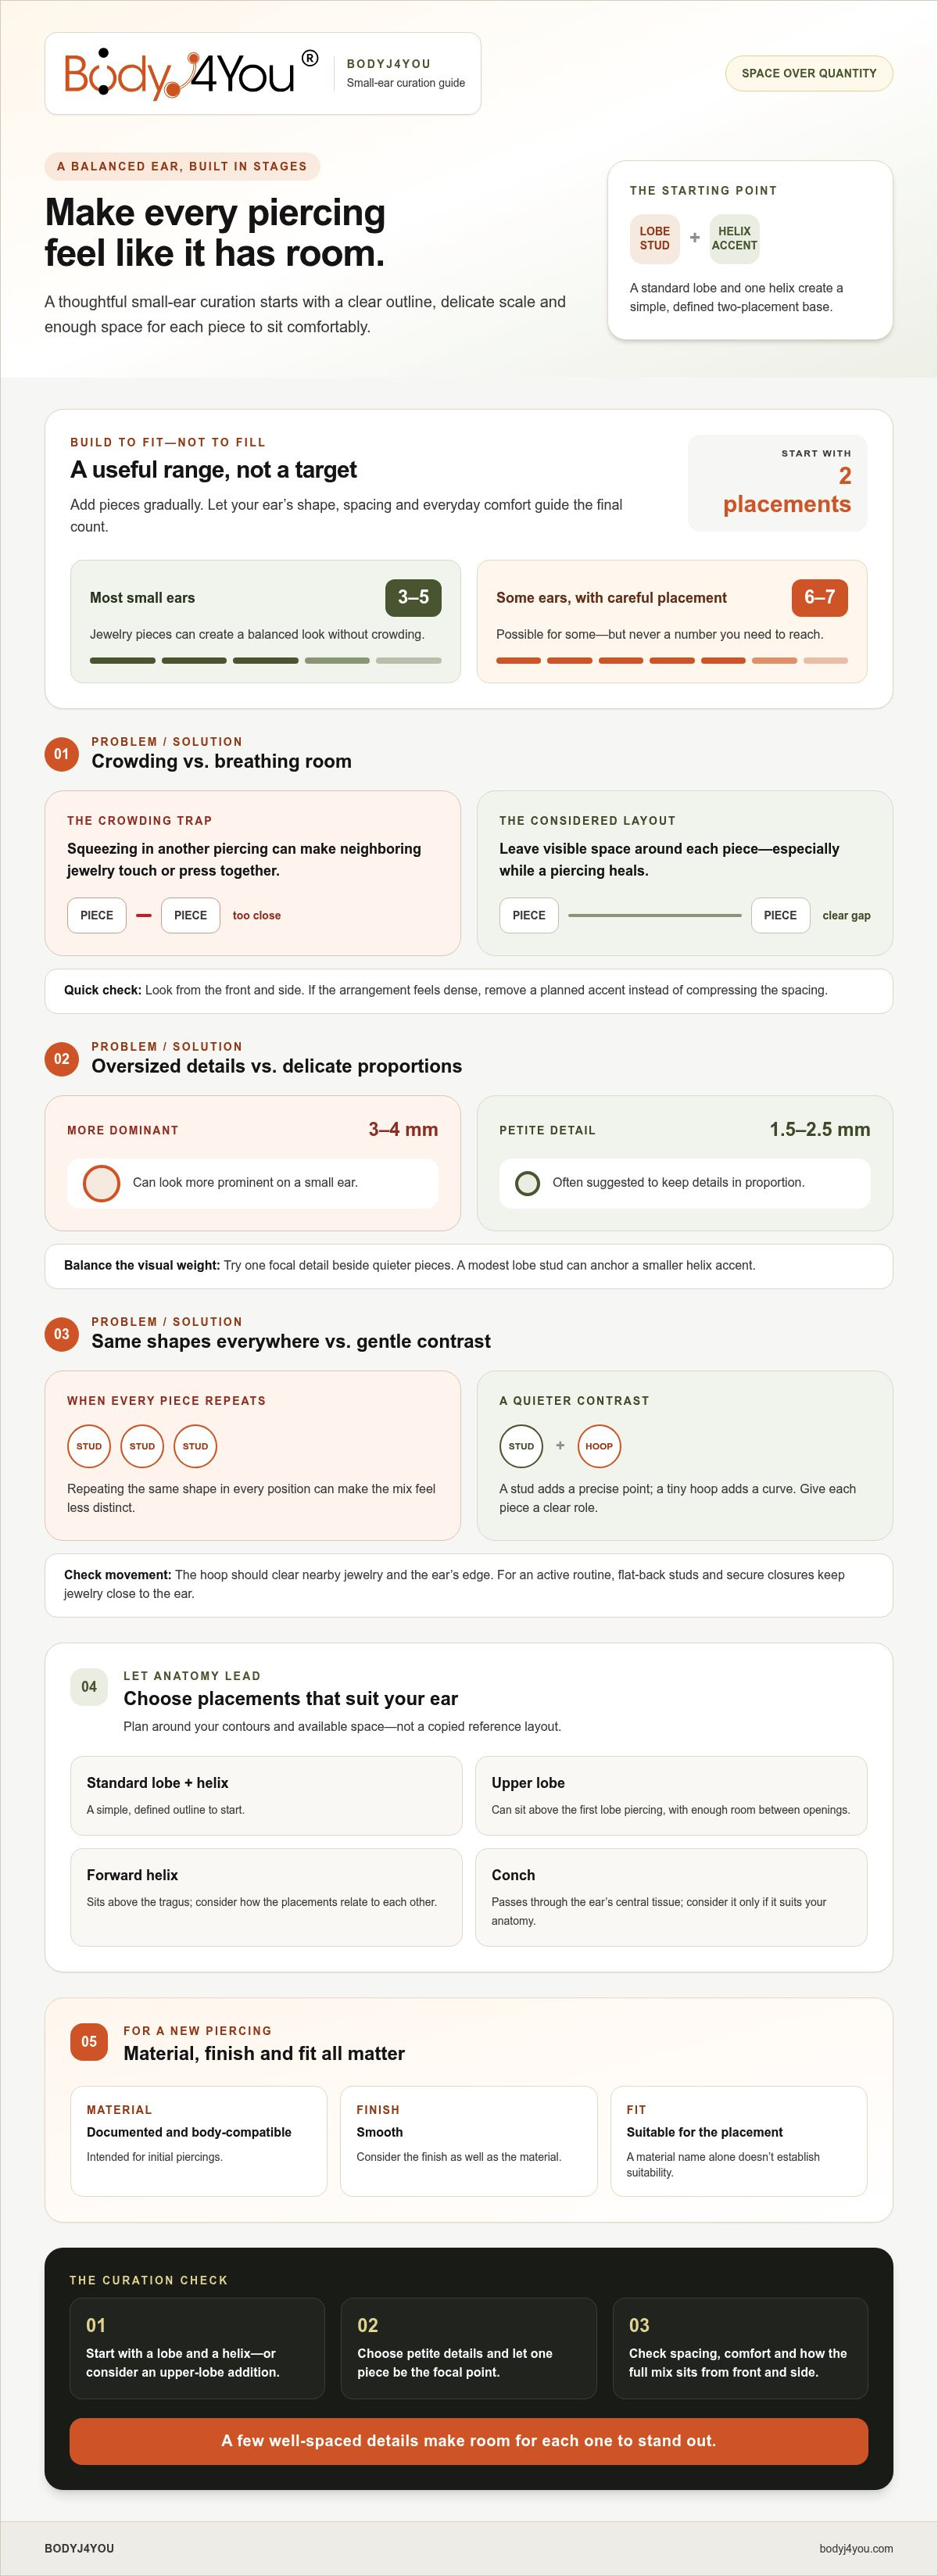
- Start with a simple lobe-and-helix arrangement, then build gradually toward a balanced 3 to 5 pieces.
- Choose petite decorative tops around 1.5 to 2.5 mm to keep each detail in proportion with a smaller ear.
- Mix tiny hoops with minimalist studs so neighboring pieces add contrast without making the overall look feel busy.
- Plan enough space between piercings to prevent new jewelry from pressing against existing pieces as they heal.
- Use your ear’s shape and available space to guide placement, especially when considering an upper-lobe, forward-helix, or conch accent.
Small, delicate jewelry for a multi-piercing look
For small ears, start with a standard lobe piercing and one helix piercing, or add an upper-lobe piercing for a three-placement arrangement. For a new piercing, choose jewelry made from a documented, body-compatible material intended for initial piercings, with a smooth finish and suitable fit. A material name alone doesn’t establish suitability.
Build the arrangement in stages. Consider your ear’s shape, the space between pieces, and how the jewelry will sit during everyday movement.
-
Consider Suitable Piercing Placements
Plan a standard lobe and one helix first for a simple, defined outline on a small ear. Alternatively, position an upper-lobe piercing above the first, leaving enough room between the openings. A forward helix sits above the tragus, while a conch passes through the ear’s central tissue. Consider either placement only if it suits your anatomy.
Consider the tragus before planning a forward-helix design. These placements occupy different areas, so plan around your ear’s contours instead of copying a reference image.
-
Balance Jewelry Scale and Spacing
Choose a starting piece, then leave visible space around it before adding another. A standard lobe stud paired with one helix accent creates a clear two-placement starting point. Most small ears accommodate 3 to 5 jewelry pieces without looking crowded; some can support 6 to 7 with careful placement. Treat those as design guidance, not a target to fill.
Check each gap from the front and side. Neighboring pieces shouldn’t touch or press together, especially while a piercing heals. Leave enough room between lobe openings so the jewelry doesn’t meet. If the layout looks dense, remove a planned accent rather than compressing the spacing.
-
Compare Decorative Jewelry Proportions
Compare the visible top of each stud against the ear’s available space. Decorative tops around 1.5 to 2.5 mm are often suggested for small ears, while 3 to 4 mm pieces can appear more dominant. Try one focal detail alongside quieter pieces, rather than giving every placement the same visual weight.
Keep the scale consistent across neighboring piercings. A modest lobe stud can anchor a smaller helix accent, while an oversized decorative top may draw attention away from both. Use a mirror to assess the complete arrangement, not each piece in isolation.
-
Choose Secure Jewelry for Daily Movement
If you exercise or move around frequently, prioritize flat-back studs and secure closures. They keep the arrangement close to the ear, while a projecting piece may catch more easily on clothing or hair. Choose a hoop diameter that sits comfortably without pressing into nearby jewelry or the ear’s edge.
Keep the design practical: a small hoop adds a curved accent, while a stud sits close to the ear. Avoid placing a hoop where it repeatedly contacts a neighboring piece as it moves.
-
Check Post Position and Fit
Check how each post sits from the front and behind the ear. Adjusting a post’s position can improve its alignment with a neighboring piercing, making the pieces look intentional rather than crowded. For a multi-piercing layout, compare the angle and visible face of each stud before choosing the combination.
Make your final choice based on comfort and spacing, not appearance alone. A hoop or post that presses against the ear can undermine the clean arrangement you planned.
Tiny hoops and minimalist studs
Pair a lobe stud with a tiny helix hoop for a minimalist look that relies on contrast rather than extra decoration. For ear curation ideas for small ears, give each piece a clear role: one can anchor the look while another adds a subtle curve.
-
Plan Minimalist Piercing Combinations
Choose one focal point and keep the neighboring piece quieter. For example, pair a small upper-lobe stud with a delicate helix hoop. This mix adds contrast without giving every piercing equal visual weight.
Sketch the arrangement from the front before choosing jewelry. Make sure each piece has clear space around it, and avoid repeating the same shape in every position. A stud beside a hoop gives the eye two distinct forms to follow.
-
Choose Flattering Earring Styles
Choose close-fitting styles that follow your ear’s outline. A tiny hoop adds a curved line, while a minimalist stud creates a precise point of detail. Together, they make a multi-piercing arrangement feel intentional rather than busy.
Use a flat-back stud when you want a low-profile look, especially in a placement where a projecting post could distract. Internal threaded labret studs are one option for a stud-led arrangement. Compare how the front sits beside a hoop before settling on the pairing.
-
Select Earring Sizes and Shapes
Compare each decorative top with the available space on your earlobe. Tops around 1.5 to 2.5 mm are often suggested for small ears; pieces measuring 3 to 4 mm can look more prominent. Use a petite top for a subtle accent, or reserve a larger detail for one focal position.
Another option among ear curation ideas for small ears is to contrast a rounded stud with a curved hoop instead of repeating similar silhouettes. The hoop should sit without pressing into the lobe or a neighboring earring. Check the full combination in a mirror, since each piece can look different on its own.
- Test the combination before wearing it for the day. Hold the studs and hoops against your ear, then turn your head and check the arrangement from the front and side. Make sure each hoop clears its neighboring stud and doesn’t catch on the ear’s edge.
For an active routine, prioritize flat-back studs and secure closures. Choose a hoop that sits close to the ear rather than swinging into nearby jewelry. If the combination feels crowded as you move, remove an accent or swap it for a smaller, simpler shape.
- Keep the design cohesive with a limited range of shapes. For instance, use one tiny hoop and two simple studs, varying their positions instead of adding decoration to each. This creates rhythm while keeping the ear’s natural outline visible.
Review the arrangement before adding another piece. A balanced combination has distinct details, comfortable spacing, and no single earring competing with the rest. Adjust a stud’s position if it looks misaligned beside its neighbor.
Alternating hoops and studs to avoid a crowded look
Alternate curved hoops with close-set studs for contrast without visual clutter. A simple layout lets each piece contribute its own shape.
- Choose a clear sequence for your lobe and cartilage placements. For example, put a stud in the first lobe piercing, a tiny hoop in the next, and another stud above. This stud-hoop-stud rhythm gives the eye distinct details to follow. If your ear has fewer placements, use the same contrast across the lobe and helix.
- Keep the number of pieces focused before adding more decoration. A curated small ear with 3 to 4 well-placed pieces often looks more refined than one with 6 to 8 crowded pieces. Treat 3 to 4 as a useful design target, not a requirement. Remove a piece if the hoops and studs begin competing for attention.
- Pair each hoop with a neighboring stud instead of grouping several moving shapes together. A small lobe hoop beside a simple upper-lobe stud balances a curved outline with a defined point. Add a second hoop only if it has room and doesn’t press against nearby jewelry. This spacing keeps the sequence clear from the front.
- Use decorative scale to distinguish focal points from supporting pieces. Tops around 1.5 to 2.5 mm are often suggested for small ears, while 3 to 4 mm tops can look more prominent. Try a petite stud beside a tiny hoop, then compare both together. Avoid choosing equally bold details for every placement.
- Check the arrangement from the front and side before wearing it. Turn your head to see whether a hoop overlaps a stud or catches on the ear’s edge. For an active routine, flat-back studs and secure closures are practical choices. A close-set stud can also provide a quiet anchor for a hoop-led arrangement.
- Review the whole ear before adding a final accent. An ear snakebite stack uses two side-by-side piercings, so treat it as one distinct feature in your layout. Balance the pair with a simpler hoop or stud elsewhere. If every area draws attention, remove a piece instead of adding another.
- Make small adjustments until the shapes feel intentional together. Changing a stud’s post position can improve its alignment with a neighboring piercing. For a discreet stud element, internal threaded labret studs can be considered as part of the mix. Keep the final combination comfortable, spaced, and visually calm.
Healing and spacing considerations
Plan each new placement around the jewelry already in your ear. While a piercing heals, spacing matters as much as the finished arrangement.
- Leave enough room between a planned piercing and existing jewelry. A new piece shouldn’t constantly touch or press against another while healing. For example, check the gap between an upper-lobe stud and the hoop below it from the front and side.
Don’t use a tightly packed reference image as a placement map. Your ear’s contours and existing openings determine where jewelry can sit without contact.
- Position a second lobe piercing far enough from the first that the openings and jewelry don’t touch. Consider both locations together before settling on the arrangement. If the studs meet or overlap visually, adjust the proposed spacing rather than squeezing in more pieces.
A side-by-side ear snakebite stack uses two piercings, so plan both positions as one feature. Leave room around the pair for any neighboring lobe or cartilage jewelry.
- Build the design in stages instead of planning every desired placement at once. Begin with one area, such as the lobe, then assess how a proposed helix accent would sit alongside it. This makes spacing easier to judge and prevents a crowded layout from becoming your starting point.
Keep the finished look in mind, but don’t let healed jewelry positions lead you to crowd a new piercing. A delicate arrangement can stay simple while each placement settles.
- Consider how hoops move near other jewelry before including them in a plan around a healing piercing. A hoop that swings against a nearby stud can make repeated contact. Compare a small hoop with a close-fitting stud, then choose a placement that keeps the pieces clear of each other.
For an active routine, consider flat-back studs and secure closures. Keep each selected piece from pressing against neighboring jewelry during ordinary movement.
- Keep the ear clean to maintain a polished arrangement. Handle jewelry with clean hands and follow the aftercare directions for a new piercing. Avoid unnecessary handling when checking whether a piece looks aligned.
For example, inspect a lobe-and-helix combination visually rather than repeatedly rotating its jewelry. Clean, undisturbed pieces are easier to assess for spacing and appearance.
- Review each proposed placement against your ear’s anatomy before expanding the design. A forward helix sits above the tragus, while a conch passes through the ear’s central tissue. These locations use different areas, so compare them with existing jewelry and available space.
A trusted piercer can help plan placements around your anatomy and intended look. Bring a simple sketch showing the lobe, helix, and any proposed next accent.
Which earring styles flatter small ears?
Choose styles by silhouette, scale, and placement. A delicate hoop, petite stud, or carefully arranged pair can each make a small ear feel thoughtfully styled.
- Use one clean focal point to anchor the arrangement visually. A small lobe stud can draw attention without competing with a helix hoop. Keep nearby jewelry simpler, such as a plain stud beside a decorative centerpiece, or select a refined piece from Jewellove to serve as your main accent. This contrast makes the focal earring easier to notice.
For a softer look, choose a tiny hoop with a smooth outline. Its curve follows the ear’s edge, while a stud adds a compact point of detail.
- Compare the decorative top with the space available on your lobe. Tops around 1.5 to 2.5 mm are often suggested for small ears; 3 to 4 mm designs look more prominent. Try the smaller scale for a subtle everyday accent, then reserve a larger detail for one chosen position.
See how each piece looks beside neighboring jewelry. A prominent stud paired with another large top can make the lobe look crowded.
- Create interest through shape rather than decorating every piece. Pair a rounded stud with a tiny hoop, or choose two studs with different outlines. For example, a simple lobe stud and a curved helix hoop create contrast across separate areas.
Keep the shapes easy to distinguish. Identical hoops in close placements can blur the outline, while a stud between curved forms creates a clearer rhythm.
- Use stacked-lobe jewelry to create a vertical line. A larger stud in the first lobe, followed by a smaller upper-lobe accent, gives the arrangement a natural visual progression. Leave enough space between the pieces to keep their outlines distinct.
For a side-by-side look, an ear snakebite stack uses two piercings. Treat the pair as one focal detail, then keep other nearby jewelry restrained.
- Consider double-sided earrings for a detail visible from both sides of the ear. They can add interest behind the lobe as well as at the front. Keep surrounding pieces simple so the two-sided effect remains the standout feature.
For an active routine, flat-back studs and secure closures are practical style choices. Make sure each piece sits comfortably and doesn’t press against another earring as you move.
- Review the whole arrangement, not each earring on its own. Three to four well-placed pieces can look more refined than six to eight crowded pieces. If the ear feels visually busy, remove an accent or swap it for a smaller silhouette.
Explore minimalist piercing jewelry options to find simple shapes that suit a considered arrangement.
BodyJ4You: Acrylic Ear Stretching Kit
BodyJ4You’s Acrylic Ear Stretching Kit is relevant if your style goal includes stretched lobes, rather than simply adding standard lobe or cartilage piercings. For another material option, the Surgical Steel Taper and Plug Kit supports the same stretching-focused direction. These kits serve a different styling choice from tiny hoops and minimalist studs, so consider whether stretching fits the look you want before choosing one.
For piercing care, BodyJ4You also offers Saline Piercing Aftercare Spray and Piercing Bump Treatment Oil. Keep aftercare separate from jewelry styling, and follow the directions provided with each product.
Visit BodyJ4You online to explore its ear-stretching and piercing-care offerings.
Shape a look that grows with you
Your ear curation can evolve as your style changes. Treat the first arrangement as a starting point, then notice which pieces feel comfortable and most like you. A small edit can refresh a familiar combination without adding another piercing. Use these ear curation ideas for small ears as inspiration, not a fixed template.
If your next step involves stretching rather than adding delicate piercings, BodyJ4You offers the Acrylic Ear Stretching Kit and Surgical Steel Taper and Plug Kit. For piercing aftercare, its Saline Piercing Aftercare Spray is another relevant option. Choose products that fit the direction you’re taking, and follow their instructions carefully.
For placement decisions or questions about a new piercing, seek guidance from a trusted piercer. For product options that support your personal style, explore BodyJ4You’s piercing and stretching products. Keep your choices thoughtful, make room for your own preferences, and let your curation feel distinctly yours.
Frequently Asked Questions
What is a Curated Ear Piercing?
A curated ear piercing is a coordinated arrangement of piercings and jewelry chosen to create an intentional look. Rather than selecting earrings one at a time, curation considers how each piece relates to the whole ear, including existing piercings and future plans. For example, someone might keep a favorite lobe stud and later choose accents that echo its shape or finish. The design can evolve with personal style.
What does ear curation mean for ear piercings?
Ear curation means treating piercings and jewelry as parts of one personal design, rather than unrelated choices. It can involve deciding which details share a finish or motif and which provide contrast. The two ears don’t need to mirror each other: a lobe-and-helix arrangement on one side can balance a simpler look on the other. The aim is an overall effect that suits your preferences.
How to plan a balanced ear piercing arrangement for small ears?
Start by looking closely at your ear’s existing piercings and contours. Take a photo or sketch the outline, then mark the areas you want to draw attention to first. Consider how glasses, headphones, or hair may sit near proposed jewelry. Keep the design flexible and discuss placement with a trusted piercer who can assess your anatomy and how your plan will fit.


