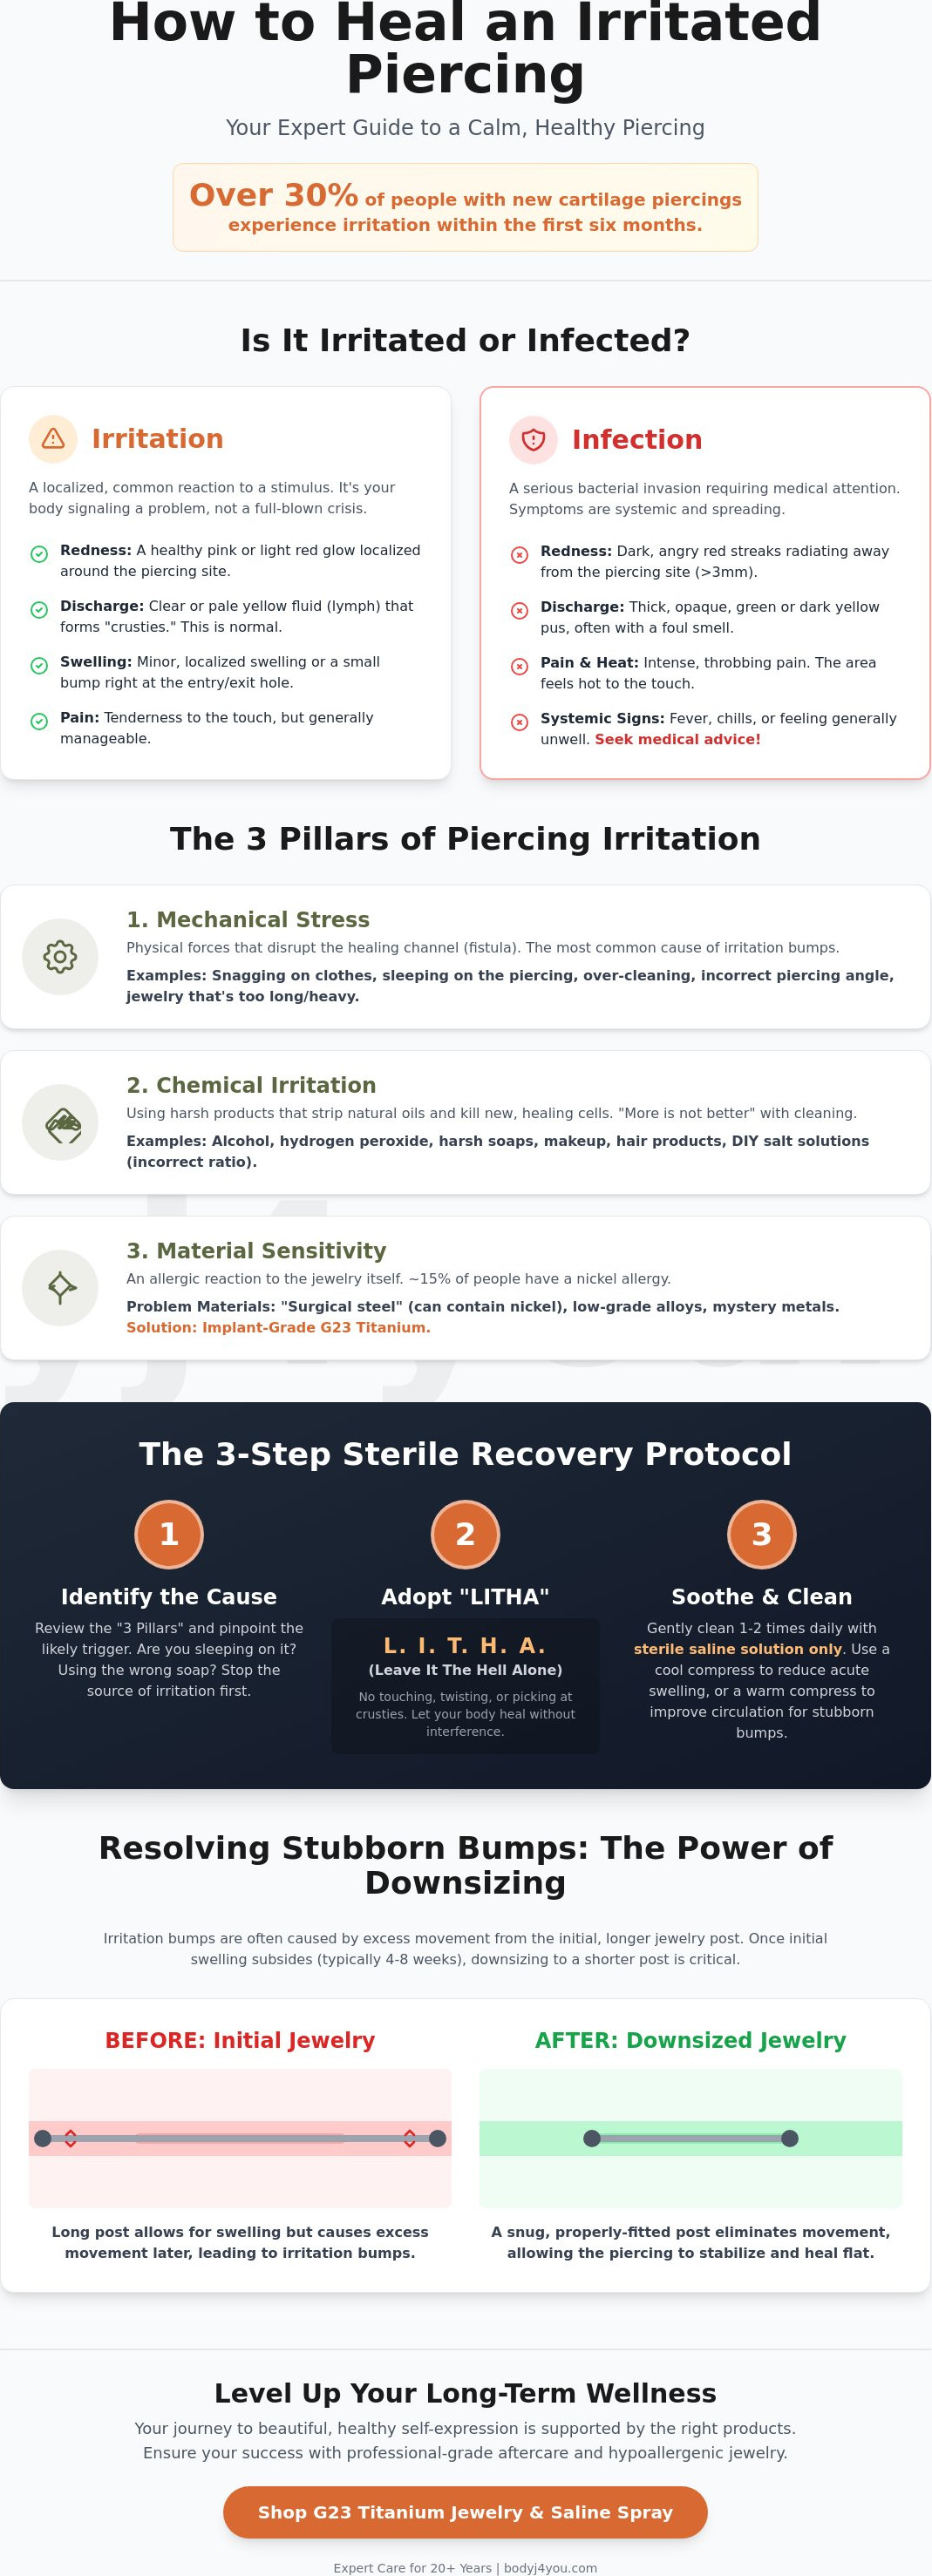
What if that persistent red bump isn't a sign of permanent failure, but a manageable signal from your body? Data shows that over 30% of people with new cartilage piercings experience localized irritation within the first six months of healing. You've likely felt the frustration of conflicting online advice while staring at a swollen, tender spot in the mirror. We understand the fear of rejection and the nagging discomfort that disrupts your sleep or daily routine. This expert guide explains how to heal an irritated piercing by identifying the root cause and applying a professional recovery plan.
It's time to level up your aftercare with a routine that is healthy, safe, and effective. At BodyJ4You, we've spent 20 years perfecting the balance between clinical safety and aesthetic beauty. You'll learn to distinguish between simple irritation and true infection while discovering how to eliminate bumps and reduce redness. We're going to break down the science of saline, the importance of hypoallergenic materials, and the exact steps needed to restore your skin's integrity. Our approach is crafted by experts and rooted in care to ensure your self-expression remains beautiful, safe, and pain-free.
Key Takeaways
- Distinguish between localized inflammation and spreading infection to ensure your recovery plan is both healthy and effective.
- Uncover the mechanical, chemical, and material triggers behind flare-ups and learn exactly how to heal an irritated piercing through targeted recovery.
- Master the professional "LITHA" protocol and temperature-based soothing techniques to stabilize your skin and provide immediate relief to angry tissue.
- Resolve stubborn piercing bumps by understanding the role of jewelry downsizing in eliminating the movement that disrupts your body’s natural healing.
- Level up your long-term wellness with a maintenance ritual rooted in hypoallergenic materials and expert-grade care for a lifetime of healthy self-expression.
Irritated vs. Infected: Identifying Your Piercing’s Condition
Success in body modification requires more than just a keen eye for aesthetics. It demands a deep respect for your body's biological limits. When you notice redness or a bump, your first instinct might be panic. We encourage you to adopt the Wise Guardian mindset instead. This approach prioritizes observation over reaction. Understanding how to heal an irritated piercing begins with accurate identification. Irritation is a localized inflammatory response to external stimuli like friction, poor jewelry quality, or accidental snagging. It's a signal, not a sentence. Crafted by Experts. Trusted by Thousands. Rooted in Care.
Distinguishing between irritation and infection is vital for your long-term health. While irritation stays localized, an infection is a systemic threat. Throughout the history of body piercing, practitioners have noted that true infections are often accompanied by spreading heat, thick green discharge, and a fever. If your piercing feels hot to the touch or you feel generally unwell, seek professional medical advice immediately. Most issues fall under the category of simple irritation that can be managed with professional-grade care, patience, and precision.
The Redness and Swelling Spectrum
A fresh piercing will naturally display a healthy pink glow for the first 14 to 21 days. This is a sign of active blood flow. Problems arise when that pink shifts into a dark, angry red that radiates away from the site. Localized edema is the body’s way of rushing white blood cells to the site. In oral piercings, you might notice "nesting," where the jewelry creates a small, comfortable pocket in the cheek or lip tissue. This differs from jewelry-induced swelling, which feels tight, painful, and restrictive. If your jewelry is sinking too deep, you may need a longer post to accommodate this natural recovery phase.
Discharge Decoded: What is Normal?
Don't let "crusties" alarm you. These are typically composed of lymph fluid, which is a clear or pale yellow substance that dries into a brittle solid. It's a sign that your body is working hard to seal the wound. Never pick these away with dry fingers. This causes micro-tears and resets your healing clock. Level up your aftercare by learning to distinguish this from pus, which is thick, opaque, and often foul-smelling. If you see 3 millimeters or more of spreading redness combined with opaque discharge, it's time to consult a doctor. Healthy healing is often messy, but it shouldn't be painful. Our 20 years of experience shows that most minor setbacks resolve with consistent saline irrigation and a hands-off approach. Learning how to heal an irritated piercing is about providing the right environment for your skin to do what it does best: regenerate.
Root Causes: Why Your Piercing is Reacting
Understanding how to heal an irritated piercing starts with pinpointing the exact source of distress. Most issues stem from three distinct pillars: Mechanical, Chemical, or Material. If you leave these reactions unaddressed, the body may initiate migration. This process involves the jewelry physically moving through the tissue, which can lead to permanent scarring or total rejection. It's a protective measure by your immune system, but it's one that can end your piercing journey prematurely if you don't intervene early.
Precision matters from the first second. An incorrect "Angle of Entry" creates a crooked channel that puts constant, lopsided pressure on the healing skin. This structural flaw often results in persistent bumps that refuse to flatten. Many enthusiasts believe that more cleaning leads to faster results. This is a myth. Over-cleaning strips away the body's natural defenses and irritates new cellular growth. Following the APP's official aftercare guidelines ensures you maintain a clean environment without sabotaging your own biology. Knowing how to heal an irritated piercing involves respecting the body's natural timeline rather than forcing it with harsh friction.
Material Sensitivity and Nickel Allergies
Mystery metals and low-grade alloys are frequent culprits in piercing flare-ups. Nickel allergies affect roughly 15% of people, causing the immune system to treat jewelry as a foreign invader. This leads to redness, itching, and weeping. Switching to high-quality Internal Threaded Labret Studs significantly reduces tissue trauma. These smooth posts glide through the fistula without causing micro-tears. For extreme skin sensitivities, G23 Titanium offers a biocompatible, nickel-free alternative to surgical steel that supports healthy, safe, and effective healing.
Mechanical Trauma and Snagging
Physical trauma is often accidental but highly damaging. The "Sleeping Effect" happens when pillow pressure compresses the piercing site for hours, triggering localized swelling and "angle shifts." Common snag hazards include textured towels, aggressive hairbrushing, and knit clothing. Mechanical irritation is a physical wound reopening, requiring physical stabilization to heal. You can level up your recovery by choosing jewelry that sits flush against the skin to minimize movement and snagging.
The 3-Step Sterile Recovery Protocol
Recovery begins with a simple philosophy: Leave It The Hell Alone (LITHA). Most people struggle with how to heal an irritated piercing because they over-clean or touch the site too often. Your body knows how to repair itself; it's your job to provide the optimal environment for that work to happen. You should see a visible reduction in redness and swelling within 3 to 7 days if you follow this structured approach. Temperature also plays a vital role in comfort. A cool compress reduces immediate swelling, while a warm saline soak increases localized blood flow to speed up cellular repair. Don't fall for the myth of rotating your jewelry. Moving the metal tears the fragile "fistula" or skin tunnel forming inside, which resets your healing clock and introduces bacteria.
Step 1: The Sterile Saline Flush
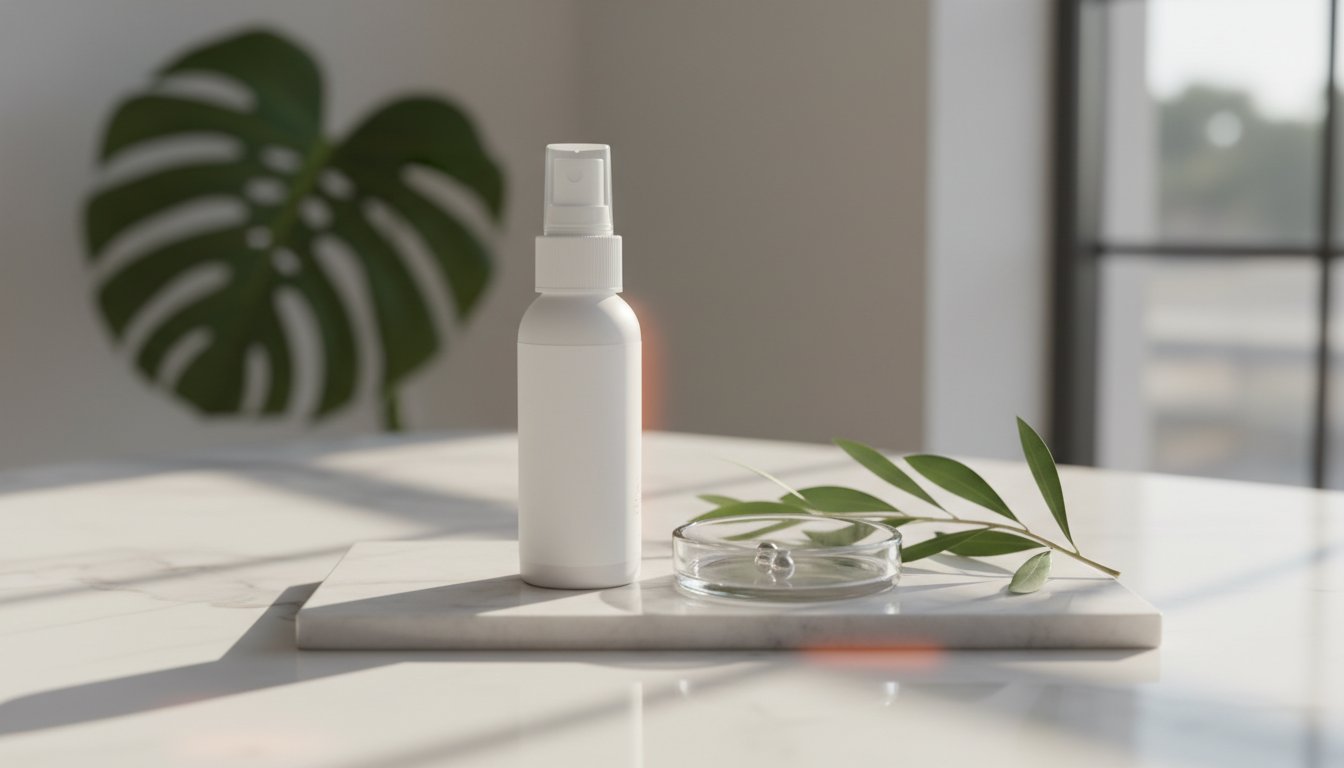
Consistency is key. Ditch the homemade salt mixtures; they're often too harsh or unsterile. Instead, use a professional Saline Piercing Aftercare Spray to ensure a precise 0.9% sodium chloride concentration. This isotonic solution cleanses without stinging. Use the "Soak and Pat" technique by saturating non-woven gauze and gently pressing it against the area for 5 minutes. Never use Q-tips or cotton balls. These materials shed tiny fibers that wrap around the jewelry, trapping bacteria and causing chronic inflammation.
Step 2: Moisture Management
Bacteria and fungi thrive in damp, dark environments. Leaving your piercing wet after a shower can lead to "moisture bumps" or fungal irritation. To prevent this, use a hair dryer on a cool, low-pressure setting to ensure the area is bone-dry. This is vital for complex cartilage areas like the Industrial or Tragus where water traps easily. Proper airflow is your best defense against stagnation. It'll keep the skin healthy, safe, and effective at its primary job: protection.
Step 3: Environmental Protection
Your piercing is a direct gateway to your bloodstream. Shield it from hair products, makeup, and perfumes that contain harsh chemicals. If you're a side-sleeper, a "piercing pillow" or a standard travel pillow is a non-negotiable tool. By placing your ear in the center hole, you eliminate the 8 hours of nightly pressure that causes jewelry migration. Finally, stay out of public water. Pools and hot tubs are breeding grounds for bacteria that can turn a minor irritation into a clinical infection. Level up your care routine by treating your piercing like the delicate wound it is. This protocol is rooted in care and designed to restore the integrity of your skin.
Managing Piercing Bumps and Stubborn Irritation
A piercing bump is rarely a sign of failure. It is often a granuloma, which acts as a protective shield formed by the body to wall off a perceived threat. This tissue growth typically occurs when the healing site experiences constant friction or pressure. Understanding how to heal an irritated piercing requires recognizing that these bumps are physiological responses to instability. While they look alarming, they are usually temporary and manageable with the right intervention. Distinguishing between a standard irritation bump and a keloid is vital; keloids are permanent, genetic scar tissue affecting roughly 10% of the population, whereas irritation bumps fluctuate in size and eventually disappear.
One of the most effective ways to resolve a bump is "downsizing" your jewelry. Initial piercings are fitted with longer bars to accommodate the first 14 days of swelling. Once that swelling subsides, a long bar creates a "seesaw" motion within the fistula. This movement tears the delicate new skin cells, leading to chronic inflammation. Visiting a professional piercer for a sterile swap between weeks 4 and 8 can stabilize the site and stop the cycle of irritation immediately.
The Power of Natural Healing Oils
Topical care provides the necessary environment for the skin to repair itself. Using a specialized Piercing Bump Treatment Oil helps to moisturize and soften the hardened scar tissue that forms around the exit holes. This approach is rooted in biology; the goal is to restore the skin's elasticity so it can close around the jewelry without tension. Consistency is the foundation of recovery. When you're focused on how to heal an irritated piercing, applying a targeted treatment twice daily can significantly reduce the height of a bump within 14 to 21 days.
- Jojoba Oil: This botanical extract is unique because it closely mimics the skin’s natural sebum. It penetrates deeply to restore the moisture barrier without clogging pores. You can find this in our Jojoba oil blends designed for sensitive skin.
- Rosehip and Castor Oil: These oils provide potent anti-inflammatory properties. They are particularly effective for older, stubborn bumps that have become dry or crusty.
- Massage Therapy: For piercings that are fully healed but feel tight or "pinched," a gentle massage with oil increases blood flow. This encourages the breakdown of excess collagen and keeps the tissue supple.
When to Swap Your Jewelry
If a bump persists despite proper cleaning, the jewelry itself is likely the culprit. This usually stems from two factors: material or fit. Low-grade metals containing nickel cause allergic reactions in about 18% of people. Switching to a flat-back labret made of implant-grade titanium or 316L surgical steel reduces "back-and-forth" movement and provides a smooth surface that won't trap bacteria.
You should always seek a professional for a "sterile swap" rather than attempting to change the jewelry at home. A piercer uses a taper to guide the new jewelry in, ensuring the fistula doesn't collapse or suffer additional trauma. This professional touch ensures your recovery stays on track. It is time to level up your aftercare routine and give your body the support it deserves.
Long-Term Piercing Health: Prevention and Maintenance
The journey to a healthy piercing continues long after the initial swelling subsides. While you might focus on how to heal an irritated piercing during a flare-up, true success lies in a consistent maintenance ritual. Treat your piercing like a permanent part of your anatomy. Clean the area with saline once or twice a week even after it feels fully recovered. This simple habit prevents the buildup of sebum, sweat, and dead skin cells that often lead to renewed irritation or localized infections in older piercings.
Your jewelry choice determines your skin's long-term reaction. Cheap alloys often contain nickel, which can trigger a delayed hypersensitivity reaction in up to 15% of the population. Investing in biocompatible materials like ASTM F136 titanium or solid 14k gold prevents the chronic low-grade inflammation that ruins the aesthetic of your modification. Your body's internal environment plays an equally vital role. Research indicates that even minor dehydration can slow cellular repair. Prioritize 8 hours of sleep and a diet rich in Vitamin C and Zinc to ensure your skin remains resilient. Your body is capable of incredible healing with the right support.
The BodyJ4You Quality Standard
Our aftercare solutions are Born in the USA, manufactured under strict quality controls to ensure every drop is pure. We've spent 20 years refining our formulas based on the evolving needs of the body modification community. Every product we create is vegan and cruelty-free, reflecting our commitment to ethical, high-performance healing. We believe in providing solutions that are healthy, safe, and effective. Crafted by Experts. Trusted by Thousands. Rooted in Care.
Level Up Your Aftercare Kit
Keep your recovery tools organized and sterile. Store your kit in a cool, dry place away from direct sunlight to preserve the integrity of the botanical ingredients. A complete kit should include:
- Isotonic saline spray for daily irrigation and debris removal.
- Piercing Cleaning Swabs for precision application in hard-to-reach areas.
- Healing oils to soothe dry skin and encourage tissue elasticity.
Don't wait for a problem to arise before you take action. Explore the full BodyJ4You Aftercare Collection to keep your piercings pristine.
Empower Your Healing Journey
Mastering the recovery process means listening to your body and responding with precision. By identifying the root cause of discomfort and sticking to a sterile protocol, you take control of your skin's health. Learning how to heal an irritated piercing involves moving beyond quick fixes and embracing professional-grade care that respects your body's natural boundaries. When you prioritize consistent maintenance and high-quality materials, you protect your investment in yourself.
BodyJ4You has spent over 20 years perfecting formulas that support your path to healthy self-expression. Our healing oils feature USDA Certified Organic ingredients to soothe stubborn bumps without the use of harsh, synthetic chemicals. Every aftercare product is manufactured locally in the USA to ensure the highest safety standards for our community of thousands. You deserve a recovery experience that's as intentional and unique as your jewelry. Trust your skin to the experts who have spent two decades rooting their craft in safety and care.
Shop our Expert-Crafted Piercing Aftercare Collection
Stay patient and keep your routine simple; your piercing will thank you for the extra attention.
Frequently Asked Questions
Is it normal for a 6-month-old piercing to suddenly get irritated?
Yes, it's very common for a 6-month-old piercing to experience sudden irritation. While the surface often looks healed, internal tissue takes up to 365 days to fully mature in cartilage areas. About 25% of enthusiasts report flare-ups during the first year due to accidental snags or pressure during sleep. Stay patient and maintain your cleaning routine to support the skin's natural recovery process.
Can I use tea tree oil on my piercing bump?
You should avoid applying pure tea tree oil directly to a piercing bump. Its 100% concentration is often too caustic for delicate healing tissue and can lead to secondary chemical burns. Instead, choose a professional piercing bump oil that uses a safe, diluted blend of organic botanicals. This ensures your care is healthy, safe, and effective for long-term skin integrity and self-expression.
How long does it take for a piercing bump to go away?
A piercing bump generally requires 14 to 42 days to disappear completely. Success depends on your consistency and knowing how to heal an irritated piercing by removing the source of friction or pressure. If the irritation persists for more than 60 days, your jewelry might be the wrong size or material. Level up your recovery by using sterile saline twice daily until the area flattens.
Should I take my jewelry out if my piercing is irritated?
You shouldn't remove your jewelry if the piercing is irritated or suspected of being infected. Keeping the post in place provides a vital channel for fluid drainage. If you remove it, the skin can seal shut in as little as 20 minutes, potentially trapping bacteria and causing a localized abscess. Consult an expert piercer to see if a jewelry upgrade to implant-grade titanium is necessary.
Can I use alcohol or hydrogen peroxide to clean an irritated piercing?
No, you must avoid using alcohol or hydrogen peroxide on any piercing. These chemicals are cytotoxic, meaning they kill the healthy fibroblasts needed for wound closure. Instead, use a sterile saline spray with a 0.9% sodium chloride concentration. This clinical standard is crafted by experts to cleanse the area without disrupting the delicate biological balance of your healing skin. Our products are rooted in care to ensure your safety.
Why is my piercing red but it doesn’t hurt?
Redness without pain often indicates a mild allergic reaction or localized vasodilation from minor trauma. Approximately 18% of people suffer from nickel sensitivity, which causes the skin to flush even if there's no sharp pain. It's a signal from your body to check your jewelry quality. Switch to hypoallergenic materials like 316L surgical steel or titanium to ensure your self-expression remains comfortable and aesthetically pleasing.
What is the "LITHA" method and does it actually work?
The LITHA method stands for "Leave It The Heck Alone," and it's a highly effective technique for recovery. By minimizing touch, you reduce the risk of cross-contamination and physical trauma to the site. Clinical observations suggest that 80% of minor irritation issues resolve when the patient stops over-handling the jewelry. It's a simple yet powerful way to learn how to heal an irritated piercing while trusting your body's natural resilience.


