
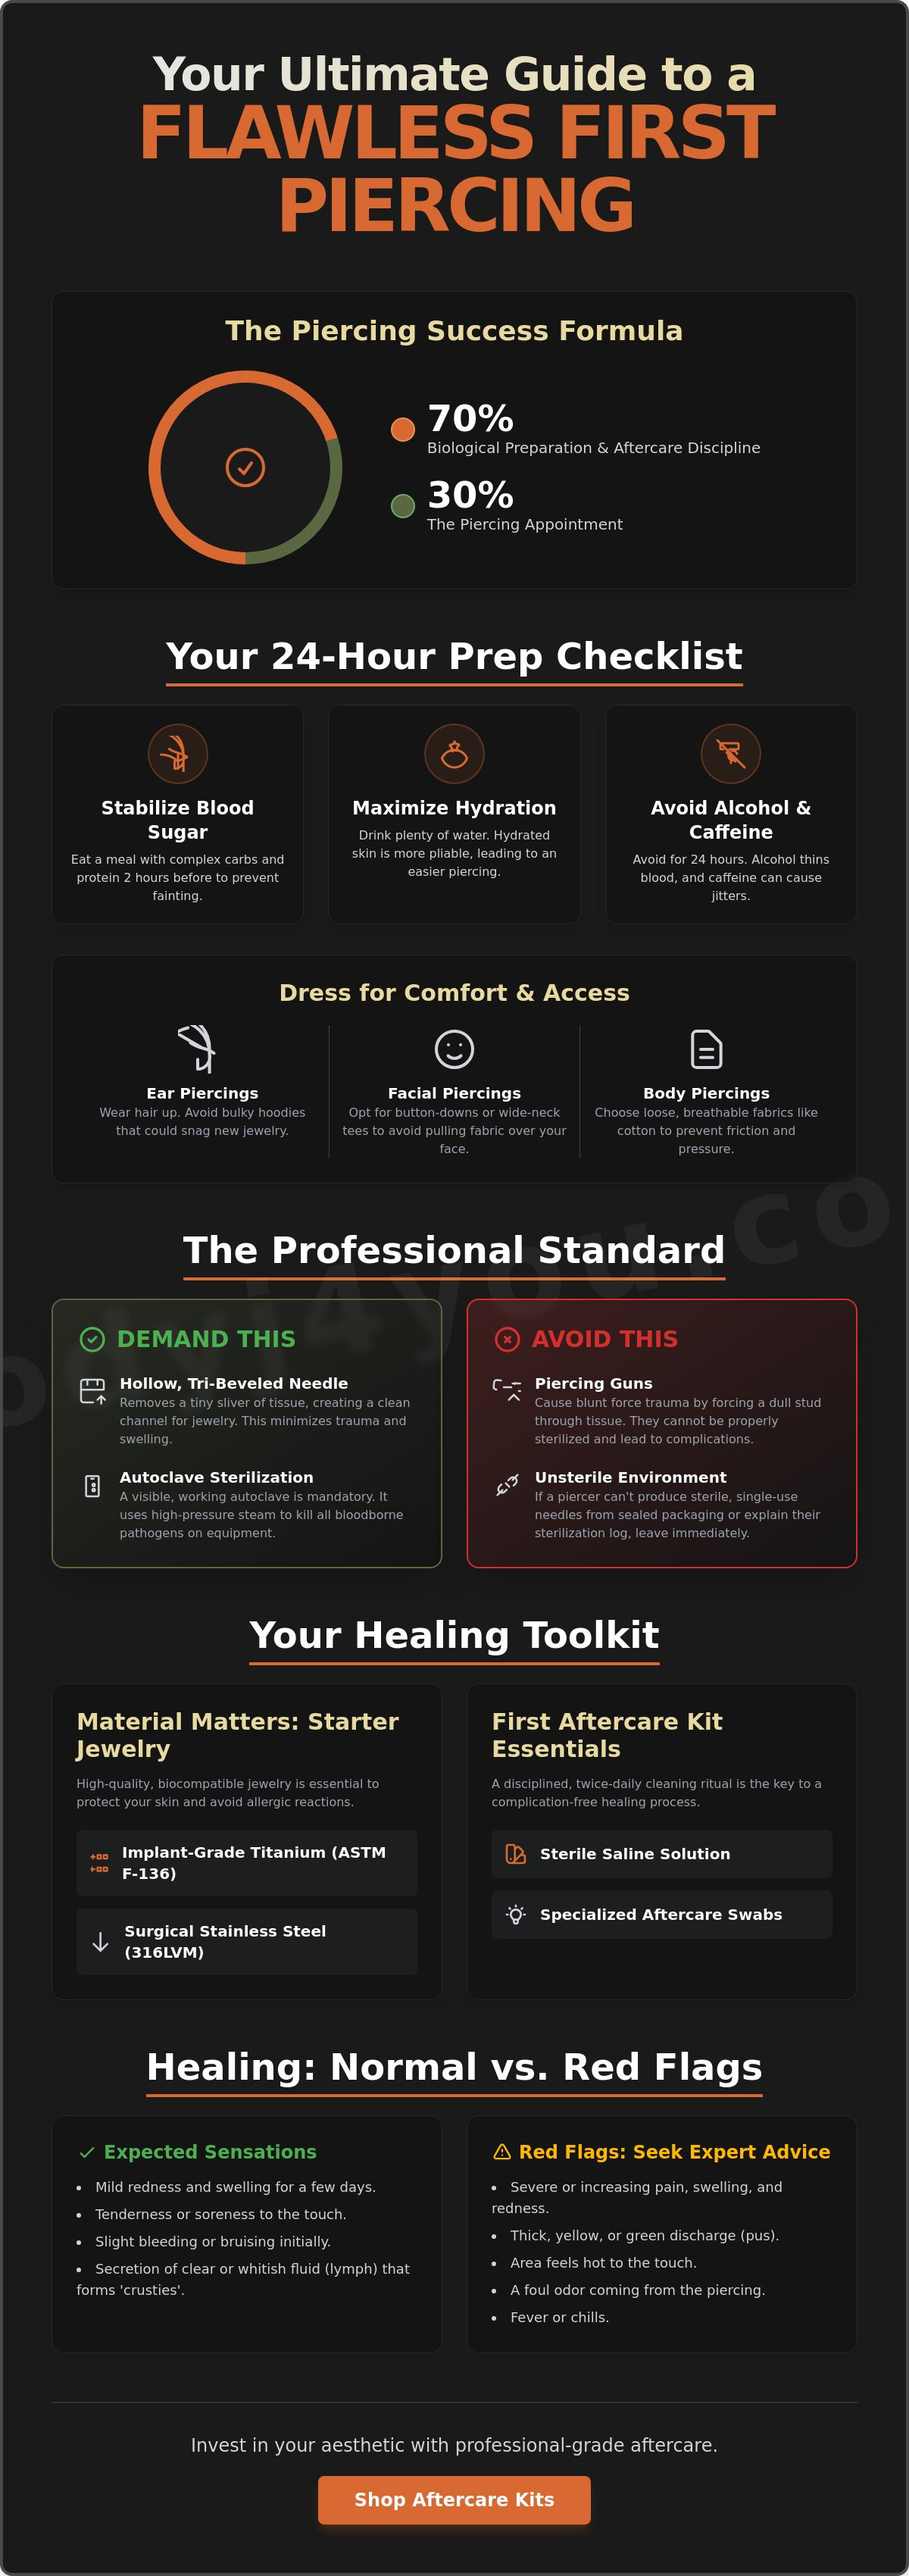
A successful first piercing is 30% the appointment and 70% the biological preparation and aftercare discipline. Safe. Stylish. Seamless. It's natural to feel a blend of adrenaline and apprehension before your first modification. You might worry about a sudden faint, a sharp sting, or the mystery of a healing bump appearing weeks later. To move from anxiety to empowerment, you need more than just a date with a needle; you need a strategy. This guide helps you prepare your body, choose a reputable studio, and curate a professional-grade first piercing aftercare kit that supports your skin's natural recovery.
You deserve a piercing experience that feels like a wellness ritual rather than a medical ordeal. We believe the path to self-expression should be clear, safe, and sophisticated. This comprehensive checklist promises to strip away the confusion of conflicting online advice. We will walk you through the essential pre-piercing steps, the biological standards for initial jewelry materials like implant-grade titanium, and the precise daily habits required for a flawless heal.
Key Takeaways
- Stabilize your blood sugar and maximize hydration to ensure a comfortable, fainting-free experience.
- Demanding autoclave sterilization and professional needle techniques is the only way to ensure clinical-grade results.
- Selecting high-quality, biocompatible jewelry materials like surgical stainless steel is essential to protect your skin’s integrity and avoid allergic reactions.
- Curate a first piercing aftercare kit with sterile saline and specialized swabs to maintain a disciplined, twice-daily cleaning ritual.
- Recognize the difference between expected healing sensations and genuine red flags to maintain your aesthetic investment.
Pre-Piercing Essentials: What to Do Before You Step into the Studio
Your journey into self-expression is a physical commitment. Body modification is an ancient art; throughout the history of body piercing, cultures have recognized that preparing the vessel is as vital as the act itself. You aren't just choosing a piece of jewelry; you're managing a biological response. While you might already be looking for a first piercing aftercare kit, the foundation of a successful heal starts 24 hours before your appointment.
The Blood Sugar Rule is your primary defense against vasovagal syncope. This is the clinical term for fainting caused by a sudden drop in heart rate and blood pressure. To prevent this, consume a substantial meal containing complex carbohydrates and proteins approximately two hours before your session. This stabilizes your nervous system. A hungry body is a stressed body. Stress leads to low pain tolerance and lightheadedness. Keeping your glucose levels steady ensures you remain conscious and comfortable throughout the process.
Hydration is your second biological pillar. Water intake directly influences skin elasticity and turgor. When you're well-hydrated, your skin is more pliable and resilient, which allows the needle to pass through the tissue with minimal resistance. Conversely, you must strictly avoid alcohol for at least 24 hours prior. Alcohol acts as a systemic blood thinner; it increases the likelihood of excessive bleeding and bruising during the procedure. Choose clothing that prioritizes access and comfort based on your chosen location:
- Ear Piercings: Wear your hair up and avoid bulky hoodies that might snag.
- Facial Piercings: Opt for button-down shirts or wide-neck tees to avoid pulling fabric over your face later.
- Body Piercings: Select loose, breathable fabrics like cotton to prevent friction and pressure on the new wound.
Biological Preparation: Fueling for the Needle
Focus on nutrients that support your internal calm. Lean proteins and slow-release grains provide the steady energy your body needs to process adrenaline. You should also limit caffeine. Excessive coffee or energy drinks can induce jitters and an elevated heart rate. This makes it difficult to remain still during precision work. A calm body ensures a clean puncture and a more positive memory of the day. Proper preparation is the first step in your first piercing aftercare kit strategy.
The Logistics Checklist: ID and Consent
Preparation also involves administrative discipline. In 2026, professional studios require valid government-issued photo identification for every client. If you're a minor, check local regulations regarding parental consent forms and specific birth certificate requirements. Research whether your chosen studio operates on a walk-in basis or requires a scheduled appointment. Arriving with the correct documentation and a clear mind allows you to focus entirely on your new aesthetic. This organized approach reflects the same discipline you will need during the healing phase.
The Professional Choice: Evaluating Your Piercer and Studio Standards
Selecting a piercer is the most critical decision in your journey. It's the difference between a seamless aesthetic and a permanent complication. Before you even purchase your first piercing aftercare kit, you must vet the environment where the procedure occurs. A reputable studio adheres to professional aftercare standards from the moment you walk in. This commitment to safety protects your health and ensures your jewelry sits perfectly for years to come.
Why the Needle is the Only Safe Option
Piercing guns are relics of an unregulated past. They function by forcing a blunt stud through the skin using high-pressure spring tension. This causes significant blunt force trauma. It tears the tissue rather than creating a clean channel. In contrast, a professional uses a hollow, tri-beveled needle. This instrument is designed to remove a tiny sliver of tissue, which creates a smooth path for the jewelry. This precision reduces swelling and minimizes the risk of the body rejecting the new addition.
Hygiene is non-negotiable. Most piercing guns are made of plastic. Plastic melts in an autoclave, which is the high-pressure steam sterilizer required to kill bloodborne pathogens. Professional needles are single-use and arrive in sterile, medical-grade packaging. If a studio doesn't have a visible autoclave or cannot explain their sterilization log, you should leave immediately. Needle piercings promote faster healing, lower inflammation, and significantly less scar tissue. This clinical approach is the only way to begin your healing journey with confidence.
Vetting the Portfolio: Beyond the Initial Photo
A piercer’s portfolio is their resume. Don't just look at "fresh" photos taken seconds after the needle is out. Look for a "healed" gallery. Healed photos prove that the piercer understands depth, angle, and long-term tissue health. Every person’s anatomy is unique. You need a specialist who respects these nuances, especially for complex placements like a septum piercing. This level of expertise ensures that your jewelry doesn't migrate or sit crookedly as the swelling subsides.
When you walk into a studio, observe the hygiene standards with a disciplined eye. A clean environment is a safe environment. Watch for these essential practices:
- Cross-Contamination Prevention: The piercer should change gloves after touching any non-sterile surface, including phones or computers.
- Workstation Clarity: The piercing area should be uncluttered and sanitized between every client.
- Single-Use Setup: All needles and gauze should be opened from sealed packs right in front of you.
A wise guardian of your health will always prioritize safety over speed. Once you've found a professional who meets these clinical standards, you can confidently begin stocking your first piercing aftercare kit with professional-grade aftercare products to maintain your new investment.
Material Matters: Selecting Your Starter Jewelry for Optimal Healing
Your body is a biological fortress. When a needle creates a new channel, your immune system immediately evaluates the material left behind. If your jewelry contains high levels of nickel or toxic alloys, your body will mount a defense. This leads to chronic inflammation, itching, or even rejection of the piercing. Biocompatibility is the measure of how well a material exists alongside living tissue without causing a reaction. Choosing the right metal is not just about aesthetics; it is about providing a stable environment for your cells to regenerate. This choice is the cornerstone of your first piercing aftercare kit strategy.
The Surgical Steel Advantage
Surgical stainless steel remains the industry standard for initial piercings. It is durable, affordable, and possesses a mirror-like finish that resists the buildup of bacteria. When selecting jewelry, you must look for implant-grade markers such as ASTM F138 or ISO 5832-1 compliance. These certifications ensure the metal is refined enough for long-term contact with internal body tissues. While fashion-focused retailers often suggest gold for sensitive skin, high-quality surgical steel provides a more consistent, hypoallergenic experience for a fresh wound.
For those with extreme sensitivities, titanium is the premium alternative. It is significantly lighter than steel and contains virtually no nickel. Titanium is chemically inert, meaning it does not react with body fluids. This makes it the safest possible choice for individuals who have historically struggled with costume jewelry or mystery metals. To keep your steel or titanium jewelry bright during recovery, avoid using harsh chemicals or abrasive cloths. A simple rinse during your daily cleaning routine is sufficient to maintain its integrity.
Threading and Jewelry Design
The architecture of your jewelry is just as critical as the metal itself. Professional piercers insist on internal threading for all starter pieces. In an internally threaded design, the screw thread is attached to the decorative end, while the post remains perfectly smooth. This is a vital safety feature. External threading, where the screw threads are on the post, can scratch and tear the delicate new skin as it passes through the channel. These micro-tears become breeding grounds for bacteria and cause unnecessary pain.
Using internal threaded labret studs is the superior choice for ear and lip piercings. The flat back reduces friction against the gums or the back of the ear, while the smooth post protects the healing fistula. You must also account for initial swelling. Your piercer will select a post that is slightly longer than necessary to allow the tissue to expand without being compressed. Following the Association of Professional Piercers aftercare guidelines means respecting this biological need for space. Once the initial inflammatory phase has passed, usually after 4 to 8 weeks, you can return to your piercer for a shorter, more comfortable post. Including these high-quality materials in your first piercing aftercare kit ensures your journey toward self-expression is both safe and stylish.
The Post-Piercing Recovery Checklist: Your First 30 Days
The first month of healing is a delicate dance between your immune system and your new jewelry. During this window, your body is working to create a fistula, which is the "skin tube" that lines the piercing channel. This process is fragile. Every time you touch, twist, or snag the jewelry, you risk tearing the microscopic new cells attempting to stabilize the wound. To ensure success, you must transition from the excitement of the studio to the discipline of a clinical recovery routine. Your first piercing aftercare kit is your primary tool for maintaining this biological balance.
The LITHA method is the gold standard for modern healing. It stands for "Leave It The Heck Alone." It sounds simple; however, it's the most difficult rule for many to follow. You should never rotate the jewelry. Modern metals like surgical steel do not "stick" to the skin, so the old advice to turn the stud is outdated and harmful. Moving the jewelry breaks the healing tissue and introduces bacteria into the open wound. Clean. Calm. Consistent. This is your tripartite motto for the next 30 days.
You will inevitably notice "crusties" forming around the entry and exit points. This is completely normal. These are composed of dried lymph fluid, a byproduct of your body's natural healing response. Do not pick them with your fingernails. Picking causes micro-trauma and introduces bacteria. Instead, soften them during your daily rinse and gently wipe them away only if they are ready to come off. If they remain stuck, leave them. They act as a biological bandage for the healing tissue underneath.
The Golden Rule: Your First Piercing Aftercare Kit
Precision is vital when choosing your cleaning agents. While older guides suggest DIY sea salt soaks, these are often unsterile and improperly balanced. A pre-mixed sterile saline spray for piercings is the only safe option in 2026. It provides the exact 0.9% sodium chloride concentration required to match your body's chemistry. This maintains the skin's pH balance without causing the dehydration associated with homemade solutions. Avoid using cotton balls; they leave behind tiny fibers that can wrap around the jewelry and cause irritation. Instead, use non-woven gauze or specialized swabs to apply your saline twice daily.
Lifestyle Adjustments for Success
Healing requires temporary changes to your daily habits. You must avoid swimming in pools, hot tubs, or lakes for at least 4 to 6 weeks. These bodies of water are reservoirs for bacteria that can easily overwhelm a fresh piercing. Similarly, keep your beauty routine away from the site. Hair products, heavy makeup, and perfumes contain chemicals that irritate the fistula. Sleep hygiene is equally important. If you have a new ear piercing, use a donut-shaped travel pillow. By placing your ear in the center hole, you avoid the pressure and friction of sleeping directly on the jewelry. This simple adjustment prevents the piercing from shifting or becoming inflamed overnight.
Invest in your recovery by stocking your first piercing aftercare kit with professional-grade saline and cleaning tools today.
Recognizing Red Flags: When to Seek Expert Advice
Distinguishing between the standard biological response to a wound and a genuine complication is the final step in your education. Your body is resilient, but it requires vigilant observation. While your first piercing aftercare kit provides the tools for daily maintenance, your intuition and knowledge act as the primary safeguards for your health. A successful heal is not just about the absence of pain; it's about the presence of stability, symmetry, and skin integrity. Understanding when to stay the course and when to intervene ensures your aesthetic journey remains a positive experience.
Normal Symptoms of a Healing Piercing
During the first few weeks, you should expect a localized reaction. Minor swelling, slight redness, and a tender sensation are standard signs of the inflammatory phase. You will likely notice a clear or pale yellow discharge that dries into a crust. This is lymph fluid, not pus. It is a sign that your white blood cells are active and protecting the area. As the skin regenerates, the site may feel tight or itchy. These are healthy indicators of cellular repair. However, certain placements require more patience. An industrial piercing, for example, often experiences prolonged sensitivity because the single bar connects two separate points of pressure. This dual-point tension makes the healing process more complex and reactive to movement.
You must monitor for genuine warning signs that deviate from this baseline. If you experience thick green or gray discharge, radiating heat, or a persistent throbbing pain that keeps you awake, these are red flags. Fever or red streaks emanating from the site require immediate medical attention from a doctor. For issues related to placement, jewelry fit, or minor irritation, your professional piercer is your best resource for a physical assessment.
Dealing with Irritation Bumps
The appearance of a small bump near the piercing site is a common hurdle for beginners. These are rarely keloids, which are permanent genetic scars. Most often, they are irritation bumps caused by moisture, friction, or poor jewelry quality. If you sleep on your piercing or use harsh chemicals, the tissue reacts by creating a localized swelling. Identifying the source of the irritation is the first step toward resolution. You can support the healing of these areas by using a specialized piercing bump treatment oil. These formulations use targeted ingredients to soothe the skin and reduce inflammation without the harshness of generic home remedies like tea tree oil.
Long-term maintenance also involves the critical step of downsizing. As the initial swelling subsides, the extra length of your starter post becomes a liability. A post that is too long will snag on clothing and shift within the channel, leading to migration or permanent irritation bumps. Between the 4 and 8 week mark, return to your piercer to have a shorter, more secure post installed. This ensures the jewelry sits flush against the skin, maintaining the angle of the piercing. Keeping a high-quality first piercing aftercare kit stocked with sterile saline and treatment oils ensures you can respond to these minor shifts with professional-grade care.
Master Your Journey to Flawless Self-Expression
Mastering your first piercing is an act of disciplined self-care. It begins with stabilizing your biology and ends with a commitment to clinical-grade maintenance. By choosing a professional studio and insisting on biocompatible materials like surgical steel or titanium, you've secured the foundation of a successful heal. You don't have to navigate the recovery phase alone. A curated first piercing aftercare kit ensures you have the precise tools necessary to protect your skin's integrity from day one.
BodyJ4You brings over 20 years of industry expertise to your recovery journey. We provide a US-manufactured aftercare line and ethically produced jewelry that bridges the gap between beauty and biology. Our collections prioritize purity and safety, ensuring your new aesthetic remains safe, stable, and stylish. Build your perfect first piercing aftercare kit with BodyJ4You and step into your new look with total confidence. You've prepared like a pro; now it's time to enjoy the results of your transformation.
Frequently Asked Questions
How much does a first piercing usually hurt?
Pain is a subjective experience that varies by location, but most clients describe the sensation as a quick pinch followed by a dull, warm throb. Earlobe piercings are generally the least painful, while cartilage and thicker tissue areas like the septum may feel more intense. The procedure is fleeting. Most piercings are completed in seconds, leaving you with a sense of empowerment rather than lingering physical distress.
Can I use rubbing alcohol or hydrogen peroxide to clean my piercing?
No, you must never use rubbing alcohol or hydrogen peroxide on a new piercing. These substances are excessively harsh; they kill the healthy cells your body needs for regeneration. Using them can lead to prolonged healing times, chemical burns, and increased irritation. Instead, your first piercing aftercare kit should contain sterile saline spray, which cleanses the wound while respecting your skin's natural biology.
How long do I have to wait before I can change my jewelry?
You should wait until the initial healing phase is complete, which typically takes 6 to 12 weeks for lobes and up to 6 months for cartilage. Swapping jewelry too early can cause the delicate fistula to collapse or become infected. It is essential to wait for the internal tissue to stabilize. Always consult your piercer for a professional assessment before attempting your first jewelry change for aesthetic reasons.
What happens if I accidentally sleep on my new piercing?
Sleeping on a new piercing can cause sudden irritation, increased swelling, or even migration due to prolonged pressure. If you wake up and notice the area is inflamed, perform a gentle saline rinse and monitor it closely for several days. Using a donut-shaped travel pillow to keep the ear suspended can prevent this issue. Consistent pressure can change the angle of the piercing, so vigilance is vital.
Is it normal for a new piercing to bleed a little?
Minor bleeding is a normal occurrence during the first few days of the healing process. Because the needle creates a fresh channel, small amounts of spotting may happen, especially if the jewelry is bumped or snagged. Use a clean piece of non-woven gauze to apply gentle pressure if the site bleeds after cleaning. However, if the bleeding is heavy or persistent, contact your piercer for an immediate consultation.
How do I know if my piercing is actually infected?
A true infection is characterized by radiating heat, thick green or gray discharge, and persistent throbbing pain that keeps you awake. While some redness and clear lymph fluid are expected, an infection often feels systemic and may be accompanied by a fever. If you notice red streaks emanating from the site, seek medical attention immediately. Most issues are simply irritations that can be resolved with a first piercing aftercare kit.
Can I get a piercing if I am under 18?
Yes, minors can obtain piercings; however, legal requirements vary by region and individual studio policy. In 2026, most reputable studios require a parent or legal guardian to be present with a valid government-issued photo ID and the minor's birth certificate. Always call your chosen studio ahead of time to confirm the specific documentation needed. This ensures the process is transparent, legal, and safe for your family.
What is the best jewelry material for someone with sensitive skin?
Implant-grade titanium is the superior choice for individuals with sensitive skin or known nickel allergies. It is a biocompatible, inert metal that does not react with body fluids or cause the chronic itching associated with fashion jewelry. Surgical stainless steel is also an excellent, durable option for the majority of people. Prioritizing high-quality, nickel-free metals protects your skin's integrity and ensures a smooth, complication-free healing journey.


