
Did you know that approximately 35% of individuals with ear piercings report at least one complication during their recovery journey? It's a startling figure that often stems from a simple lack of visual clarity. When you're staring in the mirror at a fresh helix or lobe, it's easy to spiral into anxiety about infection, rejection, or permanent scarring. You want to know exactly what does a healing piercing look like so you can stop guessing and start caring for your body with total peace of mind.
We understand that your piercing is a vulnerable point of self-expression that deserves clinical precision, nurturing care, and expert insight. This guide demystifies the recovery process by separating normal biological reactions from genuine red flags. We'll explore the difference between lymph fluid and pus, define the timeline for the "ugly phase," and provide the professional solutions you need for a seamless transition. By the end, you'll gain the confidence to distinguish between a healthy fistula in progress and a site that requires medical attention. Healing is a delicate journey; we're here to ensure you never have to walk it alone.
Key Takeaways
- Understand that your body is constructing a biological tunnel called a fistula, which naturally involves initial localized redness and minor swelling.
- Identify the critical difference between clear, healthy lymph fluid and the opaque, foul-smelling discharge associated with genuine infection.
- Gain visual clarity on exactly what does a healing piercing look like to distinguish between a normal "ugly phase" and urgent red flags.
- Recognize why a piercing that appears healed on the surface still requires internal tissue stabilization to prevent rejection or trauma.
- Learn how to use sterile saline and nourishing botanical oils to maintain a clean, supple, and aesthetically refined recovery site.
The Visual Anatomy of a Healing Piercing: What Is Normal?
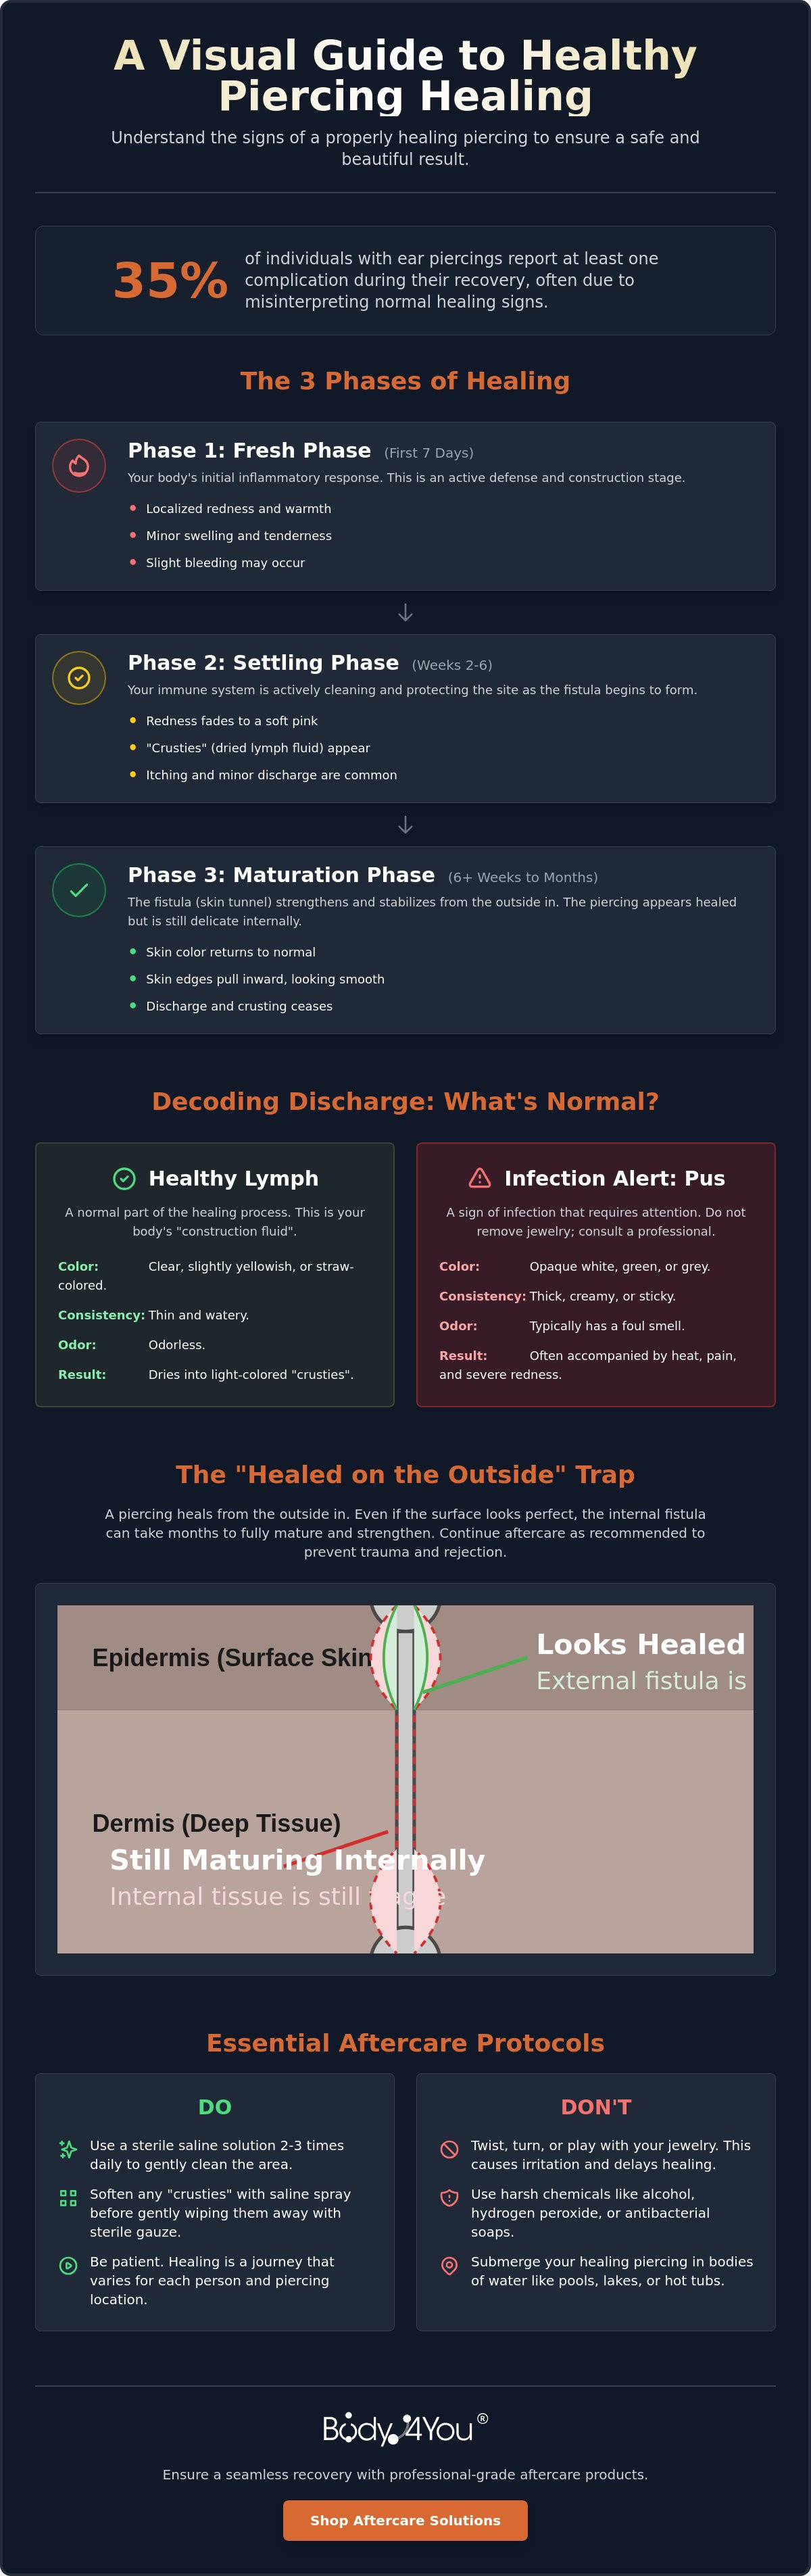
Understanding the biological reality of your new adornment is the first step toward a stress-free recovery. When you look in the mirror and ask, "what does a healing piercing look like," you are observing a complex physiological event. Your body is not simply closing a wound; it's constructing a permanent tunnel of scar tissue known as a fistula. This internal skin tube must be built from the outside in to protect your body from external pathogens. The body piercing healing process is a disciplined sequence of events that follows a predictable visual timeline.
During the Fresh Phase, typically the first seven days, expect a display of active defense. Your skin will likely show localized redness, slight swelling, and perhaps minor bleeding. This is the body's inflammatory response working to seal the site. By weeks two through six, you enter the Settling Phase. Here, the intense redness fades into a softer pink, and you'll notice "crusties" forming around the jewelry. These are dried lymph fluid, a sign that your immune system is active and healthy. As you move into the Maturation Phase, the skin edges begin to pull inward. The site looks more integrated, smooth, and stable.
Color Cues: From Angry Red to Soft Pink
Color is your primary indicator of cellular activity. In the initial 72 hours, a deep red hue is entirely normal. This happens because your body increases blood flow to the area to deliver essential white blood cells and nutrients. As the inflammatory response stabilizes, this vibrant red transitions into a light pink. It's a signal that the initial trauma has passed. Eventually, the skin returns to its natural flesh-toned state, indicating that the external edges of the fistula have successfully sealed. This progression is steady, logical, and reassuring.
Texture and Skin Tension
The feel of your skin is just as telling as the color. Fresh piercings often appear "shiny" or exceptionally tight. This is caused by minor edema, or fluid retention, as your body rushes to protect the new opening. The shiny appearance is a sign of active collagen production as your cells work to build the new tissue walls. As the piercing matures, this tension releases. Healthy healing involves the skin becoming matte and supple again, losing that translucent sheen in favor of a resilient, natural texture. You'll see the skin around the jewelry relax, moving from a state of high alert to one of quiet integration.
Lymph vs. Pus: Deciphering Piercing Fluids and Crusties
One of the most common anxieties for those monitoring a new modification is the appearance of discharge. When asking what does a healing piercing look like, you must distinguish between the body's natural defense mechanisms and signs of distress. It's vital to recognize that not all fluid is cause for alarm. Most of what you see is a sign of a healthy, active immune system working to stabilize your new aesthetic.
Lymph is your body's healing liquid. It's typically clear, thin, or slightly straw-colored. This fluid is a sophisticated cocktail of proteins and white blood cells designed to repair tissue and ward off bacteria. In contrast, pus is thick, opaque, and often colored white, green, or grey. It's almost always accompanied by a foul odor and localized heat. While lymph indicates a biological "construction site," pus signals a battle against infection that may require professional attention.
The Lymphatic System at Work
Your lymphatic system acts as a silent guardian. It delivers essential white blood cells directly to the piercing site to manage the recovery process. You'll likely notice that lymph production peaks during the second week of healing. This is perfectly normal. In its wet form, it looks like a clear gloss around the jewelry. When it dries, it becomes the "crusties" that many people mistake for a problem. These dried deposits are actually a protective seal, much like a scab, that prevents bacteria from entering the open fistula.
Removing these crusties requires a delicate touch. You should never pick at them with dry fingers, as this can tear the fragile new skin and reset your healing clock. Instead, use a Saline Piercing Aftercare Spray to soften the debris. Following the APP aftercare guidelines ensures you maintain a sterile environment without causing mechanical trauma to the site. Trust the liquid to do its job, but keep the area clean and unobstructed.
Red Flags: When Fluid Means Infection
While minor discharge is expected, you must stay vigilant for genuine red flags. Perform a simple "Heat Test" by hovering your clean hand near the site. Is the area radiating warmth? Is the redness spreading in a spider-web pattern away from the hole? These symptoms, paired with thick, cloudy discharge, suggest the body is struggling. If you notice localized swelling or a small, raised pocket of fluid, you may need to learn how to get rid of a piercing bump before the irritation escalates.
Consistency is your best defense against complications. Using sterile Piercing Cleaning Swabs soaked in saline allows for precise removal of softened crusties. This keeps the visual site clean while respecting the biological work happening beneath the surface. Monitor the color, check the temperature, and always prioritize purity in your aftercare routine.
The Healed-on-the-Outside Trap: Why Depth Matters
A common misconception in the piercing community is that surface-level calm equals total recovery. When you ask what does a healing piercing look like after the first month, the absence of redness might deceive you. This is the "healed-on-the-outside" trap. Your body naturally prioritizes closing the entry and exit points to keep pathogens out. However, the internal "tunnel" or fistula remains incredibly fragile long after the skin looks perfect.
Think of the fistula as a biological tube of skin. It takes months, not weeks, for these walls to thicken and gain the resilience needed to withstand jewelry changes. Even if your jewelry moves freely without pain, the internal tissue is often still translucent and thin. Swapping to a different style too soon can lead to the "cheese-cutter effect." This occurs when thin-gauge jewelry exerts pressure on an immature fistula, slowly slicing through the soft tissue and causing permanent migration or rejection. Patience is a virtue in personal aesthetics. Rushing the process often results in significant setbacks that could have been avoided with a few more weeks of discipline.
The 6-Month Rule for Cartilage
Cartilage healing is a marathon, not a sprint. Because cartilage lacks the rich blood flow found in earlobes, the internal maturation process is significantly delayed. What does a healing piercing look like in a helix or tragus? It might look "finished" externally by month three, but the lack of blood supply means the internal walls are still under construction. A mature cartilage site will no longer have a "dip" or slight indentation around the jewelry. For those managing more complex setups, our guide on industrial piercing 101 explains why the alignment of these internal tunnels is so critical for long-term comfort.
Testing the Maturity of Your Piercing
Identifying true maturity requires a keen eye. Look for a "rolled edge" at the piercing site. This visual marker indicates that the skin has successfully turned inward to meet the internal fistula walls, creating a smooth transition. Once you have surpassed the minimum healing time, you can perform a very gentle tug test to check for internal sensitivity. Never force movement if you feel any resistance or stinging. Following the Association of Professional Piercers aftercare guidelines is the best way to ensure you aren't mistaking a quiet surface for a fully healed site. When in doubt, seek a professional opinion before your first jewelry change.
Visual Cues for Special Piercings: Stretches and Cartilage
Specialized modifications require a specialized eye. While general recovery follows a standard path, unique placements like stretched lobes or industrial bars present distinct visual milestones. When you are monitoring these more complex sites, the question of what does a healing piercing look like becomes more nuanced. You aren't just looking for the absence of redness; you're looking for structural integrity, tissue density, and proper alignment.
Industrial barbells, for example, connect two separate cartilage holes with a single piece of rigid jewelry. This creates a unique tension. You must monitor both sites for "pulling" or uneven swelling. If one side looks angled or the skin appears tight against the bar, it may indicate excessive pressure. Similarly, septum piercings heal within a mucous membrane. This "hidden" process often involves more significant initial swelling inside the nose, which can make the jewelry appear crooked even when the placement is perfect. Understanding these nuances prevents unnecessary anxiety and helps you maintain your aesthetic vision.
Healthy Stretched Lobe Indicators
In the ear-stretching community, tissue health is the ultimate priority. A healthy stretched lobe should look like a smooth, plump "donut" of skin. It should be pink, resilient, and free of internal texture. If the skin looks thin, white, or develops a wrinkled "cat-butt" appearance, the tissue is likely stressed or stretched too quickly. For those at a 0g or larger, the lobe should maintain a consistent thickness throughout the entire circumference. To ensure you are moving at a safe pace, consult our ear gauge size chart for a precise roadmap to safety. If your lobes feel dry or tight, applying a specialized Gauges balm or Jojoba oil can restore the supple, healthy glow of mature skin.
Cartilage-Specific Healing Signs
Cartilage is notoriously temperamental due to its limited blood supply. During the first few months, many enthusiasts mistake "irritation bumps" for permanent keloids. An irritation bump is typically a small, flesh-colored or slightly red dome caused by friction, sleeping on the piercing, or improper jewelry length. These are manageable and often disappear with better care. A healthy cartilage piercing is defined as one with zero crust and no temperature elevation. You must ensure your jewelry is long enough to accommodate the initial "shiny" phase of swelling without embedding into the tissue. If you notice persistent bumps, a targeted Piercing Bump Treatment Oil can help soothe the area and return the skin to its natural, smooth state.
How to Support the Healthy Look: Aftercare Protocols
Achieving a refined aesthetic requires more than just patience. It demands a disciplined adherence to biological standards. When you understand what does a healing piercing look like at its peak, you realize that less is often more. Excessive scrubbing or the use of harsh chemicals can strip away the very cells your body is using to build the fistula. This leads to an "over-cleaned" look characterized by persistent, dry redness and flaky skin around the jewelry. You want to support the body, not overwhelm it.
A strict hands-off policy is your most effective tool for stability. Every time you touch or rotate your jewelry, you risk creating microscopic tears in the developing tissue. These tears invite bacteria and trigger inflammatory responses that cloud the visual clarity of the site. True care is about providing the right environment for your body to perform its own miracles. By maintaining a stable environment, you ensure the skin remains calm, the edges stay smooth, and the recovery stays on track.
The Saline Standard
Purity is the foundation of recovery. Using a Saline Piercing Aftercare Spray allows you to flush out debris and softened "crusties" without ever making physical contact with the wound. This preservation of the site's integrity is vital for a clean visual appearance. Misting is significantly superior to soaking because it maintains the skin's natural pH balance while delivering the precise 0.9% sodium chloride concentration required for cellular health. For detailed usage tips on this essential tool, consult our guide on sterile saline spray for piercings to maximize your results.
Nurturing the Healed Look
As the fistula stabilizes and the "shiny" phase of swelling subsides, your focus should shift to tissue conditioning. Botanical solutions like Jojoba oil and Rosehip oil are essential for maintaining the supple, resilient look of healthy skin. These oils mimic the body's natural sebum, preventing the "tight" or cracked appearance that often plagues maturing piercings. If you are managing stretched lobes, a specialized Gauges balm provides the deep hydration needed to keep the tissue plump and pink.
Should you encounter localized irritation, a targeted Piercing Bump Treatment Oil can soothe the "angry" look of minor inflammation before it escalates. This proactive approach ensures your self-expression remains vibrant and healthy. Ready to elevate your recovery routine? Shop BodyJ4You Aftercare Solutions to keep your healing on track with professional-grade products designed for the modern enthusiast.
Master Your Recovery Journey
A successful piercing is a sophisticated partnership between your aesthetic vision and your body's biological resilience. You now possess the visual clarity to identify exactly what does a healing piercing look like at every stage of the process. Remember that clear lymph is a sign of active repair, while the true maturation of the internal fistula requires patience that extends far beyond surface-level calm. By prioritizing purity and adhering to a strict hands-off policy, you protect the longevity and health of your self-expression.
BodyJ4You brings over 20 years of industry expertise to your daily routine. We provide locally manufactured skincare designed for strict quality control, a standard that has made us trusted by professional piercers worldwide. Our solutions bridge the gap between beauty and biology, ensuring your skin remains as resilient as your style. We act as a supportive specialist for your community, prioritizing the integrity of your skin over fleeting trends.
Keep your healing on track with BodyJ4You Saline Aftercare and embrace your new look with total confidence. Your journey toward safe, beautiful, and empowered self-expression is our highest priority. Stay disciplined, stay informed, and enjoy your transformation.
Frequently Asked Questions
Is it normal for a healing piercing to itch?
Itching is a common sign of tissue regeneration and the body's natural inflammatory response. As your immune system builds the internal fistula, it releases histamines that can cause a tingling or itchy sensation. This is a positive indicator of cellular activity. You should avoid scratching the area, as this introduces bacteria and causes micro-tears that reset your progress.
What color should the crust around my piercing be?
Healthy "crusties" are typically clear, white, or a pale straw-yellow. These deposits are simply dried lymph fluid, which is a vital byproduct of the healing process. If the crust transitions to a dark green, deep brown, or grey hue, it may indicate a bacterial issue. Understanding what does a healing piercing look like involves recognizing these light, translucent colors as signs of biological success.
How can I tell the difference between a healing piercing and an infected one?
A healing site exhibits localized, fading redness and thin discharge, while an infected site produces radiating heat, throbbing pain, and opaque pus. You can use the "Heat Test" to check for spreading warmth or red streaks moving away from the hole. While minor tenderness is expected, a genuine infection often feels like a persistent, deep ache accompanied by a foul odor.
Why does my piercing look healed but still hurts when I touch it?
This sensitivity occurs because skin heals from the outside in, leaving the internal fistula walls thin and fragile. While the surface looks calm, the biological tunnel is still under construction and lacks the density to handle pressure. It's a classic example of the "healed-on-the-outside" trap. Give the site several more months to thicken and stabilize before expecting total comfort during contact.
Is it normal for a piercing to be red after a month?
Light pinkness is perfectly normal after 30 days, especially for cartilage placements with limited blood flow. However, a deep or vibrant red color at this stage often suggests chronic irritation from friction, sleeping on the site, or improper aftercare. Ensure you are using a sterile saline mist and avoiding all physical trauma to help the skin transition back to its natural, resting tone.
What does a "rejected" piercing look like compared to a healing one?
A rejected piercing shows the jewelry physically migrating toward the surface of the skin, often leaving a red trail or a thinning "bridge" of tissue. A healing piercing remains deep, centered, and stable within the original placement. Rejection is a defensive move where the body treats the jewelry as a splinter, while healing is the process of the body accepting and integrating the adornment.
Can I use alcohol or peroxide if my piercing looks "gross"?
You should never use alcohol or hydrogen peroxide on a healing piercing. These substances are non-discriminatory; they kill the healthy cells and "good" bacteria your body needs to build the fistula. Using harsh chemicals creates a chemical burn that leads to excessive redness and delayed recovery. Stick to pH-balanced saline to flush the area without destroying the delicate new tissue.
How long does the "crusty" phase of healing typically last?
The peak "crusty" phase usually lasts between two and six weeks for most placements. This period aligns with the height of lymph production as your body seals the wound. While the frequency of these deposits will decrease over time, cartilage piercings may produce occasional crusties for up to a year. Consistent cleaning with a saline spray ensures these milestones remain a minor part of your journey.


