Your conch piercing isn't just a style choice; it's a biological commitment that requires a partnership between sterile hydration and mechanical stability. While the aesthetic impact is immediate, the conch piercing healing process is a marathon that demands patience, precision, and professional care. We understand the frustration of waking up with localized tenderness or discovering an unexpected bump just as you thought you were in the clear. It's exhausting to manage slow cartilage recovery, sleep-disrupting pain, and persistent irritation when you simply want to showcase your curated ear.
Sterile. Stable. Settled. This guide empowers you to master every stage of your recovery with a professional timeline and expert aftercare protocols. You'll learn exactly how to navigate the critical 6 to 12-month window, when to safely downsize your jewelry, and how to resolve common complications with specialized treatments. We provide a clear roadmap through the first year of healing, ensuring you know exactly when to transition from initial care to long-term styling. From the science of saline to the benefits of soothing botanical oils like jojoba and rosehip, you'll gain the knowledge needed for a healthy, irritation-free journey toward self-expression.
Key Takeaways
- Navigate the 6-12 month conch piercing healing process with a professional timeline that distinguishes between initial inflammation and full internal maturation.
- Implement a precise aftercare routine using sterile saline solutions to support your body's innate recovery without stripping away healthy new skin cells.
- Resolve persistent irritation bumps and sleep-related complications by identifying the root causes of pressure and moisture buildup in the ear bowl.
- Protect your aesthetic investment by understanding the essential downsizing window, which prevents jewelry migration and long-term cartilage tilting.
- Empower your self-expression with high-end, wellness-oriented solutions that prioritize purity, dermatological standards, and long-term tissue health.
The Conch Piercing Healing Timeline: What to Expect
The conch piercing healing process is a sophisticated biological journey that requires patience, precision, and respect for your body's limits. Unlike soft tissue piercings, cartilage has limited blood flow. This physiological reality extends the recovery window significantly, typically requiring 6 to 12 months for the tissue to reach full maturation. Understanding the stages of repair helps you distinguish between normal recovery and potential complications. For a foundational perspective on the history and risks associated with these procedures, you may consult this Body Piercing Overview. We view this timeline not as a hurdle, but as a partnership between your immune system and your aftercare discipline.
Phase 1: The Initial Reaction
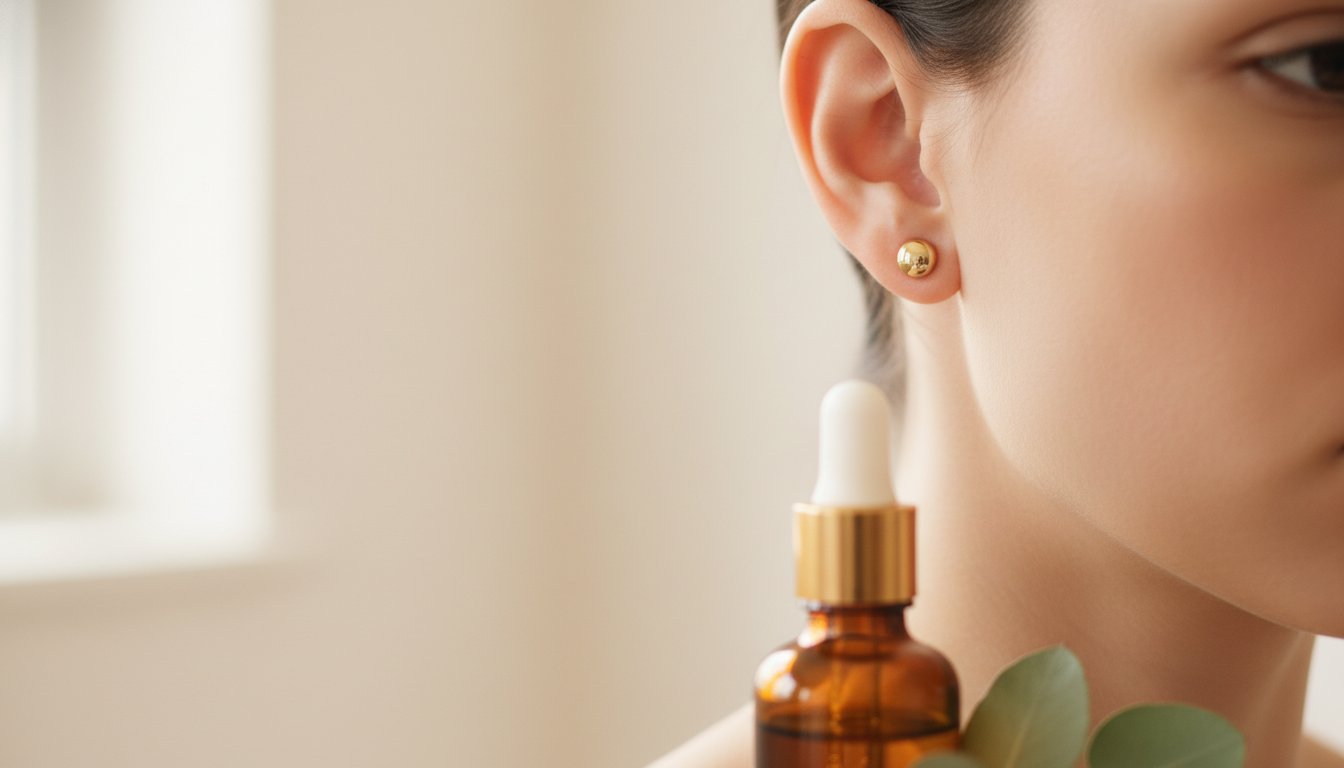
The first three weeks are defined by the inflammatory stage. During the initial 72 hours, expect localized redness, heat, and a rhythmic throbbing as your body initiates its primary defense response. It is common to see a clear or pale yellow fluid, known as lymph, crusting around the jewelry. Lymph is a natural byproduct of cellular repair that carries white blood cells to the wound site; it is not a sign of infection. During this phase, the focus is on three core pillars: stability, cleanliness, and observation. Avoid touching the site and ensure you use a sterile saline spray twice daily to clear debris without disturbing the delicate new cells.
Phase 2: The Long Plateau
From months two through five, your piercing enters the proliferative phase. This is the period when the fistula, the tube of skin that lines the piercing track, begins to form and toughen. This phase is often the most deceptive part of the conch piercing healing process because the ear may look perfectly healthy on the outside while the internal tissue remains thin and fragile. Consistency in aftercare is most critical during the third month. This is when many individuals fall into a "false sense of security" and stop their cleaning routines or attempt premature jewelry changes. Such actions can lead to immediate setbacks, including:
- Localized swelling and "The Big Swell" recurrence
- Development of irritation bumps
- Micro-tears in the developing fistula
Maturation typically begins after the six-month mark. This is when the internal tissue strengthens and the piercing finally stabilizes. You'll know you've reached this stage when the skin feels supple, there is no tenderness when touched, and the jewelry moves freely without any crust or resistance. Respecting this 12-month marathon ensures your self-expression remains healthy, vibrant, and permanent.
The Gold Standard Aftercare Protocol
Success during the conch piercing healing process depends on a delicate biological balance. Your body possesses an innate ability to repair itself; your primary responsibility is to provide a stable, sterile environment that supports this recovery. Many enthusiasts fall into the trap of over-cleaning. Excessive scrubbing or the use of harsh chemicals can strip away the fragile new skin cells trying to form the fistula. Instead, adopt a philosophy of protective care. By choosing high-quality materials like surgical steel for your initial jewelry, you significantly reduce the risk of allergic reactions and localized irritation. Purity is the priority. Stability is the goal. Healing is the result.
The Daily Cleaning Ritual
Precision in your routine prevents complications before they arise. Mist the piercing with sterile saline spray for piercings twice daily to flush out debris and lymph. Unlike homemade sea salt mixtures, which often contain improper concentrations or contaminants, professional-grade saline ensures a perfect 0.9% sodium chloride balance. This concentration mirrors your body's natural chemistry, aligning with the Association of Professional Piercers aftercare guidelines for optimal recovery. After misting, gently pat the area dry with non-woven gauze or a clean paper towel. Moisture rot occurs when the ear bowl remains damp, creating a breeding ground for bacteria. Avoid using Q-tips or cotton balls; these can leave behind microscopic fibers that snag jewelry and trigger inflammation.
The LITHA Method: Leave It The Hell Alone
Mechanical irritation is the leading cause of conch piercing failure. Every time you rotate, twist, or "break the crusties" on your jewelry, you tear the microscopic layers of new tissue forming inside the ear. This trauma restarts the healing clock and often leads to unsightly bumps. The LITHA method is a disciplined approach to recovery that prioritizes physical stability. Don't touch the site. Don't sleep on the piercing. Don't allow hair products to accumulate near the wound. When showering, let warm water flow gently over the ear to soften any stubborn crust, but avoid direct high-pressure spray that might snag the post. Maintaining this discipline is easier when you use professional-grade tools like our piercing cleaning swabs, which are designed for precision without the risk of fiber shedding. By respecting the physical boundaries of your new piercing, you ensure a smoother transition to a fully settled, curated ear.
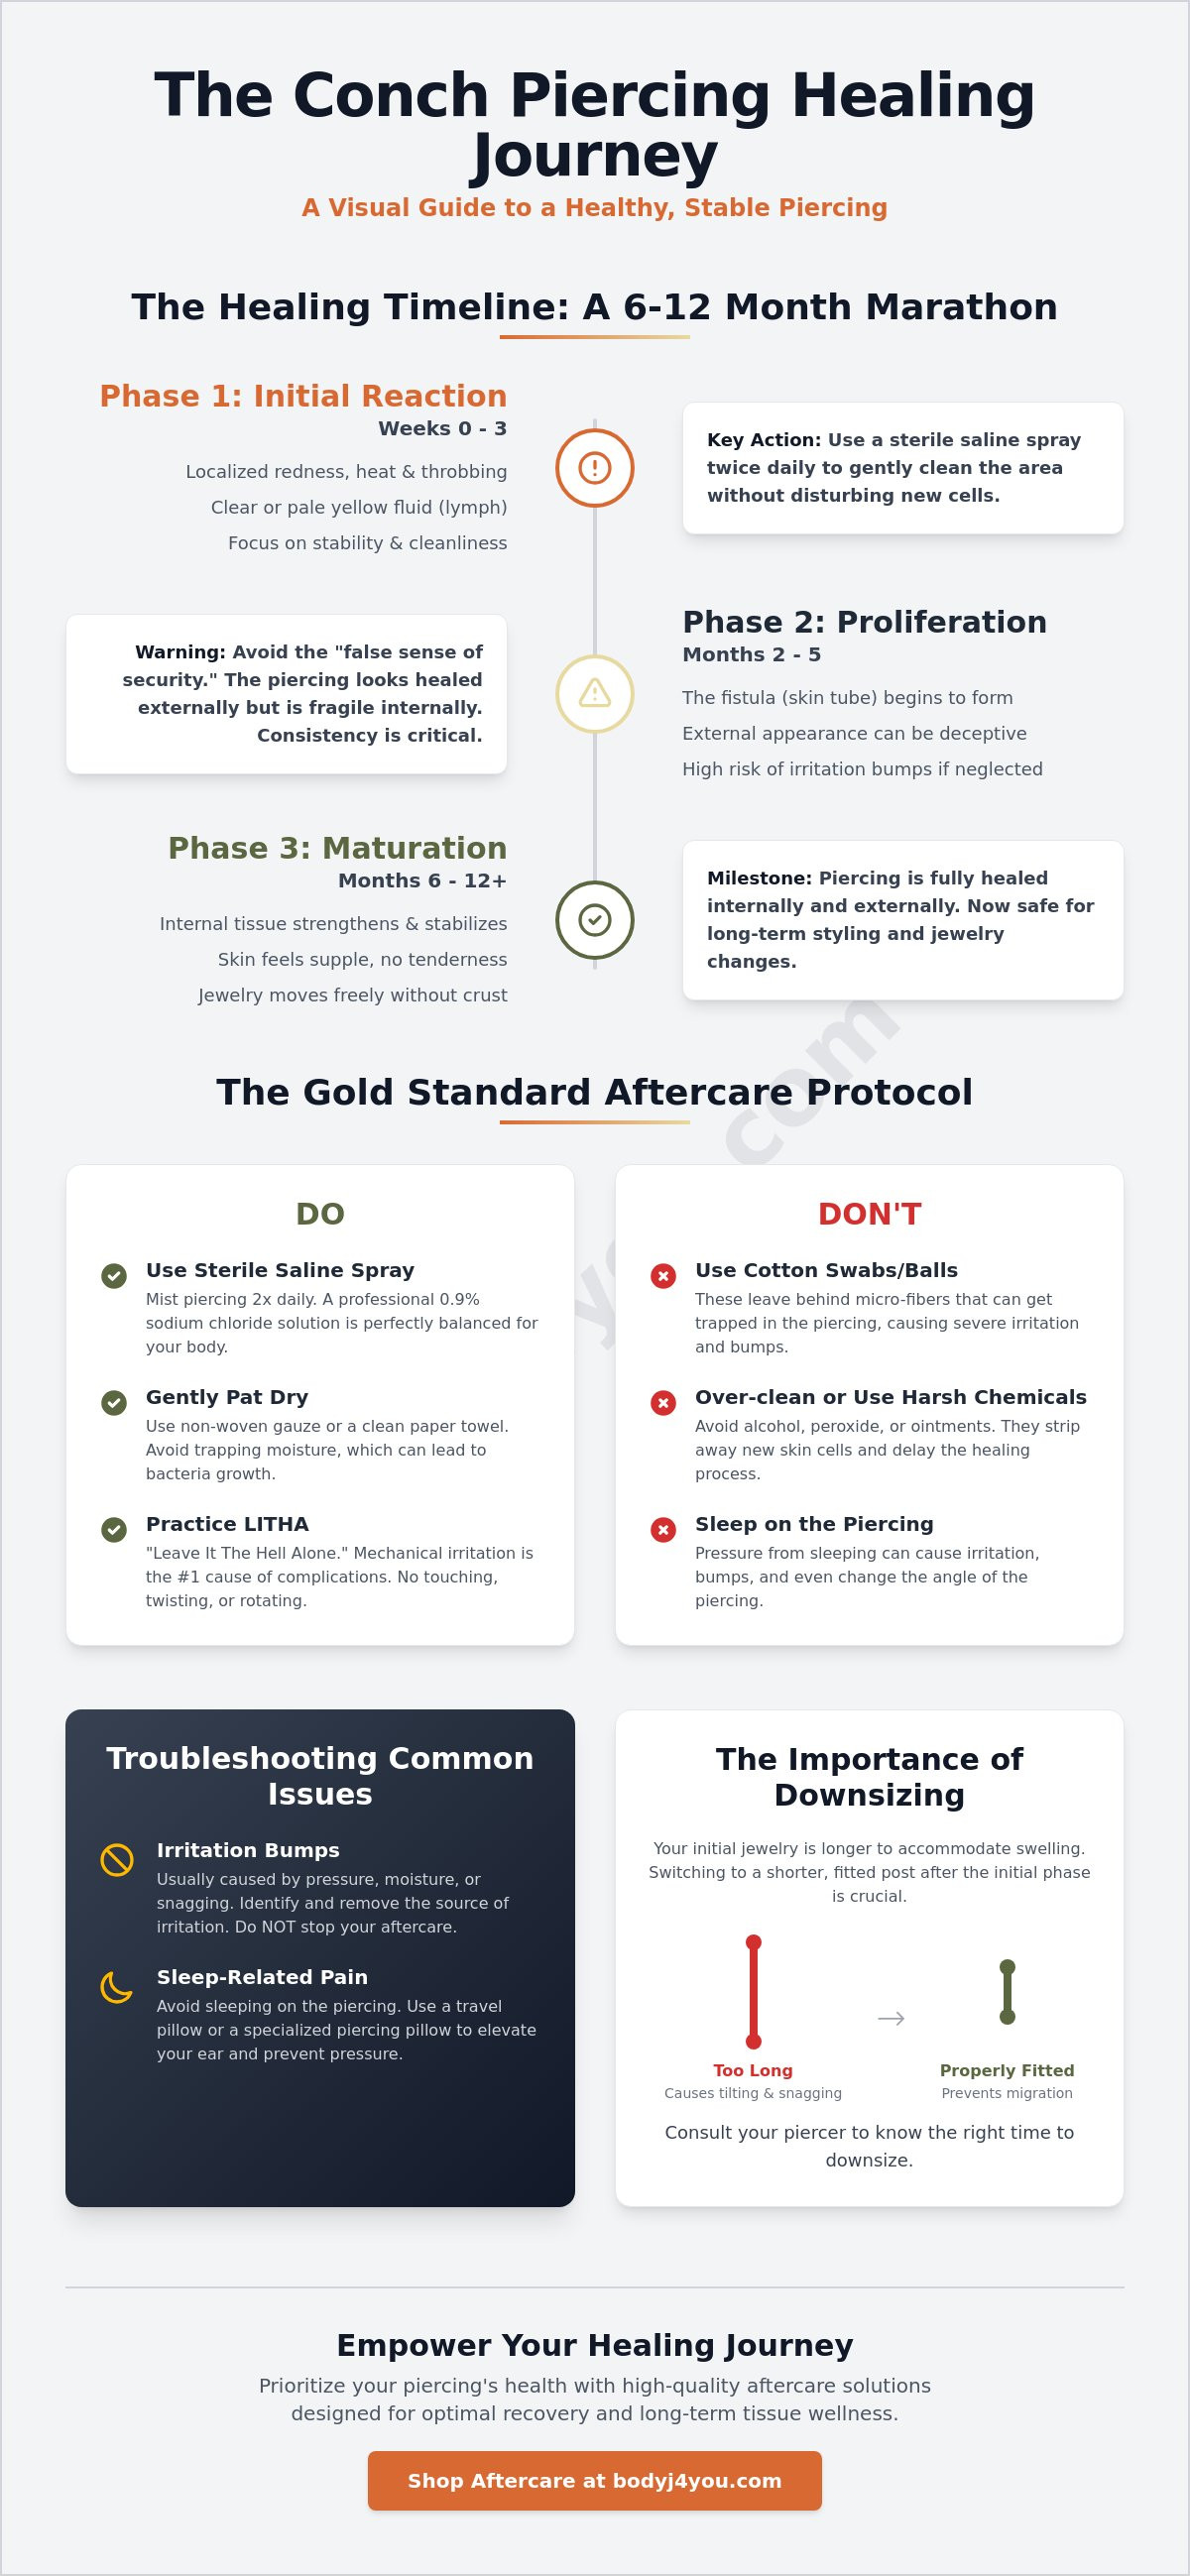
Troubleshooting Bumps and Sleep Irritation
The conch piercing healing process requires more than just cleanliness; it demands mechanical stability. Because the concha is a deep, concave bowl of cartilage, it is uniquely susceptible to moisture traps and pressure-induced trauma. When the delicate fistula is compressed or kept damp, the body often responds with hypertrophic scarring, commonly known as an irritation bump. These small, raised nodules are frequently mistaken for keloids. However, true keloids are rare genetic overgrowths of collagen that extend far beyond the original wound site. Most bumps are simply localized signals that your piercing is under stress. Identify the stressor. Remove the friction. Restore the balance.
How to Get Rid of Piercing Bumps
Resolution begins with a thorough audit of your daily habits. Is your jewelry material causing a reaction? Are you accidentally snagging the post with your hairbrush? If you notice a persistent bump, it is time to shift from passive cleaning to active soothing. Incorporating a piercing bump treatment oil can help calm localized inflammation and soften the tissue. We recommend using warm saline compresses for five minutes daily to encourage blood flow to the cartilage, which lacks its own direct blood supply. This increased circulation accelerates the removal of cellular waste and supports the stabilization of the fistula.
Safe Sleeping Strategies
Sleeping directly on a healing conch piercing is the primary cause of migration, where the jewelry shifts into an unsightly, permanent angle. This is the "Side-Sleeper’s Dilemma." To protect your piercing, adopt these three essential strategies:
- The Donut Pillow Trick: Use a travel pillow or a specialized piercing pillow with a hole in the center. Suspend your ear in the opening to eliminate all direct pressure.
- Hair Stabilization: Pin back long hair or wear a silk sleep cap. This prevents individual strands from wrapping around the labret stud and tugging on the wound during the night.
- Accessory Discipline: Avoid over-the-ear headphones for at least the first four months. The constant pressure on the cartilage bowl will inevitably trigger a flare-up.
If you wake up to find a "crusty" or slightly bloody piercing, don't panic. This is a sign of minor nocturnal trauma. Avoid picking at the site. Instead, use a gentle saline mist to soften the debris before wiping it away with a sterile swab. Consistency is your greatest ally in maintaining a healthy, irritation-free conch piercing healing process.
Downsizing and Jewelry Transitions
The conch piercing healing process isn't a static event; it's a series of strategic hardware adjustments designed to protect your ear's anatomy. When you are first pierced, a professional uses an intentionally long post to accommodate "The Big Swell." This initial inflammatory response is a natural part of cartilage repair. However, once the primary swelling subsides, that extra length becomes a liability rather than a safeguard. Cartilage is stubborn. It resists change. It requires a flush fit to remain healthy. Leaving long jewelry in for too long is the leading cause of migration, where the piercing permanently tilts into an undesirable angle.
Why Downsizing is Mandatory
A shorter post is essential for long-term mechanical stability. When jewelry is too long, it creates a "lever effect." Every time the post snags on a shirt, a strand of hair, or a pillowcase, it puts immense pressure on the delicate fistula. This constant tugging triggers the body to produce excess scar tissue, resulting in persistent irritation bumps. Most enthusiasts reach the ideal window for their first professional downsize between 6 and 12 weeks. During this visit, a shorter post is installed to sit flush against the ear. This minimizes movement. It reduces friction. It ensures the piercing stays perpendicular to the tissue. If you're ready for a more secure fit, explore our collection of Internal Threaded Labret Studs designed for clinical-grade stability.
Choosing Your Permanent Jewelry
Selecting your "forever" jewelry requires a balance of aesthetics and biology. While surgical steel is an excellent, biocompatible choice for many, those with extreme sensitivities may prefer titanium. Before making a purchase, it's vital to understand ear gauge sizes to ensure the post thickness matches your initial piercing. Most conch piercings are performed at a 16g or 14g to provide a sturdy foundation for the ear's curve.
The transition from a stud to a conch hoop is a major milestone, but it's one that requires discipline. You must wait until the internal track is fully matured, typically at the 9 to 12-month mark. Hoops introduce significant movement and weight, which can easily reopen a semi-healed fistula. When you finally make the switch, prioritize high-quality captive bead rings or clickers. A healthy piercing is a beautiful piercing. Patience is the price of a perfect curated ear.
Empowering Your Healing with BodyJ4You
Success in the conch piercing healing process is not a matter of luck; it is a result of using the right tools at the right time. At BodyJ4You, we provide a curated ecosystem of aftercare and jewelry designed to respect your unique anatomy. With over 20 years of experience supporting the body modification community, we act as a protective force for your self-expression. We bridge the gap between clinical precision and aesthetic refinement. Our products are locally manufactured to ensure clinical-grade purity. We prioritize your biological health without compromising on style. This sense of quiet pride in our heritage translates to a brand you can rely on. We are more than a retailer; we are a supportive specialist dedicated to your long-term wellness.
The Essential Aftercare Kit
Our aftercare solutions are formulated with ingredient integrity as the highest standard. The Saline Aftercare Spray is pure, sterile, and easy to apply; it provides the isotonic environment your cartilage needs to thrive. For those facing the common "Side-Sleeper’s Dilemma" mentioned earlier, our healing oils are designed to target stubborn cartilage bumps with soothing, natural ingredients. We also include precision cleaning swabs in our kits. These are essential for reaching the deep, concave areas of the concha without leaving behind irritating fibers. Clean. Protect. Stabilize. These three pillars define our approach to recovery. By maintaining strict dermatological standards in our production, we ensure that every application supports your body’s innate healing ability rather than hindering it.
Premium Jewelry for Every Stage
Choosing the right hardware is a critical decision in the conch piercing healing process. We specialize in internal threaded labret studs, which ensure the smooth portion of the post passes through the fistula to minimize tissue trauma during insertion. This design prevents the microscopic tearing often caused by external threads. Once your piercing has reached full maturation, our vast collection of surgical steel hoops offers a safe, polished way to complete your curated ear. Every piece in our collection is crafted to be affordable yet high-quality, ensuring you never have to choose between your budget and your well-being. We focus on niche problem-solving, positioning ourselves as specialists in a broad market. Our commitment to ethical sourcing and material purity means you can wear our jewelry with confidence.
Your journey toward a fully settled, healthy piercing deserves the oversight of a specialist. Shop the BodyJ4You collection today to find the perfect balance of safety and style for your conch piercing. We are here to guide you through every stage of your aesthetic evolution, ensuring your self-expression remains as healthy as it is beautiful.
Master Your Curated Aesthetic
The conch piercing healing process is a journey defined by patience and precision. You now understand that success requires more than just time; it demands a commitment to mechanical stability and sterile hydration. By respecting the 12-month maturation timeline and prioritizing essential milestones like professional downsizing, you protect your ear's anatomy from migration and persistent irritation. Remember that your body is a partner in this recovery. Provide it with the stability it needs, and it will reward you with a vibrant, settled piercing that lasts a lifetime.
At BodyJ4You, we stand as your supportive specialist through every stage of this evolution. We bring over 20 years of industry experience to your aftercare routine, offering US-manufactured solutions and dermatologically inspired ingredients that prioritize biological integrity. Whether you're soothing a new piercing or transitioning to premium surgical steel jewelry, our curated collection ensures your self-expression remains safe and aspirational. Secure your healing journey with BodyJ4You Aftercare today. Your path to a perfectly healed, curated ear begins with the right tools and a disciplined spirit. Stay consistent, stay patient, and enjoy the art of your own growth.
Frequently Asked Questions
How painful is the conch piercing healing process compared to other ear piercings?
The conch piercing healing process is generally more intense than a standard lobe but comparable to a daith or rook. Because the cartilage in the concha is significantly thicker than the helix, you might experience a persistent throb for the first 72 hours. Most individuals rate the initial procedure as a mid-range discomfort. The long-term recovery is defined more by localized tenderness than acute pain.
Can I sleep on my side while my conch piercing is healing?
You should not sleep directly on your side during the first 4 to 6 months of recovery. Constant pressure against the ear bowl causes the jewelry to migrate, which results in a permanent, crooked angle. If you are a dedicated side-sleeper, use a travel pillow to suspend your ear in the center hole. This simple adjustment ensures mechanical stability while you rest and prevents irritation bumps.
When can I safely change my conch jewelry to a hoop?
You must wait at least 6 to 9 months before transitioning from a stud to a hoop. While the exterior might look settled, the internal fistula requires months of maturation to handle the weight and movement of a ring. Changing to a hoop too early often triggers a setback in the conch piercing healing process. Patience ensures your curated ear remains healthy and aesthetically pleasing.
What should I do if my conch piercing develops a bump?
If a bump develops, identify and remove the source of irritation immediately. This is often caused by nocturnal pressure or using poor-quality jewelry materials. Apply a warm saline compress twice daily to encourage blood flow to the cartilage. You can also use a specialized piercing bump treatment oil to soothe localized inflammation and support the skin's natural recovery.
Is it normal for my conch piercing to still hurt after three months?
Occasional tenderness at the three-month mark is perfectly normal. Cartilage heals from the outside in; the internal tissue remains very fragile at this stage. If the pain is sharp or accompanied by new swelling, it likely indicates a recent snag or pressure trauma. Continue your saline routine and maintain strict LITHA (Leave It The Hell Alone) discipline to allow the site to stabilize.
How do I know if my conch piercing is infected versus just irritated?
Infection is characterized by spreading redness, extreme heat, and thick, foul-smelling green or yellow discharge. In contrast, irritation usually presents as localized redness and clear or white lymph fluid. If you experience fever or chills, seek medical advice immediately. Most issues are simply irritation caused by mechanical stress or improper aftercare protocols.
Can I swim in a pool or the ocean with a new conch piercing?
Avoid swimming in pools, lakes, or the ocean for at least 8 weeks. Standing water is a breeding ground for bacteria that can easily enter the open wound. Chlorine and salt can also be excessively drying to the new tissue. If you must enter the water, keep your head dry or use a waterproof bandage to seal the area completely from contaminants.
What gauge is a standard conch piercing?
A standard conch piercing is typically performed at a 16-gauge or 14-gauge. This thickness provides the necessary stability for the dense cartilage of the ear bowl. Using a thinner gauge can lead to migration or the "cheese-cutter effect" over time. Always verify your specific size with your professional piercer before purchasing new internal threaded labret studs for your collection.


