

What if the most effective way to heal your new cartilage piercing is actually to do almost nothing at all? While it feels counterintuitive, achieving a flawless result is a marathon of biological patience where minimal intervention yields the maximum aesthetic result. By following professional helix piercing aftercare instructions, you can transform a vulnerable wound into a permanent piece of self-expression without the common setbacks of irritation or unsightly bumps.
We understand the frustration of slow healing times, the sharp discomfort of a piercing that refuses to let you sleep, and the anxiety of seeing an unexpected bump form. You deserve a healing journey that is predictable, safe, and empowering. This guide provides a professional-grade daily routine and expert troubleshooting tips to ensure your skin remains clear and healthy. You will learn the exact science of saline cleansing, the importance of jewelry material, and the precise timeline for when to safely downsize your labret stud. Our goal is to provide the purity, precision, and protection you need for a fully healed, aesthetic finish.
Key Takeaways
- Understand why the avascular nature of ear cartilage requires a more disciplined and patient approach than traditional lobe piercings.
- Master the essential helix piercing aftercare instructions that prioritize hand hygiene and sterile saline irrigation for a pristine healing environment.
- Discover lifestyle secrets like the "Donut" method to protect your piercing from physical trauma and chemical irritation during sleep and daily grooming.
- Learn to troubleshoot common complications by identifying the root causes of irritation bumps using our professional "Checklist of Three."
- Recognize the critical biological milestones that indicate when it is safe to downsize your jewelry for long-term stability and comfort.
The Anatomy of Cartilage Healing: Why Helix Piercings Are Unique
The helix is the delicate, curved outer rim of your ear's cartilage. While it provides a stunning canvas for self-expression, it is structurally distinct from the soft, fleshy tissue of your earlobe. Understanding The Anatomy of Cartilage Healing is the first step toward a successful aesthetic result. Modern helix piercing aftercare instructions prioritize the biological reality of this tissue to ensure your new jewelry remains a source of pride rather than a source of irritation.
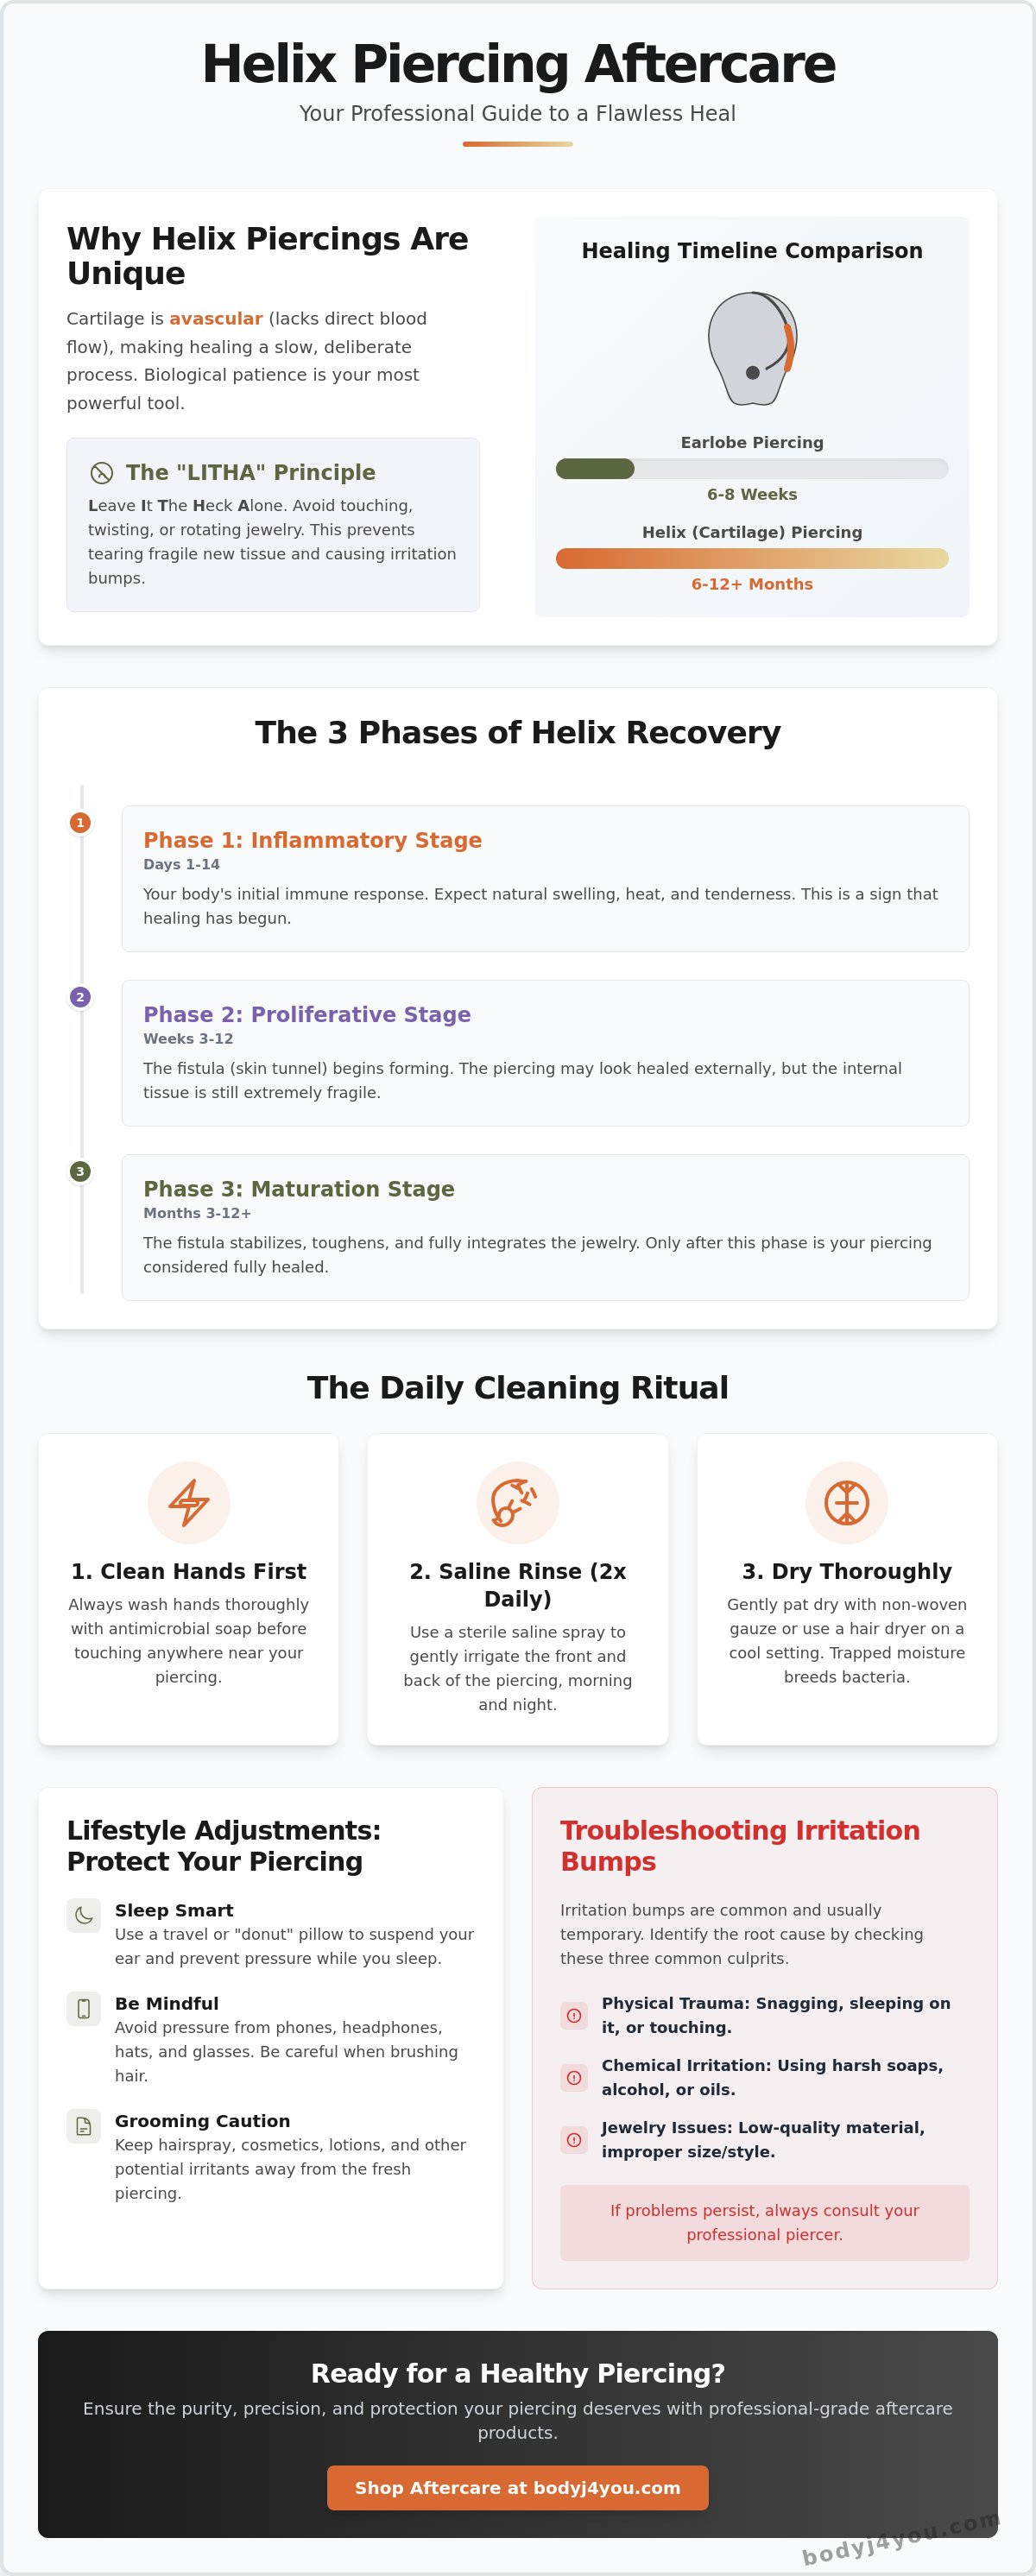
Biological patience is your most powerful tool. Cartilage is avascular, meaning it lacks the direct, robust blood flow found in other parts of the body. Blood brings oxygen. It carries nutrients. It removes waste. In the absence of a rich capillary network, the body must work significantly harder to transport these healing agents to the site of your piercing. This biological reality is why cartilage is often stubborn, slow to recover, and sensitive to environmental changes. Expect a timeline of 6 to 12 months for complete internal stabilization. During this period, you must act as a Wise Guardian for your skin. Your goal is to protect the site from trauma while providing the purity it needs to thrive.
The Three Phases of Helix Recovery
Healing isn't a single event; it's a disciplined sequence. In Phase 1, the inflammatory stage (Days 1-14), your body reacts with natural swelling, heat, and tenderness. This is a sign of your immune system's protective response. Phase 2, the proliferative stage (Weeks 3-12), is where the "fistula" or skin tunnel begins to form around your jewelry. While the piercing may look healed on the surface, the internal tissue is still incredibly fragile. Finally, Phase 3, maturation (Months 3-12), is when the piercing stabilizes, toughens, and fully integrates the jewelry into your anatomy.
Why "LITHA" (Leave It The Heck Alone) Works
Minimal intervention is the gold standard of modern care. Excessive movement disrupts the delicate new cellular growth trying to bridge the gap in your cartilage. When you rotate a stud or play with a hoop, you tear the microscopically thin layers of healing skin. This friction often leads to unsightly piercing bumps or prolonged redness. Following professional helix piercing aftercare instructions means trusting the process and avoiding the urge to touch. You will likely notice "crusties," which are dried lymph fluid and dead skin cells. These are a natural byproduct of the healing process. Don't pick them. Let the warm water of your shower or a gentle saline irrigation naturally rinse them away to maintain the integrity of your skin.
The Daily Ritual: Step-by-Step Helix Cleaning Protocol
Clean hands are the non-negotiable foundation of wellness. Before you even consider touching the area around your ear, you must wash your hands thoroughly with antimicrobial soap. Bacteria are opportunistic. A single touch with unwashed fingers can introduce pathogens into the delicate fistula, stalling your progress and risking irritation. Adhering to professional helix piercing aftercare instructions begins with this simple, disciplined act of hygiene. Precision in care leads to perfection in aesthetics.
The clinical standard for cartilage recovery is a twice-daily cleaning rhythm. Once in the morning. Once at night. This consistency ensures that debris doesn't accumulate while preventing the over-cleaning that can lead to dryness. To maintain the biological integrity of the site, use a sterile saline spray for piercings to irrigate the front and back of the helix. Unlike traditional methods that rely on physical contact, a pressurized mist provides a gentle, hands-off approach that flushes away impurities without disturbing the jewelry. Following a Step-by-Step Helix Cleaning Protocol ensures you are using the most current industry standards for safety and comfort.
Moisture is a hidden enemy. After irrigation, you must ensure the area is completely dry. Trapped moisture can soften the skin and create a breeding ground for bacteria. Don't use plush towels, as their loops can snag jewelry and leave behind lint. Instead, gently pat the site with non-woven gauze or use a hair dryer on a cool, low setting. This targeted drying keeps the skin stable and the environment controlled. For those who prefer a more tactile approach during the later stages of healing, using specialized piercing cleaning swabs can help reach tight crevices without the risk of loose fibers found in standard cotton buds.
The Saline Advantage vs. DIY Solutions
Purity is paramount. While DIY salt water soaks were once common, they are often too harsh or non-sterile for modern standards. Homemade solutions lack the precise 0.9% sodium chloride ratio required for isotonic safety. If a mixture is too salty, it dehydrates the cells; if it isn't salty enough, it won't effectively clean. A medical-grade saline spray ensures a sterile, balanced environment every time. The pressurized delivery also reaches the hidden anatomy behind the helix rim where debris often hides, providing a level of cleanliness that manual soaking simply cannot match.
Managing "Crusties" Without Irritation
You'll likely notice a clear or pale yellow discharge that hardens around your jewelry. Don't panic. This is lymph fluid, a healthy sign that your body is transporting white blood cells to the area. It's a natural part of the healing journey. However, you must manage this buildup carefully. Soften the debris in the shower under a gentle stream of warm water before applying your saline spray. Never pick, scratch, or force these "crusties" off when they are dry. Doing so creates micro-tears in the healing tissue, which is a primary cause of the unsightly bumps many people fear. Patience is your most effective tool for maintaining clear, healthy skin.
Lifestyle Adjustments: Protecting Your Piercing in the Wild
Healing is a 24-hour commitment that requires constant vigilance in your daily environment. While the cleaning ritual provides the foundation, your lifestyle choices determine whether the tissue remains calm or becomes chronically inflamed. Integrating professional helix piercing aftercare instructions into your routine means identifying hidden risks in your surroundings. From the way you rest your head to the accessories you wear, every interaction matters. You are the guardian of your aesthetic journey.
The Sleeping Strategy
Pressure is the silent disruptor of cartilage alignment. When you sleep directly on a fresh piercing, the constant weight can cause "migration," where the jewelry shifts to an unflattering angle. To prevent this, adopt the "Donut" method by using a travel pillow. Place your ear in the center hole to ensure zero contact with the surface. It's a simple, effective, and protective strategy. Avoid heavy blankets or oversized pillows that might pin the ear against your head. This trapped heat and pressure can trigger sudden swelling and irritation.
Beauty and Grooming Precautions
Chemical purity is vital for a recovering helix. Shampoos, conditioners, and hairsprays contain fragrances and surfactants that are often too harsh for a healing wound. Implement a "rinse-last" shower routine: wash your hair first, then thoroughly irrigate your ear with fresh water to remove any residue. If you have long hair, keep it tied back during the first few months. Loose strands can easily wrap around a labret stud, causing painful snags and micro-tears. Be especially vocal at the hair salon. A single aggressive comb stroke can cause significant "salon trauma," setting your healing back by weeks.
Modern life presents unique challenges for ear health. Your smartphone screen is a reservoir for bacteria; sanitize your device daily or use the speakerphone function to avoid contact. Similarly, be mindful of tight beanies, helmets, and over-ear headphones. These items compress the cartilage and trap moisture, which can lead to the development of irritation bumps. If you are active in high-impact sports, consider wearing a protective headband to secure the jewelry. If you do experience minor redness or a flare-up from a snag, applying a specialized piercing bump treatment oil can help soothe the skin and restore balance. Consistency in these small adjustments ensures your helix remains clear, healthy, and beautiful.
Troubleshooting Complications: Piercing Bumps and Irritation
Even with the most disciplined helix piercing aftercare instructions, the journey to a fully healed cartilage piercing can encounter obstacles. The "dreaded helix bump" is a common sight for many, but it isn't a sign of failure. It's a signal. Most of these small, raised nodules are irritation bumps, which are localized inflammatory responses to physical or chemical stress. These are often confused with keloids, but true keloids are rare, permanent, and typically tied to genetic predispositions. Most bumps you encounter will subside once the source of stress is removed.
To restore balance, we utilize the "Checklist of Three." First, audit your aftercare consistency; have you been diligent with your saline irrigation? Second, evaluate the jewelry fit; is the bar too long and snagging, or is it so short that it's embedding into the tissue? Third, verify the material purity. If your skin feels chronically itchy or looks purple rather than pink, you may be reacting to the jewelry itself. Understanding how to get rid of piercing bump issues requires a systematic approach to these three pillars.
The Irritation Bump Rescue Protocol
If a bump appears, transition into a rescue mindset. Warm saline compresses are your most effective tool for promoting drainage and encouraging blood flow to the avascular cartilage. Soak a non-woven gauze in warm saline and hold it against the site for five minutes. To soothe localized inflammation and support the skin's natural barrier, apply a specialized piercing bump treatment oil. This botanical blend provides a protective layer that calms the tissue without the harshness of chemicals. If the bump is caused by jewelry that is too long, a professional downsize may be the only way to stop the cycle of irritation.
Material Matters: Steel vs. Titanium
The biology of your ear is unique, and some individuals are more sensitive to metal alloys than others. Persistent redness and weeping often point to a nickel allergy. While high-quality surgical steel is a stabilizing choice for many and offers a high-end aesthetic, it does contain trace amounts of nickel. If irritation persists despite perfect care, switching to G23 Titanium is often the solution. Titanium is completely biocompatible and nickel-free, offering the ultimate purity for sensitive skin. Ensure any replacement jewelry is internally threaded to prevent micro-tears during the transition.
You must also learn to recognize the signs of a true bacterial infection, which requires medical attention. While irritation is common, an infection is a systemic threat. Watch for radiating heat, thick green or foul-smelling discharge, and extreme throbbing that extends beyond the ear. If these symptoms are accompanied by a fever or swollen lymph nodes in the neck, consult a healthcare professional immediately. For daily maintenance and to prevent these issues before they start, ensure you have a fresh supply of saline piercing aftercare spray to keep the site pristine and protected.
Long-Term Maintenance: When to Change Your Helix Jewelry
The journey toward a fully integrated piercing doesn't end when the initial swelling fades. In fact, the most critical milestone for long-term stability occurs around the six to eight-week mark: the downsizing appointment. While your initial helix piercing aftercare instructions focused on managing a fresh wound, this phase is about refining the fit. Your piercer likely used a longer post to accommodate the body's natural inflammatory response. Once that swelling subsides, the extra length becomes a liability. A long bar is prone to snagging, tilting, and causing the very irritation bumps you've worked so hard to avoid. Swapping to a shorter, fitted post ensures the jewelry remains perpendicular to the tissue, preserving the intended aesthetic angle.
How do you determine if your piercing is ready for a permanent style change? We utilize the "Thirty-Day Rule" for biological readiness. Your helix must exhibit no crusting, no tenderness, and no redness for at least 30 consecutive days. If you experience even a minor flare-up on day 25, the clock resets. This discipline ensures the internal maturation of the fistula is sufficiently advanced to handle the stress of a jewelry swap. Remember that while a piercing may look healed on the surface, the internal cartilage is still stabilizing. Rushing into a hoop or a heavy clicker too early can lead to "cheese-cutter effect," where the jewelry puts undue pressure on the healing channel.
The Danger of Changing Jewelry Too Early
Patience is the hallmark of a Wise Guardian. Attempting to change your jewelry before the channel is mature can cause significant "jewelry trauma." This physical stress can reset your healing clock by months as the raw internal tissue is scraped by the passing bar. You should also avoid the temptation of low-quality "fashion jewelry" found in generic retail environments. These pieces often feature poor surface finishes and high nickel content, which can trigger late-stage allergic reactions. For your first few transitions, it's highly recommended to have a professional assist you to ensure the process is sterile and trauma-free.
Curating Your Ear: Safe Jewelry Choices
When you finally begin to curate your aesthetic, prioritize engineering as much as style. We recommend the use of internal threaded labret studs for all cartilage work. Unlike external threading, where the screw threads are on the post itself, internal threading ensures that only a smooth, polished surface passes through your ear. This prevents microscopic scraping of the delicate fistula. Before selecting new pieces, consult an ear gauge size chart to confirm the precise thickness and length required for your anatomy. Choosing the right fit is the final step in mastering professional helix piercing aftercare instructions and ensuring your self-expression remains both healthy and beautiful. Purity, precision, and protection are the keys to a lifetime of aesthetic success.
Mastering the Path to Permanent Aesthetic Success
Your journey to a fully healed helix is a testament to biological patience and disciplined care. By respecting the unique, avascular nature of cartilage and maintaining a sterile cleaning ritual, you ensure your self-expression remains as vibrant as your vision. The "LITHA" method remains your most powerful ally throughout this healing marathon. Protect the site from physical trauma, prioritize hand hygiene, and always choose high-quality materials to maintain the long-term integrity of your skin.
Mastering these helix piercing aftercare instructions transforms the recovery process from a localized challenge into a seamless, empowering part of your lifestyle. At BodyJ4You, we provide the clinical purity and technical precision your body deserves. With over 20 years of industry expertise, our locally manufactured skincare line offers the nurturing care necessary for your self-expression to thrive. We understand that your aesthetic journey is personal; it's a reflection of your identity that shouldn't be compromised by avoidable irritation. Whether you are soothing a minor flare-up or selecting your first permanent internal threaded stud, we are here to support every milestone with purity, precision, and care.
Shop Expert-Approved Piercing Aftercare Solutions
Stay patient, stay disciplined, and stay inspired. Your aesthetic goals are well within reach, and your new piercing will soon be a permanent, beautiful reflection of your unique identity.
Frequently Asked Questions
How long does a helix piercing take to heal?
A helix piercing typically requires 6 to 12 months to achieve complete internal maturation. While the surface may look calm within weeks, the avascular cartilage heals from the outside in. This extended timeline demands consistent discipline and patience. Rushing the process or neglecting your helix piercing aftercare instructions can lead to setbacks that reset your biological progress.
Can I use tea tree oil on my helix piercing bump?
You should avoid using pure tea tree oil as it is often too caustic and astringent for healing tissue. This potent essential oil can cause chemical burns and extreme dryness, which often aggravates irritation bumps further. Instead, choose a balanced, professional-grade piercing bump treatment oil. These formulations provide the necessary soothing properties without compromising the skin's delicate moisture barrier.
Is it normal for my helix piercing to still hurt after a month?
Intermittent tenderness or dull aching is a normal part of the proliferative stage during the first few months of recovery. Cartilage is highly sensitive to environmental changes and minor physical contact. However, if the pain is accompanied by radiating heat, significant throbbing, or fever, you should consult a professional. Most lingering discomfort is simply a sign that the internal fistula is still forming.
When can I sleep on my new helix piercing?
You should wait until the piercing is fully healed, usually 6 to 12 months, before sleeping directly on that ear. Constant pressure can lead to jewelry migration or chronic inflammation bumps. To maintain your comfort while protecting your investment, continue using a travel pillow. This simple adjustment ensures your ear remains suspended and free from the weight of your head during the night.
What should I do if my hair gets caught in my piercing?
If your hair snags on your jewelry, do not pull or tug at the strands. Gently saturate the area with saline spray to lubricate the jewelry and soften any debris that might be trapping the hair. Carefully untangle the hair once the area is wet. If a snag causes immediate swelling, apply a cool compress to calm the localized trauma and prevent a bump from forming.
Can I swim in a pool or the ocean with a new helix piercing?
You must avoid swimming in pools, lakes, or oceans for at least 8 to 12 weeks after your procedure. Public bodies of water are reservoirs for bacteria and chemicals like chlorine that can cause severe infections or chemical irritation. If you must swim, use a waterproof bandage to seal the site. Always rinse the piercing with sterile saline immediately after any accidental exposure to non-sterile water.
Why is there a bump on the back of my helix piercing?
A bump on the back of the ear is usually an irritation response caused by sleeping pressure or jewelry friction. This localized swelling signifies that the tissue is under stress and needs a more stable environment. Following your helix piercing aftercare instructions precisely and ensuring your jewelry is properly sized will typically resolve these nodules. Consistency in your routine is the key to clear skin.
How often should I clean my helix piercing with saline?
You should clean your piercing twice daily, once in the morning and once at night, using a sterile saline mist. Over-cleaning can be just as damaging as neglect because it strips the skin of its natural protective oils and causes dryness. This balanced rhythm maintains a pristine environment while allowing the body's natural defenses to work. Consistency is the foundation of a healthy, aesthetic result.


